Apr 25, 2019

ALTENEW APRIL 2019 WASHI TAPE / EMBOSSING PASTE RELEASE BLOG HOP + GIVEAWAY


Hi there,
Welcome to the ALTENEW APRIL 2019 WASHI TAPE / EMBOSSING PASTE RELEASE BLOG HOP + GIVEAWAY,  you are arriving from Virginia's blog.

I am so excited to be taking part of today's blog hop as i get to use the new washi tapes, and the lovely embossing paste.  What can i say, these are all so lovely and easy to work with  that a lot of projects came together in a short amount of time.  Let me show you:


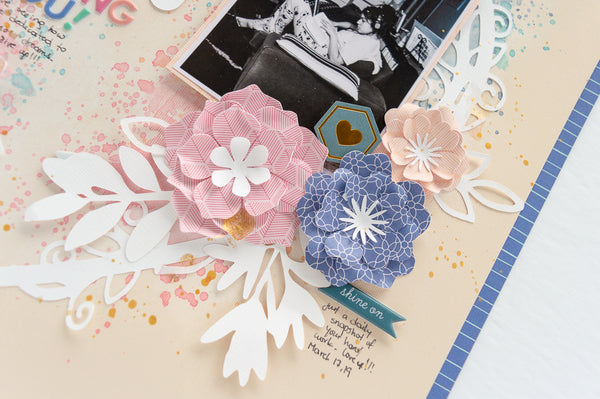
The new washi tapes are versatile, and the colors in the new Misty Meadows tape were the perfect color to document my sister's recent family vacation in my family album (Life Crafted Album from Citrus Twist Kits).  So, first i covered a piece of cardstock with the tape, and used the Floral Heart Frame Die to cut a frame from the center of the page.


I backed space with Vellum, and then added a sentiment in a small label.  For the other side of this page, i used  a piece of washi taped covered cardstock to back the picture, and then embellished the page with fussy cut florals from the Botanical Rhapsody washi tape ( it had been added to vellum prior cutting)


Love how the washi tape made this page come together so easily, but since i had the heart frame, i decided to use it on the other side of this layout.


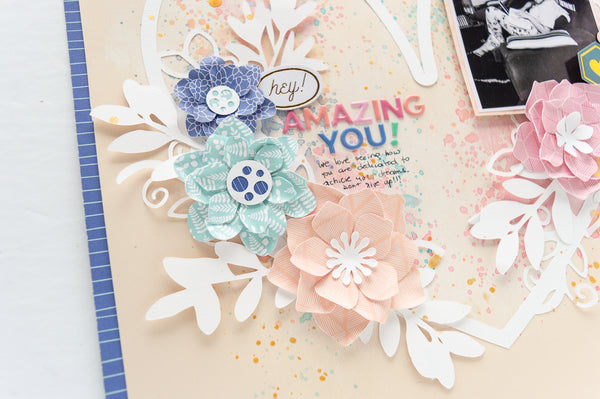
First, i covered the page with a piece of the Gold String Washi tape, and used an exacto knife to detail the heart cut out.  I added the heart frame to in the heart outline, and then added a label with the title for this page ( chipboard sticker from the Reflections Scrapbook Kit)


To finish this layout, the next page was covered with the Misty Meadows washi tape, a few embellishments around the picture complete this page.   Like i mentioned before, the washi tapes are a must in your stash, their versatility is out of this world, and now let's talk about that glorious Embossing Paste.


The new Embossing Paste is amazing, and it can be used in many applications that would enhance your cards, and scrapbook pages.   The next few projects were all created  from using the same Embossing mixture.


A bit of Lagoon Shimmer Ink Spray was mixed with the Embossing paste and applied with an stencil brush through the Flowing BUtterfly stencil for this layout.   The soft Gold Trim washi tape complements the colors of the embellishments, and the acetate butterfly just completes this page.


The same mixture was also used to create the background and embellishments for this set of cards.  First the Embossing Paste / Ink Spray mixture was added to a piece of heavy cardstock using the Square Weave stencil, and set to dry completely  before use.


Using the Halftone Nesting Hearts Die set, a few hearts were cut from the embossed cardstock.   The card base was created by adding a piece of  the Gold String washi tape to a card base.  The die cut hearts were then stacked using foam adhesive; the sentiment -from the Frilled Petals Stamp set- was embossed to the card.


The remaining piece of embossed cardstock was then trimmed and attached to a pre made card base.  A piece of the Golden Trim washi tape was added to the bottom of this piece. A flower and leaves were then added to the card (these were created with the Wallpaper Art set), followed by a gold embossed sentiment from the Handpicked Bouquet Stamp set.


The same embossing paste was added through the Watercolor Stripes stencil to create an ombre look in the center of the page.   I used the Teal Shadow washi tape to create all the florals for  this page ( first i attached the washi to vellum, and fussy cut all the florals from it).   I used a piece of papers from the Verdant Walk collection to back the picture, and embellish the page with stickers and die cuts from the Live Your Dream collection and enamel dots.  The next process video will show you how the Embossing Paste mixture was used to create all these projects:


I love how these turned out, and how many projects i was able to create with the embossing paste mixture.   Remember to stop by Altenew to check all these amazing products, and now it is time for a little GIVEAWAY:


To celebrate this release, Altenew is giving away a $30 gift certificate to 6 lucky winners! Please leave a comment on the Altenew Card Blog and/or Altenew Scrapbook Blog by 5/1/2019 for a chance to win.

We’ll also draw a winner to receive a $15 gift certificate from the comments left on each designer’s blog on the blog hop list below. All winners will be announced on the Altenew Card Blog on 5/4/2019.


GOOD LUCK everyone!

It is time to continue your blog hop, you are headed to Lydia Evans  blog.  You can always come back here to start the hop, or join the Altenew Card blog or Altenew Scrapbook blog to join in the fun. A list of all the participants has been added for your convenience


Thank you so much for joining me today, if you have questions on how this came together, please do not hesitate to contact me!

XO

Nathalie


Apr 22, 2019

HEY AMAZING YOU! - JustNick Studio


Hi there!
Nathalie with you today bringing you a new project that fits this week's theme, Flowers.   There are so many new beautiful cut files available in the JustNick Studio shop, so, I picked a few of them to create this fresh flowery page.


I started this page by adding a bit of mixed media to the background using acrylic white paint and Distress inks.  While the background dried, i cut from white cardstock the Henna Heart cut file as well as a few stems using the Stems 2 cut file.


Once the background dried, the heart cut out was glued to the page. I pulled Pinkfresh Studio's Joyful Day collection to create the flowers using the Build a Flower 3, Build a Flower 4, Build a Flower 6, and Build a Flower 7 cut files.


I ruffled the edges of the flowers using a bone folder and then build them together.  I replace the flowers in the heart cut out with these flowers, and added the  stems behind them so that they create clusters around the page.


A few embellishments from the Joyful Day collection complete the clusters and title in the page.  A few lines of journal and gold ink droplets are the final touches added.


I hope this has inspired you to mix a few of the JustNick Studio designs in your next project.  Nicole has added lots of beautiful designs to the store lately, it is hard to just choose one.
Remember you can always contact me if you have questions on how this came together.

XO

SUMMER VIBES - Citrus Twist Kits

Hi there!

Nathalie with you today with a new scrapbook layout.   I don't know  about you, but this month's kits and stamps are so versatile that all it took was a bit of mixed media to pull this page together:


I picked the new Maggie Holmes - Sunny Days - Acrylic paint set from the CTK shop cause i knew they would easily combined with all the papers from this month's kits.  For this page, i used the blue and teal paint to create the background of the page.


Once the background dried, i used an edge punch (Scallop lace from EK Tools) to create two strips of paper from the Add-on kit.  Since my daughter is wearing blue in the picture, i chose to use colors that match those tones.   Once the strips were stitched to the page, it was all about layering papers from the Make It a Venti and add on behind the picture.


To soften the blue tones of the page, i chose to bring a little bit of pink details in the fussy cut flowers and butterflies (add on kit).  Then used embellishments from the Add on Kit and cut apart elements to create clusters around the picture.


To finish the page, i combined stickers from the add on kit and the Make it A Venti Alphas as well as some stamping using blue ink and this month's Add on Stamp.  The following video will show you how it all came together.


Though the mixed media is just peaking from behind all the layers of paper and embellishments, i love how it sets the mood for the page.   Remember you can always contact me if you have questions, and stop by the Citrus Twist Kits shop to check the kits and all the coordinating goodies that arrive each month.

XO


Apr 11, 2019

SPRING _JustNIck Studio

Hi there!
Nathalie with you today, and  it has been a long and cold winter here in Canada,and Spring is slowly showing up.  So, instead of waiting around for Spring to finally catch up, i decided to pull a few memories from last year's season to create this page using a few of  the beautiful JustNick Studio cut files.


I wanted something really light and airy for this layout, so i started with the Type It Alpha cut file to create the large vertical title.  I welded the letters together, and cut them out of white cardstock. 


To back the title, i chose to use the negative part of the cut out, and vellum for every other letter.   A bit of foam adhesive helps to create the dimension on the letters, and make them stand out.

 Once the background was set on the background, i laid the picture in place,and used the new Rolled Flower 1, Rolled Flower 2, and Rolled Flower 3  cut files and papers from the new Scrapbook and Cards Today Magazine Spring Fling kit to create the flowers for this page.


I used a ball tool to curl the edges of the flowers a bit, and then used a pencil to help me start the rolling process for this flowers, and then took out the pencil and continue rolling them together.  A bit of hot glue at the center of the flower holds the rolled flower together.  I added a matching enamel dot to the center of the flower to hide the hot glue.


 I glued the flowers around the picture and title of this page, but added a few leaves made from the Stems cut file from white cardstock.   A few extra embellishments -all from the SCT Spring Fling kit- complete this page.


I hope this inspires you to jumpstart your Spring documenting.  There are so many new cut files in the JustNick Studio shop that will help you bring a bit of Spring to your projects. 

XO,

Apr 9, 2019

HAPPINESS IS HOMEMADE - Scrapbook Nerd


Hi there!
This week the Scrapbook Nerd DT will be working projects based on this month's color challenge.   What can I say this challenge is perfect for my "Black and white with a shade of rainbow" obsession.


It all started with building the background using the Pinkfresh Studio watercolor collection on a piece of Vicki Boutin foundation paper that had been gessoed. 


While the background dried, the chevrons (1in wide) for this project were created from the 6x6 Joyful Day paper pad -Pinkfresh Studio- and Flower Market collection - Carta Bella-.   These were stitched to the background.


A second set of smaller chevrons  (0.5in wide) was stitched to the bottom right corner of the page, followed by the title -i used word stickers from the Joyful Day collection and Puffy Alphas from the Everyday Musings collection both from Pinkfresh Studio-.


Once the picture was set in place, small clusters of embellishments were set around it.  I chose to color block the embellishments so that they match the color of the background.   All that was left to add was a few lines of journal and some drops of gold ink.  Here is the final layout:


 I love the colors of the layout, and how the black and white papers ground the page, and  contrast and combine seamlessly with the colors and papers.  I have created a small video on how this came together (forgive the stuffy sound of my voice, as i am fighting a bad cold at the moment!)


Remember to check the Scrapbook Nerd store for all and so many more goodies that are constantly arriving to the store. If you have questions on how this came together, please do not hesitate to contact me!

XO


Apr 8, 2019

SWEET SUNSHINE _ Citrus Twist Kits


This week, i joined Anna and Emma on the Citrus Twist Kits sketch challenge.  HEre is the sketch i used for this page:


   I love a good sketch as it eases my process and takes away the guessing work from it.  For this, i used mostly the April Add-on kit with a few extra goodies from the CTK shop.


it all started with a bit of blue paint in the background.  I used the new Maggie Holmes paints from the SUnny DAys collection available at the shop, and a dry brush to create the distress look of the background.


After that, i followed the sketch,  first i laid the cut file, followed by adding layers behind the picture to match those in the sketch.  I used papers from the APril kit to create coordinating layers.


To embellish the page, i fussy cut florals from the Sunny Days paper in the kit and place them as a cascade behind the picture.   The rest of the embellishments comes from the ephemera pack, and sticker book from the Sunny Days collection.


To finish the page, first i trimmed the page on all sides, distress the edges and glued it to a paper that matched the color of the background also included in the kit.  Here  i used a combination of the stickers, ephemera and Add-on stamps to set my title in place.


I love how this turned out and how easy it came together by following the sketch.   Remember  you can check all the materials at the CTK Shop and a new sketch every SUnday in the CTK blog.


xo

HOPPY EASTER MY PEEPS - Simple Stories


Hi there! Nathalie back with you today.  I am so blessed to continue working with Simple Stories for another term, i truly love their products and the people behind the scenes. As we start a new season, Spring -here in the Northern Hemisphere-, we are also getting ready to celebrate Easter, so i want to share with you a new project created with the new Bunnies and Baskets collection.


For this layout, i chose a cut file from Handipaper to be the centerpiece of the page, and cut it from white cardstock, backed it all with vellum.  To add color to the flowers, i used some Vicki Boutin Art Crayon and Stencil Brush to add color to the back of the vellum, then backed the entire cut file with the Black/Cream basics paper from the Spring Farmhouse collection.


To build the layout, first, a piece of the White Dot/Chestnut Sn@p Basics paper was hand stitched to the b side of the Easter Blessings paper.  I set the bunny on the right corner of the paper, and layered a few Easter egg cut outs (also from Handipaper) along the bottom part of the layout.


I used the other papers from the Bunnies and Baskets collection to create layers behind the picture of my little niece and nephew from a few Easters back, and  then tucked the picture to the left side of the  bunny.  I fussy cut a few florals from the the Easter Blessings paper and  used them to create clusters around the layout along with the stickers from the collection.


For the title of this page, i simply used the large word sticker from the collection, and propped it with some foam adhesive.  A small cluster of fussy cut florals and stickers complete this page.


I really love how this turned out and how cute the picture of my littles looks nestled around lots of Easter icons.  The new Simple Stories' Bunnies and Baskets collection is sure to bring the special touch to your Easter memories.

Til next time,


Materials used:
Bunnies and Baskets collection:
10684
10685
10686
10688
Chestnut/ white dot Sn@p basics 2851
10726  Black/cream Spring Farmhouse simple paper