Showing posts with label Prima watercolor. Show all posts

Jan 15, 2019

Life Today


Scrapbook Layout created for JustNick Studio  - LIFE TODAY -


Hello everyone!
Nathalie with you today with a new project that brings color and small details in a page to celebrate the small moments in life.   I love having a large selection of cut files here in the Just Nick shop that can easily be combined into a page of your own.


To start, i added a bit of watercolor (Prima Marketing) to the background -since i wanted to create a very abstract floral background, i chose a shade of green for the background-.  While it dried, the Doily Background was used to create the large cut out from white cardstock.


I chose to back the cut out using warm tone papers from Pink Paislee's Whimsical collection and some vellum.   A bit of foam adhesive helps to bring some dimension to the cut out.


A few butterflies were also cut from the same patterned papers using the Butterfly Background 2 cut file.  This time, i carefully highlighted just one of the detailed butterflies to create the cutting pattern in the Silhouette software.  A bit of fussy cutting -just one of the wings' corners- was all that was needed to have a single image.  I added the butterflies around the background making sure that they sit within the flower of its same color.
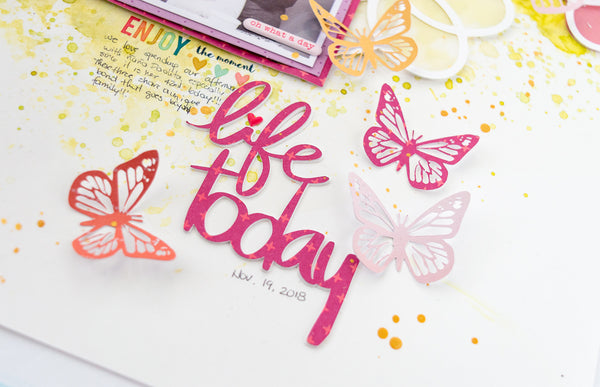


Once  the picture was placed on the layout, the Here and Now cut file was used to create the title of this page.  I welded the two words together, and cut them three times -2 from cardstock, 1 from patterned paper - so that they can be stack together.


I love how this turned out, especially when there are flowers and butterflies and i was able to sneak in  a picture of my boy in the mix.  Remember to stop by Just NIck Studio to check all the cut files used in this layout and the new ones being added each week.
If you have questions on how this came together, please do not hesitate to contact me!

XO

Sep 25, 2018

Fall Beauty


Scrapbook Layout created for Scrapbook Nerd  - FALL BEAUTY -


Hi there!
It is time to share this week's project for Scrapbook Nerd, and since this week we are hosting an online crop, i thought to share the project created for the crop.


I started by creating the background using one of the papers from the Simple Stories High style paper pad, and a bit of Prima Watercolor.  Once it dried, a wreath cut out was split in half and then propped on foam dots so that the leaves meet in the middle.


The picture was backed and layered with papers from the Simple Stories Forever Fall collection, and then nestled in between the leaves clusters.  These were also the perfect spot to add lots of small details using embellishments from the collection.


The title was then added using a combination of the stickers from the collection, and alphas from the Sn@p basics pack.   Once it was all glued together, then the  page was trimmed on all sides, and glued to the b side paper from the VIntage Halloween collection from SImple Stories.  Here is the final layout:


Maybe is the Fall lover in me, but this is so beautiful to me!  I hope it inspires you to come join us in the Scrapbook Nerd Friends page on Facebook to join the challenges. Remember to check Scrapbook  Nerd for all the materials used here, and let me know if you have questions on how this was put together.

XO


Mar 21, 2018

Adventure Awaits


Scrapbook Layout created for Scrapbook Nerd  -  ADVENTURE AWAITS  -


Hi there!

There are so many beautiful paper collections arriving at my doorstep, and I love them, but there are those special collections that keep you coming back, and this is the case of 1Canoe2 Creekside collection.  So I decided to create this page for Scrapbook Nerd using a bit of mixed media and some of the collection.


A bit of watercolor from one of Prima Marketing's palette (Odyssey) was used to create the background.   Then the wood texture stamp from Kaisercraft and some brown archival ink were used to create the wood texture on top of the watercolor.   Just love the background!!!


Next, I fussy cut the wood-like colored roses from the collection's paper,  and clustered them at the corners of the picture so that they form a diagonal on the page. Along the way,  I added a few stickers and die cuts from the collection to  add some more color to the page.


To balance the page, a small cluster was created using stickers from the collection.  A bit of the background was also repeated on this corner of the page so that the look is coherent on the page.  A few stamped images using a Citrus Twist Kits stamp complete this page:


Can I say that i love how this page  came together, and the monochromatic look of the page with those small pops of color.   Just love the look of the page.

Stop by Scrapbook Nerd to check all the materials used in this layout (all come from the store, they are great at ordering in stuff for you!). Remember i am a comment away if you have questions on how this was put together.

Take care!

Jan 22, 2018

Grateful


Scrapbook Layout created for Maya Road  - GRATEFUL -


Hi there, Roadies!!

Nathalie with you today to bring you a bit of inspiration using the beautiful Maya Road products.   It has been a rather cold and snowy winter here in Toronto (Canada), so I have been thinking of better days ahead, and decided to create a cheery layout.


Lately, I have been feeling uninspired, so to kick back my mojo, I pulled some watercolor and a few of the Maya Road dies.


For the background, i used a combination of two of my Prima watercolor palettes and some watercolor paper to try and recreate the background of the picture.


While the background was drying, I used the Geometric Feather Steel die,  Be Brave Die Set, and the Geometric Heart Steel Die  to cut a few images from papers from the Quartz Rose collection from Prima Marketing.


Once the watercolor background had dried,  and the picture had been put in place.   A few images from the  Rose Garden Sentiment stamp set  were added (with grey Archival Ink) around the background to mark the places were the clusters of die cuts will be placed.


To create the clusters on the page,   few fussy cut flowers and die cuts were used.  In addition, a Feather clip was added to the top corner's cluster, and different sentiments from the Golden Moments Kit stamp set were added around the clusters.


To create the title of this page, a banner was cut, from one of the collection's papers, using the With Love Nature Die bundle;  and the  word "GRATEFUL" was stamped on it using the Just My Type Stamp Sheet.    After that a few lines of journal, and a few drops of rose gold ink complete the page.


This page came together in less than an hour ( it took that long to have the watercolor background dried completely), and it was the perfect cure for the case of the Blahs.   I hope this inspires you to visit the Maya Road Store   to check for some of the materials used here.

Remember, I am just a comment away if you have questions on how this came together.

XOXO,


Nov 21, 2017

Find Wonder in All Things


Scrapbook Layout created for Scrapbook Nerd - FIND WONDER IN ALL THINGS -


Hello there!

It is time for a new round of  DT projects for Scrapbook Nerd (I love the owners of this store!!).   This time I chose to work with the Dream Big collection from Fancy Pants Designs to document a picture of my daughter as we experience some beautiful skies while flying to Ecuador.


I used a cut file from the Silhouette Store to create the large stitched title in the page,  A bit of watercolor brings the title forward.  Then I trimmed the cardstock and glued it to one of the papers from the collection.


I chose to distress a piece of the mat, and inserted a small cluster of ephemera so that there are small little spots of interest along the page.   Just loved the unexpected cluster.


To bring all the  idea of flying, I used pieces from the collection to create the clusters around the page.   I fell in love with the birds icons from the collection!!


I love how this came together.   The colors are dreamy, and all that stitching sings in my heart.   Remember to stop by the Scrapbook Nerd store to check all the materials used here.  There are so many beautiful products available at  the store.

I will be back in a bit with a surprise for you all,


take care!!


Materials Used:
Fancy Pants Designs - Dream Big collection - 12x12 paper kit, 6x6 paper pad, clips, ephemera
Cut file - Silhouette Store
Prima Marketing - Pastel Dreams watercolor palette

Jul 29, 2017

You & Me


Scrapbook Layout created for Just Nick Studio  - YOU & ME -


Hello there!

I hope you all are enjoying these beautiful Summer Days (the current season here in Canada!).  After a long vacation to my native Ecuador, i am finally back home and loaded with lots of ideas, and memories to document.   For this particular picture of my cousin and my goddaughter, i used one of the newer cut files , Frilly Floral Frames, to create its soft and girly background.


My starting point was to create a grid design for the page, but once I started playing with the frames on my Silhouette software, I was drawn to the visual triangle the three frames formed around the picture.  So I went ahead, and welded the 3 frames together, to create the cut out for this page.


Once the cut out was created, i backed the flower in each corner with some of the papers from Cocoa Vanilla's Wild at Heart collection that was included in the May 2017 Clique Kits  monthly kit.


Since i wanted the layout very girly, i chose to use one of the papers from the collection as the background for the page.   The watercolor  design in the page brings the details in the white cut outs.  In addition, a layer of white vellum was added to the squares (as a layer behind the cut out) just to the sections where the square do not intersect.


 Using a paper piercing tool, a stitching guide was created around the edges of the squares. Three different color embroidery thread was used  to stitch the frames, so that they match the colors in the background paper.


For the title of this page, the "You Make Me Smile" cut file was used to stitch the "You & Me" sentiment to the page.  Once the stitching was completed, a bit of shimmer watercolor complete the look of the title.   This same watercolor was used to create the splatters around the page.


I really hope this inspires you to take a look at the new designs available at the Just Nick Studio store.  The versatility of each of the designs will allow you to create a one-of-a-kind project.

Remember, I am a comment away if you have further questions on how this came together.

Thanks for stopping by today!!

Jul 28, 2017

Vacation


Scrapbook Layout created for Clique Kits  - VACATION -


Hi there!

Today I am up on the Clique Kits blog with a new layout that showcases the beautiful Malibu TN kit, and a bit of mixed media.

As you all know, we are still unpacking after a long vacation to Ecuador, so there are so many memories to document, and this month's Malibu kit is so summery, I had to reach for one of the beach pictures to create the spread.  Here is small video on how the page came together:


For this page, I am using the  VACATION cut file that i created for Scrapbook Nerd ( i will add the PNG to the material list, so you can get a copy here, too).   I backed the letter spaces with papers from  the collection, except the letter "O" which was backed with the picture of the resort we stay at.


To bring attention to the picture, I frame it by creating clusters of embellishments around the letter "O".   A few stickers from the Summer Lights collection from Pink Paislee paired nicely with the ephemera pieces from the Hello Sunshine collection from Fancy Pants.


To match the colors of the papers, I opted to create a watercolor background, and kept the design simple after that, only adding a third cluster to complete the visual triangle.


The exclusive printables included in this kit worked perfect to add just enough detail on the page.   Here is the final layout:


Love the final layout -even after a 6 week scrapbooking break-.  I hope this serves as inspiration to take a look at the beautiful Malibu kit from Clique Kits.  Remember that you can contact me with any questions about my work, i will be happy to answer.   If you use the cut file, i would love to see what you create with it, so tag me on your project -if you share it on social media-!

Thanks for Stopping by!


Materials Used:
Clique Kits: Malibu Traveler's Notebook kit

Prima Watercolor paletter - The Tropicals
Bazzill - Marshmallow heavy cardstock
Cut file:


Jul 8, 2017

Enjoy Life


Scrapbook Layout created for Scrapboook Nerd   - ENJOY LIFE -


Hello there!

It is Summer Camp time over at Scrapbook Nerd.  Each year the ladies run a month long on line crop  for all their followers.  Of course there is always prizes, and giveaways. This year, I  will also be challenging the store followers with a few fun challenges.  The first one is called "TIME FOR TIE DYE".


I was inspired to work on this layout when i saw the new Jillibean Soup collection  - Bowl of Dreams-.  So I set to play on watercolor paper with some of the Prima Marketing  watercolors - The Tropicals set-.     Oncec the watercolor dried, a bit of gold texture paste was added using the new Echo Park stencil.


The title of this page was created from a cut file from the Silhouette store. I stitched the title using the colors of the tie dye background, and glued the title to the page using strong adhesive.  Here is another close up of the layout:


I kept the rest of the layout simple, so I chose a picture of my mom and daughter on one of our walks, and used some of the papers and embellishments from the collection to layer and frame the picture.


A few lines of  journal, and a mat for the layout were the final touches.  Here is what the final layout looks like:


The colors in the background remind me of a tie dyed shirt, plus they are bright and cheery, perfect for a  Summer Camp challenge.

I hope you can join us at Scrapbook Nerd Friends and Family Facebook page to join in the challenges.  Remember, I am a comment away for any questions you  may have on the layout.

See you all soon!


Materials Used:
Cut file - Silhouette Store
Watercolor paper
Patterned paper collection and  embellishments -  Bowl of Dreams - Jillibean Soup
watercolor palette - The tropicals - Prima Marketing
Texture paste - Gold - Heidi Swapp
Stencil - Beach Towel - Summer Fun collection - Echo Park