Showing posts with label design team project. Show all posts

Apr 22, 2019

SUMMER VIBES - Citrus Twist Kits

Hi there!

Nathalie with you today with a new scrapbook layout.   I don't know  about you, but this month's kits and stamps are so versatile that all it took was a bit of mixed media to pull this page together:


I picked the new Maggie Holmes - Sunny Days - Acrylic paint set from the CTK shop cause i knew they would easily combined with all the papers from this month's kits.  For this page, i used the blue and teal paint to create the background of the page.


Once the background dried, i used an edge punch (Scallop lace from EK Tools) to create two strips of paper from the Add-on kit.  Since my daughter is wearing blue in the picture, i chose to use colors that match those tones.   Once the strips were stitched to the page, it was all about layering papers from the Make It a Venti and add on behind the picture.


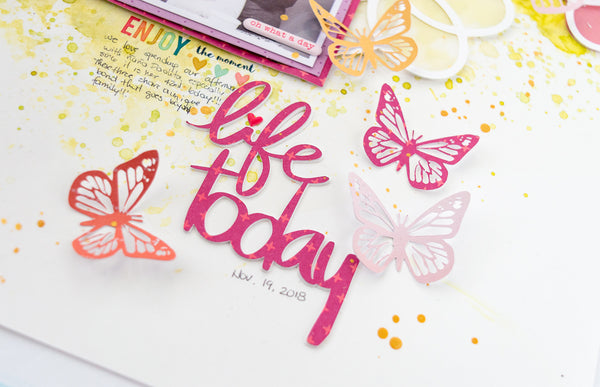
To soften the blue tones of the page, i chose to bring a little bit of pink details in the fussy cut flowers and butterflies (add on kit).  Then used embellishments from the Add on Kit and cut apart elements to create clusters around the picture.


To finish the page, i combined stickers from the add on kit and the Make it A Venti Alphas as well as some stamping using blue ink and this month's Add on Stamp.  The following video will show you how it all came together.


Though the mixed media is just peaking from behind all the layers of paper and embellishments, i love how it sets the mood for the page.   Remember you can always contact me if you have questions, and stop by the Citrus Twist Kits shop to check the kits and all the coordinating goodies that arrive each month.

XO


Mar 5, 2019

Smile Always


Scrapbook Layout created for JustNick Studio  -  SMILE ALWAYS -


Hello everyone!
Nathalie with you today!  The weather here in Toronto is still stuck in winter mode, so, what better than bring some needed spring with a colorful new layout that features a few new cut files from JustNick studio.


For this page, i chose the newly released  Spring Florals cut file to cut a few  of the images - in graduating sizes -  from papers of various Jillibean Soup collections.


While the flowers were being cut, i chose to add a bit of color to the background using Distress Oxides.   


Having the flowers in graduating sizes helped with the layering of the die cuts to create the flowers and dimension on them.   I chose to add a foam circle in the star shaped flowers so that the 3 layers of die cuts can be distinguished.


The flowers were attached to the background so that they formed a small diagonal line at the top half of the page.   I nestled the picture in the center of the line, and added just a few embellishments around the page.


To create the title,  a combination of word die cuts were created using the Smile and Love You  Eternal cut files from patterned papers from Jillibean Soup collections.  These were layered to create a bit of dimension and to make sure they stand out on the page.


I love how easily this page came together with just a few cut files and a bit of mixed media.   There are so many beautiful cut files arriving at the Just Nick Studio shop weekly, you want to make sure to check them all.  Remember you can always contact me with any questions!

XO

Jan 15, 2019

Life Today


Scrapbook Layout created for JustNick Studio  - LIFE TODAY -


Hello everyone!
Nathalie with you today with a new project that brings color and small details in a page to celebrate the small moments in life.   I love having a large selection of cut files here in the Just Nick shop that can easily be combined into a page of your own.


To start, i added a bit of watercolor (Prima Marketing) to the background -since i wanted to create a very abstract floral background, i chose a shade of green for the background-.  While it dried, the Doily Background was used to create the large cut out from white cardstock.


I chose to back the cut out using warm tone papers from Pink Paislee's Whimsical collection and some vellum.   A bit of foam adhesive helps to bring some dimension to the cut out.


A few butterflies were also cut from the same patterned papers using the Butterfly Background 2 cut file.  This time, i carefully highlighted just one of the detailed butterflies to create the cutting pattern in the Silhouette software.  A bit of fussy cutting -just one of the wings' corners- was all that was needed to have a single image.  I added the butterflies around the background making sure that they sit within the flower of its same color.


Once  the picture was placed on the layout, the Here and Now cut file was used to create the title of this page.  I welded the two words together, and cut them three times -2 from cardstock, 1 from patterned paper - so that they can be stack together.


I love how this turned out, especially when there are flowers and butterflies and i was able to sneak in  a picture of my boy in the mix.  Remember to stop by Just NIck Studio to check all the cut files used in this layout and the new ones being added each week.
If you have questions on how this came together, please do not hesitate to contact me!

XO

Selfie Time


Scrapbook Layout created for Scrapbook Nerd  - SELFIE TIME -


Hi there!
 Nathalie with you today with a new layout that showcases the new "Along The Way" collection from Pebbles.   I  am a confirmed paper lover, but nothing makes me happier than finding collections that can be used in everyday documenting. This collection has rich colors, and many designs that can be used at any season or time of the year.


    What better way to showcase a collection while documenting a picture than to detail backing a cut file.  For this layout, i chose a cut file from Handipaper, Floral Photo Camera to create one of the focus points of  this page.


   This cut out is rather simple in design with intricate details, so i was careful backing each of the small areas of the cut to make sure that the small details come forward.


 All the patterned paper in the collection made it so easy to bring the camera to live for this page.  The following video will show you a more in-depth look on how the page was put together:


 The placement of the picture in the page, along with the detailed camera are the focus of this page.   However all the fussy cut floral motif from the patterned paper, ephemera and stickers bring softness to this page.


     To avoid taking the focus away from the picture and cut out, a simple title was created using alphas from the Whimsical collection from Pink Paislee, and accenting it with a sticker from the Along The Way collection.


      I hope this has inspired you to stop by the Scrapbook Nerd store to check all the materials used in this page.   Remember there are always new goodies arriving at the store! As always, if you have questions on how this came together, please just leave me a comment here.


 XO

Jan 9, 2019

Documenting 2019 - Week 1


Life Crafted layouts created for Citrus Twist kits  - Week 1 -


Hi there!

Have you guys seen the new Life Crafted kits and albums from Citrus twist Kits!   The new Life Crafted kits are an upgraded version of the past PL kits, they are bigger and filled with lots of embellishments, a larger stamp and all with a beautiful focus each month.  But the best part of the system is an exclusive album that was created for this kit, and fits the standard page of a TN... so, match made in Heaven perfection for my documenting.  Well, i am still keeping my TN, it ismy daily form of story telling, but now i can translate the family stories to a format that we all can enjoy, and I get to embellish to my hearts content!!!


Since this year i decide to call both my album  and  TN series Magic, it was only fitting that  i start with a title that comprises this idea.


I used CTK Spencer Alpha stamps and the Fresh Starts kit (january 2019) to create this spread.   Though I am still dusting off my PL skills, I am loving the versatility this album presents (just hold on so you can see what else i have created in this format... just a few more weeks!)


The size lets me add plenty of documenting, large pictures, and dimension... a win, win, win in my book.  However, many of you might not know that i started my scrapbook journey with a PL album, so i am dusting off my skills to create this set for my family. 


Here is another entry in the album, this time i combined the standard insert with a 3x8 one so that i can house my PL cards (YAY!!) and pictures.


This month's CTK stamp add ons are amazing, so i utilize the This is Life stamp to create the wreath on the page, and then embellished it with chipboard and vellum stickers from the Fresh Starts Kits.


One of my most favorite things to create in pocket pages is dimension and  tactile pieces, so having chipboard outside of the sleeve just makes me so happy!

I will be back to show you a few entries of my personal journal (TN) in a few days.  Remember to check the new Life Crafted kits and albums from Citrus Twist Kits, you will love them, too!

XO

Dec 1, 2018

Merry - Altered art-


 Hi  there!
It is starting to feel and look a lot like Christmas, and what better way to celebrate the beginning of the season than to share cut files! For the next 12 days, JustNick Studio will be giving a cut file a day for free!  So, let's get started!


Today's free cut file is "Build a Poinsetta", and it is the perfect cut file to create beautiful layouts and cards, but how about a decor piece for your home, well...


Every few years we change the color of the Christmas tree decorations, and this year our daughter decided the colors: blush, white and blue-gray.   The new colors mean that our Christmas decorations also have to be revamped a bit, so i decided to create this piece to for our home.


 I pulled a Jillibean embroidery hoop and painted to match our wood pieces.  While the paint dried, i used today's free cut file, "Build a Poinsetta" to cut the pieces for the flowers from papers that matched the tones of the tree ornaments.  A bit of Vicki Boutin Art Crayon helps to add the shading to the petals, while a bone folder helped to create the movement of the flowers and leaves.  To finish each flower, I added a few french knots to the center of each flower.


To add the sentiment to the hoop, i decided to pull the  Merry and Bright cut file and used only the "merry" word of it to create the stitched sentiment on the hoop.


To assemble the piece, i added some small branches created using a soon-to-be-released "Holiday Boughs" cut file, and then glued all the pieces to the hoop.  I added a piece of ribbon to the top of the hoop, so that the piece can also be hung from the tree or around our home.  Just love how this turned out!!!


Now it is time for you to visit the store to get your free copy of this cut file, so:
Enter the code: POINTFREE at checkout to get this design for free.
This code is only valid until midnight CST on December 01, 2018.
No purchase necessary. Coupon code must be entered to receive this item for free. No refunds will be given.The design will still be available in the JustNick Store for purchase after the discount code expires.

I cannot wait to see what you create with this cut file!  As always please do not hesitate to contact me if you have questions on how this was put together.

XO

Oct 10, 2018

Stay Wild

Scrapbook Layout created for Just Nick Studio  - STAY WILD -


Hi there!
Nathalie back with you today with a new project using some of the Just Nick Studio cut files.   I love all things Fall, and as soon as Cat Martin (one of our past designers) released her new digital collection, Norwegian Wood.   The idea of building a forest scene/diorama came to my mind.
To create the frames that are in the background and around the page, i  used the Floral Corner and Graphic Frames cut files.


First i copy and welded a few of the Flower Corner cut file so that they form a square of flowers on the mat.  


Then i attached one of the Graphic Frames to the flower square and sent it to cut from white cardstock.   I cut two frames, one to fit the entire page, and a smaller one at about 2 inches shorter.


Before gluing pieces to the page, the smaller frame was use as a mask to add a bit of color (so that it match the tones in the collection)to the center of the page - I used VIcki Boutin Crayons for this-.  


Each frame was backed with colored vellum (also created with VIcki Boutin Crayons) and then a bit of foam adhesive was used to create the dimension on the page.   Since the background and frames are doing a lots of the work, just a few decorations from the collection were needed to complete this page.


Love how this turned out.   Sometimes all  it takes is a few cut files to translate your ideas into the perfect layout.  Remember to stop by JustNick Studio to check the cut files used in this project, and all the new designs being added weekly.
You can always contact me if you have questions on how this was put together.
XO