Showing posts with label butterflies. Show all posts

May 17, 2019

ALWAYS REMEMBER TODAY - JustNick Studio


Hi there!
Nathalie with you today with a new layout fit for our "word" challenge.  I love large titles, so this theme fits right up my alley, and with so many cut files available in the JustNick Studio store, this was just a dream to put together.


To start this page, i pulled together the Word 3, Love List and Word 2 cut files to create the title of the page, "ALWAYS REMEMBER THIS".   I simply pick a word of each file and weld them together so that they naturally create a space for the picture.


Once the words were welded, they were cut twice from white cardstock and once from a paper from the Pinkfresh Studio's Everyday Musings collection.   The white cut outs were glued together, and then the patterned paper cut out was attached to the white ones with a small offset so that it creates the illusion of dimension.


To add color to the background a bit of liquid watercolor (Pinkfresh Studio) was added so that it covered all the area where the word and picture would sit.  While the background dried, i pulled the new Butterfly cut file to cut a few outlines  and the shapes from white cardstock and patterned paper.


To assemble the page, first the title  was glued to the background, and then using a black fineliner  the outline was traced - this emphasizes the title-.  The butterflies were glued together, and then they were clustered on the layout based on the respective color in the background.


A few stickers and embellishments from the Everyday Musings collection were added around the layout.  A few lines of journal and gold ink splatters completes this page.
I hope this inspires you to check all the word files and other designs in the JustNick shop, the choices are infinite when it comes to mixing and matching designs to create a one-of-a-kind cut out for your project.  

XO


Jan 15, 2019

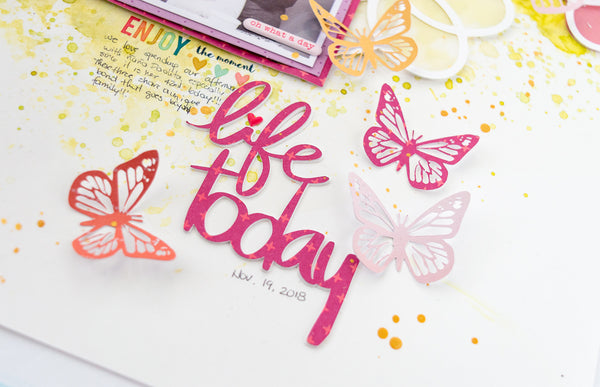
Life Today


Scrapbook Layout created for JustNick Studio  - LIFE TODAY -


Hello everyone!
Nathalie with you today with a new project that brings color and small details in a page to celebrate the small moments in life.   I love having a large selection of cut files here in the Just Nick shop that can easily be combined into a page of your own.


To start, i added a bit of watercolor (Prima Marketing) to the background -since i wanted to create a very abstract floral background, i chose a shade of green for the background-.  While it dried, the Doily Background was used to create the large cut out from white cardstock.


I chose to back the cut out using warm tone papers from Pink Paislee's Whimsical collection and some vellum.   A bit of foam adhesive helps to bring some dimension to the cut out.


A few butterflies were also cut from the same patterned papers using the Butterfly Background 2 cut file.  This time, i carefully highlighted just one of the detailed butterflies to create the cutting pattern in the Silhouette software.  A bit of fussy cutting -just one of the wings' corners- was all that was needed to have a single image.  I added the butterflies around the background making sure that they sit within the flower of its same color.


Once  the picture was placed on the layout, the Here and Now cut file was used to create the title of this page.  I welded the two words together, and cut them three times -2 from cardstock, 1 from patterned paper - so that they can be stack together.


I love how this turned out, especially when there are flowers and butterflies and i was able to sneak in  a picture of my boy in the mix.  Remember to stop by Just NIck Studio to check all the cut files used in this layout and the new ones being added each week.
If you have questions on how this came together, please do not hesitate to contact me!

XO

Feb 23, 2018

Happy Girls!


Scrapbook Layout created for Vicki Boutin DT   -  HAPPY GIRLS!  -


Hi there!  Nathalie with you today bringing you a bit of inspiration using the beautiful “All The Good Things” papers.   I love butterflies, and been wanting to use them to bring a sense of movement to a page.  


I chose to document a picture of my daughter and younger sister in a tender embrace, and decided to use happy warm tones to bring the memory to life. 
The background of the page was created on a prepped/gessoed Foundation paper using acrylic paint –Coral Macaroon- and art crayons ( warm set only) .  


The acrylic paint was diluted, and added to the paper using the packaging technique.  While the paint was still wet on the paper, a bit of art crayon was added so that it combined with the acrylic paint.  All the excess paint was soaked with paper towel, and then a new coat of art crayons was applied using one of Vicki’s water brushes; this time however, the diluted acrylic paint was used to spread the art crayons on the page.   Once I was happy with the look of the background, it was set aside to dry.


To create the butterflies, I pulled papers from both the 7x10 and 12x12 paper pads that  had a lot of warm tones in them.  There is so much to chose from in the All The Good Things Collection!   Using a 1.5in butterfly punch I created die cuts from the papers and some white vellum, and decided to stitch them together along the centerline of the image.


Once the background was dried, I started to put together the layout.  First I backed the picture with some of the beautiful Floral paper from the collection, and mounted on foam adhesive.  The butterflies were then glued to the background so that they are floating around the picture


The title of the page was then added to the opposite side of the picture using a combination of the glitter foam thickers and the alphas from the collection.   A few rub ons and butterflies complete the small cluster.


Finally a few more clusters were created around the picture.   A small tag from the frame die cuts pack, a phrase sticker, and a watercolor sticker (all from the collection) form the top cluster of the picture.  For the bottom cluster, I used a combination of cardstock stickers  that matched the colors of the butterflies.   To finish the page, I added a few stamped sentiments using the roller stamp ( love that little roller!) and some gold ink, a few lines of journal, and some gold ink splatters.


I hope you are inspired to pull all your Vicki Boutin products and create some magic for your next page.  Here is a small video that shows you how this page came together:


Let me know if you have questions on how this page came together.

XOXO


Materials Used
Mediums:
Foundation Paper
Water Brushes
Gesso
Acrylic Paint – Coral Macaroon
Art Crayons – Warm Set

All The Good Things Collection:
12x12 paper pad
7x10 paper pad
Die cut ephemera – Frames
Cardstock Stickers
Gold Glitter foam Thickers
Chipboard Alpha
Rub-ons
Roller Stamp
Watercolor Stickers

Nov 5, 2017

I Believe You Can


Scrapbook Layout created for Scrapbook Nerd -  I BELIEVE YOU CAN -


Hello there!

It is favorite week over at Scrapbook Nerd, a chance for all the DT to chose a favorite to showcase on a project.   Now, being a lover of pretty paper, it was hard for me to choose a favorite, but i love Paige Evans style, and her paper collections never disappoint ( i think I have hoarded pieces of each of her collections, and have bought doubles just to safe keep them in my shelves!)


For this page, i was inspired by all the beautiful and colorful butterflies in the Turn the Page 12x12 paper pad (they have gold foiling on them!), so I used a bit of my watercolors to create a soft background that graduated in colors, and formed a path to place the flying butterflies.


While the background dried, i spent quite a bit of time fussy cutting the images, and gluing a few of them together -this will help with creating the idea of flying when the wings are folded up.


Once all the pieces were ready to assemble, I carefully started gluing the butterflies to the respective color on the background.  Some of the butterflies were pop on  foam adhesive to add dimension and create levels on the page.


I just love the collection so much, and all the embellishments were perfect to add just a few details around the page, and to form the title on the layout about my daughter.   Here is the completed layout:


I just love how this page came together!   The Turn the Page collection is gorgeous and so versatile.  Just look at the colors, and design.  Honestly i have created so many projects with it, and still have lots of material left (not to count the entire collection I am keeping for later use  ;)  )  Remember to check all the collection at Scrapbook Nerd, this entire collection is available there!

I am always a comment away if you have questions on how this came together.


take care!


Jun 15, 2017

Beautiful - Love Yourself -


Scrapbook Layout created for Clique Kits  - BEAUTIFUL - Love Yourself- --


Hello there!

Today I am up on the Clique Kits blog with a new project that focuses on creating your own embellishments.  I am so in love with this month's Aquarelle kit, that i am trying to use every single piece of paper in the kit.  Here is a small video on how i created this layout, so sit back and enjoy!!


As you can see in the video, I had used pieces from both papers(that had the mint/light blue color in them), so I found  a way of combining them both to create the layout's mat.


The number of butterflies i would need for this layout was larger than the ones left in the patterned paper, so I doodle a butterfly, and used it to create a cut file.  Using my Silhouette cameo, a large number of the butterflies were cut.  Before taking them off the mat, i sprayed a light mist of mint and light blue  on them.


To create the look on the butterflies, I used some distress oxides, and a craft mat (but any ink and plastic wrap/acrylic block would work).  After stamping each color on the mat, i diluted them with water, making sure that each color formed droplets on the mat.  Then i started smooshing the butterflies onto the color droplets and left them to dry.   Once they were ready, I used a fine black precision pen to delineate the butterflies.   The seam on the paper gave me a guide as to where to place all the cut outs.


The title of the page was first attached to the bottom of the page, followed by picture at the top of the seam line. Next using foam adhesive and glue, I attached all the cut outs to the page.


The picture of my daughter and me is nicely framed at the top of the page by pieces from the kit's ephemera pack, and some Clique Kits exclusive printables. My journal lines were added to a piece from the fussy cut paper in the collection, and some gold ink, here is the final layout:


I hope this serves as inspiration to create your own embellishments.   I am obsessed with butterflies, so this page is just fulfilling my creative side of my brain.   Remember to check Clique Kits if you are interested on the kit, or to check what they are stocking on their shelves.

See you all soon!!


Materials Used:
Clique Kits - Aquarelle kit
Ink - Distress Oxides - Broken China, Faded Jeans, Worn Lipstick, Fossilized Amber, Cracked Pistachio, Orange Marmalade - Ranger

Oct 26, 2016

Imagine-ck pep rally


Clique Kits Pep Rally   -  IMAGINE  -


Hello there,


You are just arriving from Enza's blog  ( the entire line up for today's Pep rally is located at the bottom of this post).

Welcome to my blog!  It is my first time taking part on the Clique Kits Pep Rally, and i am very excited to share one of the layouts i worked with this month's beautiful Sapphire kit.   


The Sapphire kit features the beautiful Pinkfresh Studio's Indigo Hills collection, and these papers are truly beautiful, that i wanted to incorporate them all into a layout.  My choice was to use a punch to create butterflies out of each of the papers in the kit.  I  also use the same punch to create butterflies from different color vellum papers.


Once i had all the butterfly cut-outs, i lightly glued each butterfly to  a vellum one.    A few ink splatters were then sprinkled on the mat starting at the bottom corner, and moving up in a diagonal. 


Next,I glued the picture (which i layered with some of the kit's exclusive cards), and using removable tape,  glued the layered butterflies following the path of the  ink splatters.


Using a paper piercing tool, i followed the path of the butterflies, and created a stitching guide by making holes in the mat.   I used gold and white embroidery thread to back-hand-stitch and secure the butterflies to the layout.


For the title, I used one of this month's Clique Kits exclusives to create the word imagine.   I cut the word on white card stock, and used a gold paint marker to color it.   I glued the word to the mat at the end of the stitched lines.  Here is the final layout:


I hope this serves as inspiration to pick your Clique Kits' Sapphire Kit;  there are still some left in the store, and also stop by to check the upcoming November kit -Swan Lake-.  Don't forget to comment on the blogs as you go along, you or a friend could win this month's kit...

Thank you for stopping by!


... now you are off to  Caroli's Blog.

Here is the line-up for today's Pep Rally, in case you missed one of the stops:

Gia Lau https://giaaloha.wordpress.com/
Nicole Martel https://nicolemartel.blogspot.com
*Magali Le Luc- http://blogladybird.blogspot.ca/
*Melissa Elsner- http://theprofoundbrunette.com
*Enza Gudor- https://creativefindingsblog.wordpress.com/
*Nathalie DeSousa- http://tachita55.blogspot.ca/    <<<YOU ARE HERE


NEXT STOP  -->>*Caroli Schulz- www.carolinaschulz.com <<--  NEXT STOP


May 13, 2016

Be Free


Scrapbook Layout for Scrapook Nerd On-Line crop   - Be Free -


A close up of the layout.

Hello everyone!


Today, I am bringing you a new layout created for the  "Let Your Creativity Bloom" on-line crop at Scrapbook Nerd.  My challenge for the crop is to use butterflies in a creative way.   Here is my take on the challenge.

The large butterfly shaker in construction

I started by using the "origami butterfly" cut file from the Silhouette Store to cut two large butterflies, and a few more of a smaller scale.  Using some vellum, I backed the large butterflies. Then, using removable adhesive, i glued them together as to form a shaker figure,  Using a paper piercer i made holes along the cut out part of the butterfly, so I can hand stitch it together.  Before sealing the edges together, I added sequin in the same color as the embroidery floss used.


the finished butterfly shaker in the layout.


For the mat, I used watercolor paper cut to 11x11 in.  Using Heidi Swapp's color shine inks, I created a watercolor background to match the colors of  the sequin, and added ink splatters all over the page.  I then trace the edge of the smaller butterflies on different vellum papers, and attached them to the cut out (just at the center line).

Using the sewing machine, the watercolor background was added to a 12x12 patterned paper mat;  the butterflies were also stitched to the layout along the lines created by the ink splatters.    I added a black and white picture of my niece with a few embelishments in little clusters around its edge.


I added a lot of texture to the page, and continued the wood
grain look of the backing paper by using wood veneers for the title.


I made sure to staple the  layers of the picture to the paper, so that it will remain in place.   The large butterfly has a row of foam dots under the wing to create the illusion of flight.   Here is  the final layout:


The layout captures the lightness of her dress flying as she twirls, just like the butterflies' wings.


I hope you join us in the on-line crop over at scrapbooknerd.com.

Till next time...

Happy Crafting!!