Showing posts with label Mixed Media. Show all posts

Dec 29, 2021

SANTA CLAUS IS COMING TO TOWN - Doodlebug

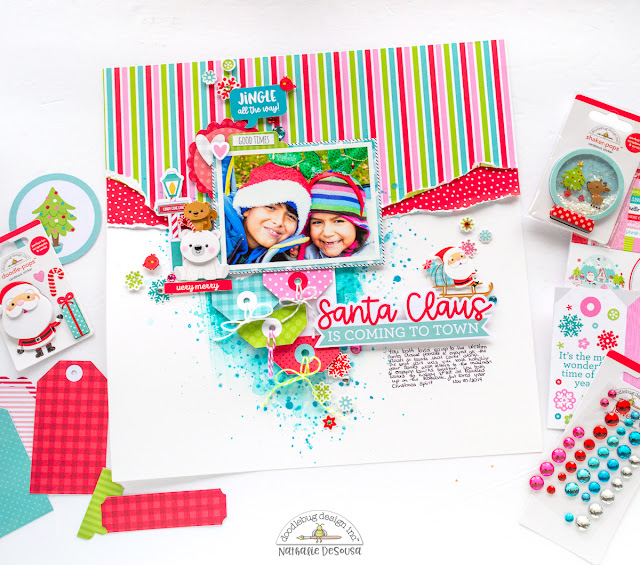
 Now at the bustle and hustle of Christmas is over, it is time to get all those memories into your albums.   Today, I want to show you a fun a colorful idea featuring Let It Snow collection.


I started by adding a bit of color to the background.  I literally dragged an ink pad on the page, then soften the dragged lines with a wet brush.  While the background dried, I ripped a few pieces of two of the patterned paper in the collection.  I wanted  those edges to show on the page.


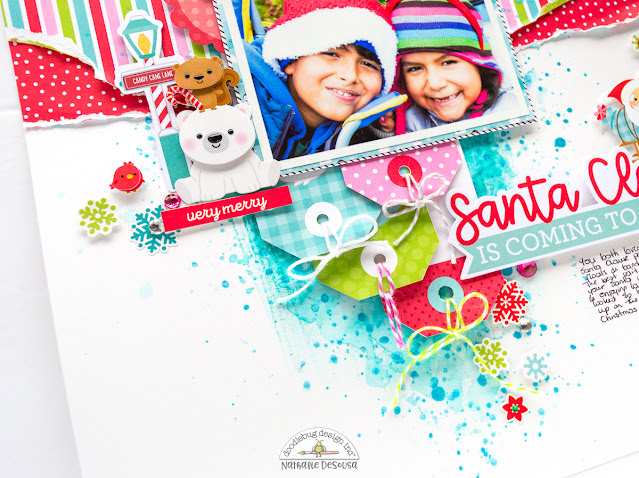
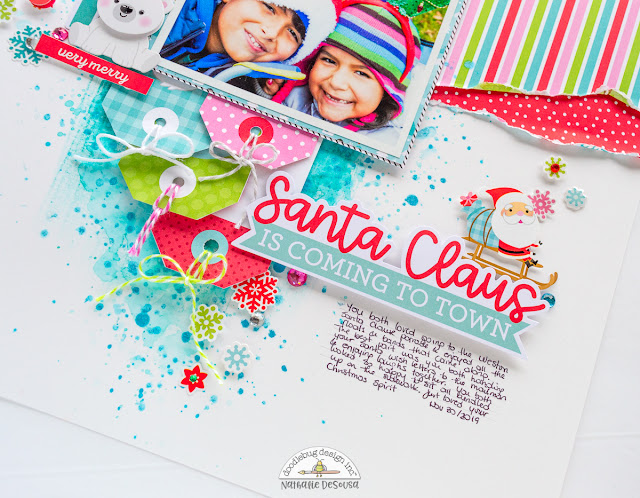
I fussy cut a few of the tags out, and used them a layers below the photo.   I simply started adding a few more embellishements around the photo and the tags.  I love Doodlepops, they are the perfect addition to any page.


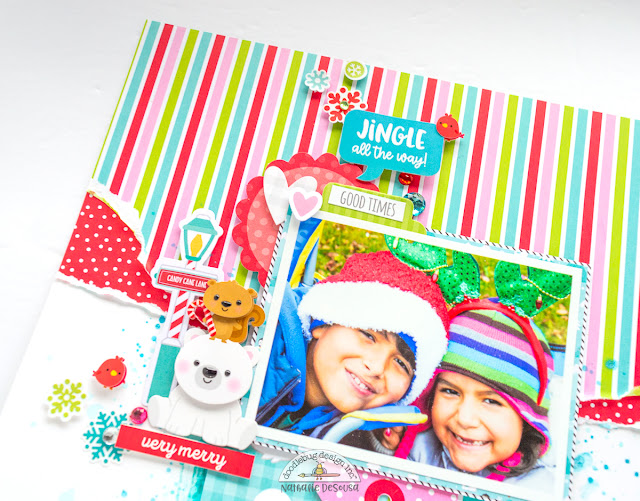
I elongated the design by adding a few more embellishments on the top part of the photo.  These help balance the page, and create a soft anchor line for the page.


I chose the title from the Chit Chat pack as it reminded me of the location of this photo, the Santa Claus parade. The small Santa icon sticker is the right size for the title.  A few more embellishments and a bit of glimmer is all tahti i


I hope this inspires you to document your Christmas memories with the beautiful Let IT Snow collection.


XO


Instagram | Blog | YouTube 


SUPPLIES:

Let It Snow collection

Gems

Twine -White, Pool, Bubblegum, Gray

Other:

Distress Ink pad, and spray

Oct 17, 2021

TOGETHER - Simple Stories


Hello there!

Nathalie with you today to share a new layout featuring the new Simple Vintage Weathered Garden.  I love Simple Vintage collections, but this new addition is probably one of my very favorite.  The color combo, floral design, and butterflies are probably the reason I love this collection.  There are so many beautiful pieces in this collection, it was so easy to create this page.


As always, the chipboard frames are always the first piece I reached for.  This time, I am combining one of the frames with the new Sticker banner for this page.     

I started by trimming the Honey/Magnolia basic to 10.5x10.5 in square. I attached this to the Every Little Things paper ( along the top edge of the paper).   Here, I added a bit of mixed media to make sure all the pieces of the banner pop from the page


In order to fit the  chipboard frame as part of the banner.  I had to cut the frame in the banner so that the butterflies could sit atop the frame.    A bit of foam adhesive secures the frame to the page.


I added a few more embellishments through the banner, so that it bulks it up and is proportionate to the chipboard frame.


Lastly it was all about building a title for the page.  In order to balance the page,  I added a few of the foam stickers at the bottom part of the basic paper, making sure that it followed the same line as photo.  To finish, I added a few more butterflies, through the page,


I love how this turned out.  There are so many details in each piece of the collection, that you will have your projects done in seconds.

XO

Sep 5, 2021

SPOOKY FA-BOO-LOUS! - Simple Stories


Hello Crafty Friends!

Nathalie here to share a bit of inspiration using  the  new SPOOKY NIGHTS collection.   This collection is seriously super cute with the perfect mix of  spooky and fun.   It is perfect to document those Trick-or-Treating nights!  So, I pull a few old photos from my kids -back when they were little- for this page.


The inspiration for the page was the Gone Batty paper.  As soon as I saw the night scene, I knew that I could recreate it for my photos.

I cut a 6" circle from Color Vibe Warm White cardstock.  I  used art crayons and a bit of water to color in my full moon. A bit of gray and black art crayon create the spooky craters in the moon.  I set it aside to dry and started to work on the background.  I trimmed the Gone Batty paper to 11"x11"and framed it with the  Creep It Real Paper.


While the  moon dried;  I free hand-cut a few clouds from Color Vibe  Gray Cardstock.   I used  a stencil brush and black art crayons to  define the edges of the clouds, then added a bit of interest to the clouds with the  Jack-O-Lantern stencil.   I glued the moon and clouds to the background (a bit of foam adhesive helps to create the layered look of the clouds).  I sprinkled a bit of the star stickers around the background, and then added a few  bats  flying around.


I used a few of the haunted house images from the collection to create the bottom part of the scene on my page.    The cut apart cards from the 6x8 paper pad were perfect to frame the photos.   A bit of foam adhesive makes them pop from the row of houses. 


The foam are one of the best ways to create a title for the page.  The size of the title just posts from the page; so,  I chose a small cardstock sticker to complete it.


This page was a treat to put together.  I just love how it turned out, and how perfect it tells the story of the day.  Remember to check the SPOOKY NIGHTS collection from Simple Stories; you are going to love it!!


XO


Apr 8, 2021

Altenew 7th Anniversary Blog Hop Day 1 + Giveaway (over $1,400 in Total Prizes)


Hello there!

Welcome to ALTENEW 7th ANNIVERSARY BLOG HOP DAY 1 + GIVEAWAY.  You are arriving from Scrapbook.com blog.  A list of all the participants is available at the bottom of this post for your convenience.

Happy Birthday ALTENEW!!! For the past 7 years they have been producing high quality products for all sorts of paper crafting.  My journey with Altenew has been nothing short of one of the best creative adventures.   So, for today's post, I decided to create a page that started with just cardstock...


Let me tell you, nothing more satisfying that create a memory from scratch!  It all started with a piece of 9x12 Altenew Watercolor Paper.  I used Lagoon and Sea Breeze Watercolor Brush Markers refills to paint the entire sheet of paper, thus creating the ombre effect.


I trimmed about 2 inches of the colored paper to create my title using the Caps Bold Alphabet Die set.   At the same time, added a bit of Embossing Paste through the Feeling Dotty Stencil  - using the Ink Blending Tool very softly- to the top and bottom edges of the cardstock.


While the paste dried, I used a mix of Gradient Cardstocks and regular cardstock to cut all the flowers for the page using the Jumbo Gardening Picks Layering Die Set.    I went with bright colors that will contrast and complement the background.


To assemble the page, first I backed the picture with a piece of paper from the Summer Garden Paper Pack.  Next, I glued the cardstock on the center of a 12x12 white sheet of cardstock, and the title on a vertical line on the right of the color cardstock.  I used the die cut flowers to create a large cluster at the bottom of the teal cardstock and title.


To complete my page, I added another cluster of flowers on the top left corner of the colored cardstock.  Then used Embossing Ink and Antique Gold Embossing Powder to add some texture and shine to some pieces from the Sweet Hearts Adhesive Wood Veneers (I added them around the page). Finally, I used the Mix & Match Mariposa Die Set to create two butterflies from white cardstock and vellum.


I just love how easy I was able to combine Altenew products to create this page, and I totally love how it turned out!   

I am sure that after seeing all the inspiration from today and the next few days, you all will  be looking into purchasing some Altenew goodies. Here a small promotion that will help you add product to your stash:


Of course all Altenew's blog hop always have a GIVEAWAY!!! And this time there are huge prizes from Altenew and some great sponsors we all love.


Over $1,400 in total prizes! Altenew is giving away a $70 gift certificate to 5 lucky winners and one Altenew Academy class to 15 lucky winners. There are also 19 awesome companies/crafty friends who are celebrating with us, and they are offering the following prizes:


Be sure to leave comments by 4/18/2021 for a chance to win one of 41 prizes! To make the hop more exciting, start your comment with "Hi from (city or country where you're from)!" 41 winners will be chosen at random from the comments left on any of the blogs listed below and will be announced on the Altenew Card Blog on 4/24/2021.


Good Luck everyone!


Now, let's continue the fun and inspiration, you are off to visit the always inspiring Simon Says Stamps blog.  Remember you can always return here, or visit the Altenew blog to start the hop. Here is a list of all the participants for your convenience:


Thanks for visiting!!!