Sep 26, 2018

Read Always


Scrapbook Layout created for Citrus Twist Kits  -  READ ALWAYS  -


Hi there!


Time is flying, and we are about to move onto October, so how about one more project for Citrus Twist Kits using their September kits before we move onto the beautiful October kits.


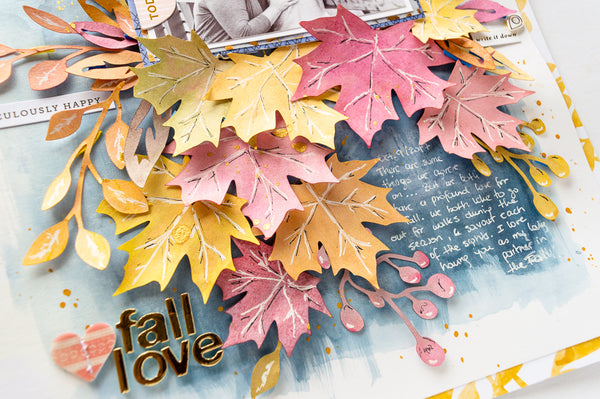
For this page, i used the "Good Stuff" add-on kit and few of the exclusive stamps.   Just love the 6x8 Willow LAne paper pad included in the kit; so, a pulled a few of the papers to create a title for the page.


The letters were cut on the Silhouette Cameo, and then hand stitched to bring a bit more detail and color to the title.


Before adding the title onto the page, I used a bit of Whipped Spackle and a Stencil from Echo Park to add a bit of tone-on-tone deital to the background.  The letters were then glued straight to the page.  To complete the title i used the colorful alphas from the WIllow Lane collection under the large handstitched letters.


Next, I nestled the picture under the letters, and added a few details using the Vicki Boutin ephemera pieces, all the brads and enamel dots from My Mind's Eye and then a few Chipboard stickers from Amy Tangerine included in the Embellishment kit. 


A few elements from the monthly cut-apart sheet and some stamped images using CTK exclusive stamps was all that this layout needed.  Love how this page came together so easily, and filled with texture and color.

Remember to stop by Citrus Twist Kits to check all the kits and add ons used on this page, and please do not hesitate to contact me if you have questions on how this was put together. 

XO


Sep 25, 2018

Fall Beauty


Scrapbook Layout created for Scrapbook Nerd  - FALL BEAUTY -


Hi there!
It is time to share this week's project for Scrapbook Nerd, and since this week we are hosting an online crop, i thought to share the project created for the crop.


I started by creating the background using one of the papers from the Simple Stories High style paper pad, and a bit of Prima Watercolor.  Once it dried, a wreath cut out was split in half and then propped on foam dots so that the leaves meet in the middle.


The picture was backed and layered with papers from the Simple Stories Forever Fall collection, and then nestled in between the leaves clusters.  These were also the perfect spot to add lots of small details using embellishments from the collection.


The title was then added using a combination of the stickers from the collection, and alphas from the Sn@p basics pack.   Once it was all glued together, then the  page was trimmed on all sides, and glued to the b side paper from the VIntage Halloween collection from SImple Stories.  Here is the final layout:


Maybe is the Fall lover in me, but this is so beautiful to me!  I hope it inspires you to come join us in the Scrapbook Nerd Friends page on Facebook to join the challenges. Remember to check Scrapbook  Nerd for all the materials used here, and let me know if you have questions on how this was put together.

XO


Sep 24, 2018

Fall Love


Scrapbook Layout created for Just Nick Studio  -  FALL LOVE  -


Hello everyone!
Happy Fall everyone!  Nathalie with you today with a new layout for Fall week.  Can you tell I love Fall?!  I am so excited to pull out my sweaters, drink all the PSL i  can find, but mostly to go out and enjoy all the colorful nature.   So, i poured some of my love of the season into this new layout that uses a few of the Just Nick Studio cut files and a bit of mixed media.


To start this page, i used the Grateful cut fileFall Florals cut file, and the Leaf It to Me cut file, to cut the various leaves you see from white cardstock.


 To cut the solid maple leaves for this page, i used only the outline of the Leaf it To Me cut  file ( I released the path of the image on my Silhouette software, and then just highlighted the outline to be cut). 


Once all the leaves were cut out, i pulled my Pinkfresh liquid watercolors to add a very saturated amount to all of them, and set them aside to dry completely; this helped to create the natural curvature in the leaves.


While the leaves dried, I used some of the watercolors to create my background, and then trimmed the cardstock and glued it to a paper from Pinkfresh Studio.


Once all the leaves were dried, i used a white and black fine gel liners to detail the vines in the leaves, and then used foam adhesive to attach them to the background.    Just a few embellishments were needed to complete this page after all those colorful leaves.


I love how this turned out!, and all it took was a sheet of white cardstock, some of the beautiful Just Nick Studio and some watercolors. 
Remember to stop by the JustNick Studio store to check all the cut files used in this page and the new designs being added each week.  As always you can contact me if you have questions on how this was put together.
XO


Sep 22, 2018

Hey, Hey Sunshine


Scrapbook Layout created for Vicki Boutin  -  HEY, HEY SUNSHINE,  Take Note  -


Hi there, Nathalie with you today with a new project created using Vicki’s mixed media line and the new Field Notes collection.   I am so in love with this collection, as it is so versatile;  I can easily create lovely pages with the paper designs, but it can easily also be used to create masculine pages in a very short amount of time. 


As most of my pages work, I started with no plan in mind, the only starting point was the picture of my son.  I love the socks he is wearing in this photo, so I chose the colors of it to create the background for my page using layers of mixed media.


First a bit of stamping using the new Escape stamp set, then some yellow art crayon to create the watercolor background.   The blue art crayons were then used to create the stenciled circle look on the page using the scribbled circle stencil and the stencil brushes, and to finish, I repeated the stenciling technique using black art crayon, the script circle and a damped stencil brush.


Now it was time to embellish. First, I used some of the Field Notes collection and some foam adhesive to back and add layers behind the picture.  Next, I  used a combination of watercolor  and chipboard stickers and some of the puffy shapes to  create clusters around the picture.


I wanted to leave lots of white space on this page, so I chose to add the title to the left edge of the page at the same level of the picture.   First, I trimmed about a half an inch from the foundation paper,  cut a small slit at about half the length.  Then followed the same steps used to create the background, but this time I chose to form a triangle that pointed to the picture.  Once the mixed media dried, I backed the layer with a paper from the collection forming a pocket for my journaling tag and used the folded corners a placement for my title.


I hope you all inspired to check Vicki’s new Field Notes collection and  create something magical with it.   Well, that is all for me!  Remember to share your Vicki Boutin creations with us!  I look forward to seeing how you use her products.

XO


Materials Used:
Foundation Paper
Gesso
Warm, Neutral and Cool Art Crayon sets
Stencil Brush
Scribble Circles and Script Stencil
Escape Stamp Set
All The Good Things Rotary Stamp Set
Watercolor Brushes
All the Good Things 7x10 paper pad and Watercolor Stickers
Field Notes collection – 12x12 paper pad; Chipboard, Puffy and Watercolor Stickers, Ephemera pack – Journaling spots; Black Puffy Thickers


Sep 21, 2018

Hello Fall


Scrapbook Layout created for Simple Stories  - HELLO FALL -


Hi there, Nathalie with you today bringing you a bit of Fall.   I think that i look forward to the Fall season more than anything else; it's the cozy feeling, the colors, the cooler weather, PSL( Pumpkin Spice Latte!) and of course the crunching leaves.  And this year, Simple Stories new collection, "FOREVER FALL", is the perfect one to document all these treasured moments


To construct this page, a cut file from the Silhouette store was used to cut out letters to form the title from various papers from the collection.


While i hand stitched the title, I used a cut file from The Cut Shoppe to a group of leaves from all the papers in the collection. The color palette of the papers and designs in the collection are just perfect for the season, that i just couldn't chose one!


To have all the details of the page pop, i chose to use the Sn@p Basic Walnut/Cream Dot paper as a mat for this page.  Once the title was set in place, I layered some of the leaves at both corners of the title


A few stickers and die cuts were also nestled around the clusters just to  bring more interest to the page.  I added the small, "Hello", circle die cut behind the top corner of the title so that it can read as "HELLO FALL".


Since Fall is my favorite season, there is always so many memories being made outdoors;  the picture was embellished with a few clusters at the top and bottom right corner. Just love all the embellishments included in the FOREVER FALL collection.

I hope this page has inspired you start your Fall documenting.   The FOREVER FALL collection by Simple Stories is sure to bring the season to your page!

Happy Fall you all

XO


Materials Used:
#2852   Sn@p Basic paper - Walnut/Cream Dot paper

Forever Fall collection:
#10267   Collection Kit
#10268   12x12 sticker combo
#10271   Pumpkin Everything
#10273   Autumn Love
#10275   Gather Together
#10276   Give Thanks
#10277   3x4 vertical elements
#10279   4x6 Horizontal elements
#10281   Chipboard Stickers
#10282   Bits and Pieces
#10283   4x6 Cardstock stickers

Sep 19, 2018

Sweet Wonderful Memories


Scrapbook Layout created for Citrus Twist Kits  - SWEET WONDERFUL MEMORIES -


Hello there!

It is time to get your fingers messy and inky!  Nathalie here to give you a bit of inspiration on mixing the beautiful Heartbreaker kits, the Traveler's Notebook Stamp set, and a bit of mixed media.


Well, when i saw all the colors in the Heartbreaker scrapbook kit all I could think about  was how to incorporate lots of mixed media in a confined space (so that it is less scary to some!).  The solution use the mixed media to back a cut out / cut file.


To create the background,  i used the PinkFresh Studio liquid watercolor collection available in the CTK shop, and the packaging technique.  As the colors were being added, i was careful not to stretch them outside of the frame of the cut file, as i wanted to try at best to confine the mixed media to the area behind the cut file, and picture.


Once the background completely dried, the cut out (this was created with one of this month's free cut files available at the Citrus Twist Kits shop) was attached using some foam adhesive so that it pops off the page.


Now it was time to complete the layout; first i backed the picture with one of the beautiful Willow Lane Papers included in the Hearbreaker kit, and then added layers of ephemera, elements from the die-cut page (available for free at the CTK shop) and some of the gold chipboard and puffy stickers that are included in the Scrapbook and embellishment Kits.  Loving the golden accents on the page!  Along the way, I added a few sentiments to the page using this month's Traveler's Notebook Stamp set - Mom Duty -.


Since the picture  was placed in the top left corner of the page, a large cluster was placed in the bottom right corner of the page using a combination of the Heartbreaker kit's embellishments such as ephemera (love that big camera form the Amy Tangerine's die cut pack), puffy stickers, and some of the chipboard stickers from the embellishment kit.
The following video will give you a more in depthe look at how this page was put together using the Heartbreaker kits:


I know some are still intimidated by mixed media, but having the mixed media confined to a selected space reduces the messy look of the page, and adds the perfect pop of color to the background, or in this case as the backing of a cut out.


I  hope this inspires you to use a bit of mixed media in your memory keeping.  Remember to share with us what you are creating with the Heartbreaker kits, we love to see the kits in action and be inspired by all your projects.

XO


Sep 18, 2018

The Good Life Today


Scrapbook Layout created for Scrapbook Nerd  - THE GOOD LIFE TODAY -


Hi there!

Hope you all are well!  This week's assignment for Scrapbook Nerd was to create projects based on everyday moments, which is perfect for the way i document our lives.  So i went i pulled a picture of what i see on a normal basis to create this page.


The background was first created using Distress Oxides so that they match papers from various Paige Evans collections. I chose a masculine palette to match the picture i am using.  Once the inks had been applied with a foam applicator so that they look like strips of color, a Kaisercraft stencil and a baby wipe was used to create the starry background.   Some ink was diluted and added to the bottom of each color strip followed by stamped images of stars using the Turn The Page stamp set and the respective inks.


While the inks completely dried, I went ahead and backed the cut out (created with a Just Nick Studio cut file) with papers from a few of Paige Evans collections (in case you don't know,  i have them all, have hoarded most of them, and love them all!!!).  A bit of foam adhesive creates the dimension look of the title.


After setting the title on the background,  the picture was backed and layered with the same papes used on the title.   Now to embellish, i went through all the collection pulling stars embellishments from papers, washi tapes and even fussy cutting some.  Gotta love the little rub ons stars from the latest Pick Me Up collection.


I pulled a few embellishments from the collections so that they will match the colors of the background, and even managed to tie a heart charm (form Oh My Heart ) to one of the paper clips from the Take Me Away collection.  Here is the final layout:


Love how this turned out!  I love documenting everyday moments,  as they are the ones that we take for granted sometimes, in a way that they become stars in my scrapbook journey.

Stop by Scrapbook Nerd to check for all the materials used in this page.  As always let me know if you have questions on how this was put together.

XO

Sep 17, 2018

My Personal Journal - week 31


 Hi There!

I hope you all had a relaxing weekend!  I have been busy workingn on a few very cool projects behind the scenes, and still trying to make time to finish photographing and editing all of my August and September TN entries.   So without further ado, here are the entries for week 31 and  my Summer Journal (part 2)


created  using  past Citrus Twist Kits

Created using Citrus Twist kits and Digital files from In A Creative Bubble


Created using Citrus Twist Kits PL kits and Kaisercraft stamps


Created using Citrus Twist Kits and Stamps


Created using past Citrus Twist Kits  past kits and Stamps

Created using digital files from Citrus Twist Kits and Ali Edwards

Created using Citrus Twist Kits August kits and stamps


Created using Citrus Twist Kits and Doodlebug alphas


Created using Citrus Twist Kits August kit and Freckled Fawn embellishments

Created using Citrus Twist Kits August PL kit


Created with the Golden Hour TN kit from Studio Calico and stamps from Citrus Twist Kits and Feed Your Craft


Created with the August TN kit from Studio Calico


created with the August TN kit from Studio Calico 


I hope to carve some time to keep on editing the pictures so i can share with you all  entries.   As always you can leave me a comment if you have questions on how any of these came together.

XO