Mar 31, 2017

My Personal Journal

field-notes   Hello there! I hope you are enjoying all the projects that the beautiful April kit, "JELLYBEAN", and that they are inspiring you to use every single piece included in the kit.  The papers, embellishments, and the exclusive printables are so versatile, and perfect to use in all kinds of paper projects.
CK_Apr17_Kit4
 I have kept a journal throughout my entire life.  The format has transformed to the years, but once I discovered Traveler's Notebooks a few years back, i have been hooked on them.    I try at best to make at least a daily entry on my journal, it works as my PL format.  This month, I have loved adding bits and pieces from the JELLYBEAN kit to my journal.

  CK_Nathalie DeSousa_April2017_My Personal Journal-3  
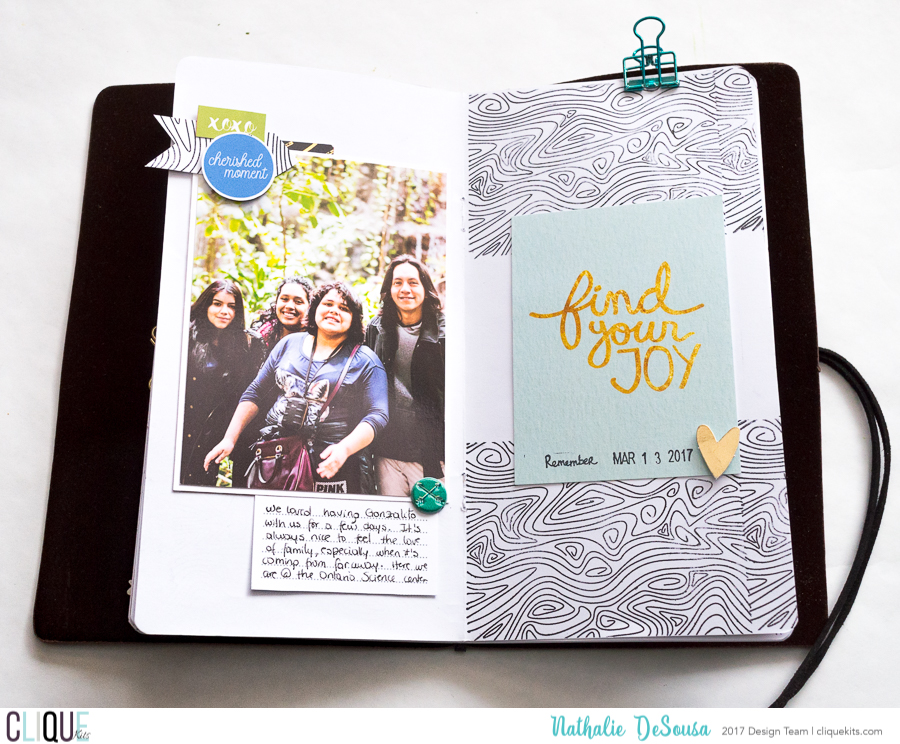
This month's challenge sponsor is Latina Crafter; their stamps are just gorgeous.  I was lucky to receive this beautiful wood veneer stamp, which i used to create the background on one of my TN entries.   Using archival ink, I stamped the image at opposite edges of the TN's page, and a small piece of white card stock.  Once I placed the picture on the opposite page,  I used the stamp card stock to create a small arrow that tied the two pages together.  The PL cards included in the kit, and the exclusive printables are just perfect when documenting in this format.   CK_Nathalie DeSousa_April2017_My Personal Journal-5   
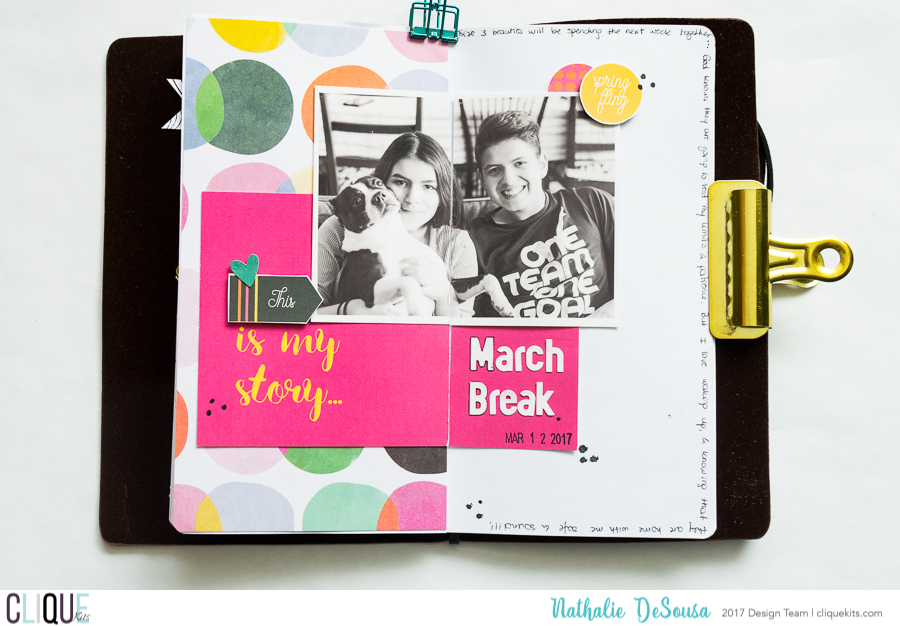
My next entry is all about my kid's first day of Spring Break ( we survived!!).  For this entry, I  used the small scraps of the Oh My Heart paper #  to cover one side of the page.   The large PL card, included in the Jellybean kit, was then glued across both sides of the TN - I simply cut the card with the paper trimmer, and glued it to the TN-
.   CK_Nathalie DeSousa_April2017_My Personal Journal


   CK_Nathalie DeSousa_April2017_My Personal Journal-2   


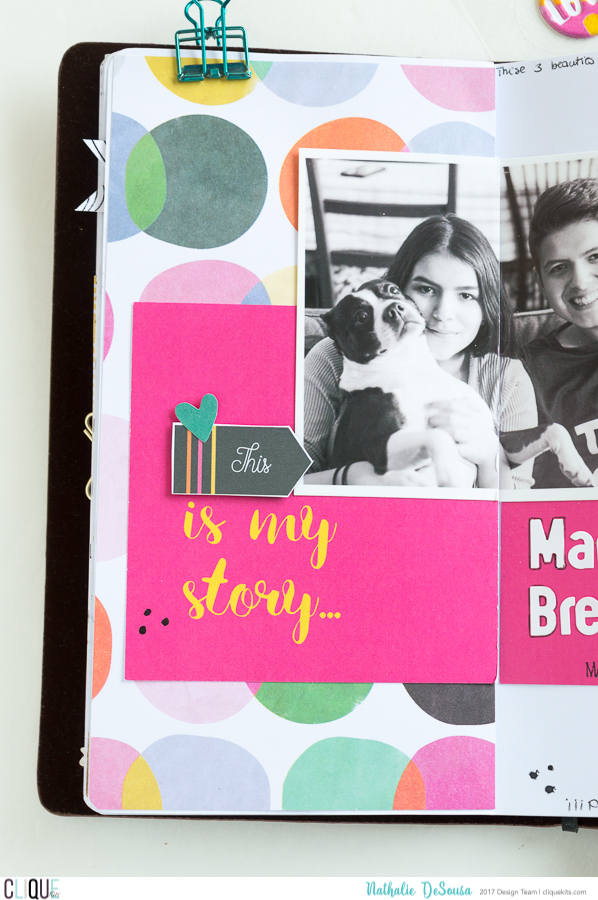
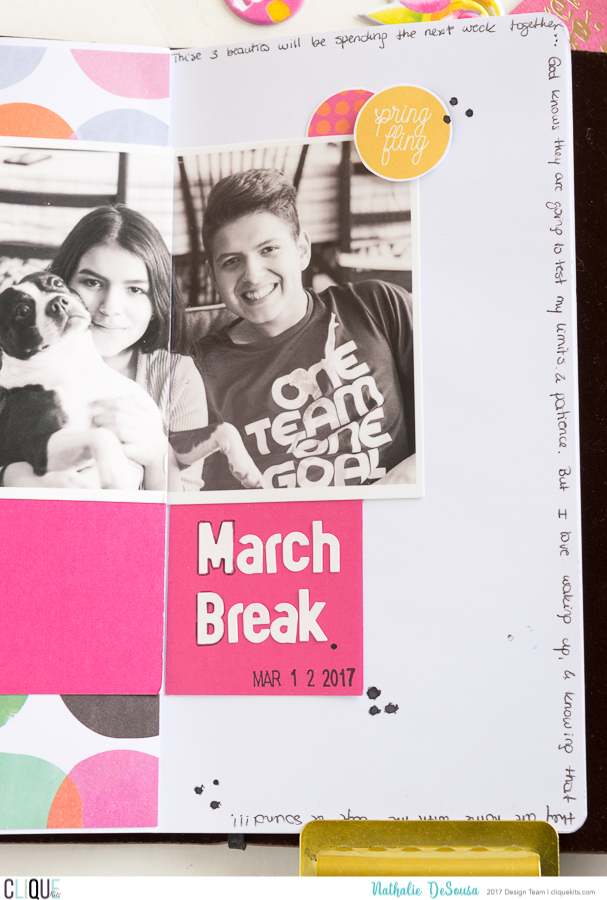
Once again, I used this month's exclusive printables to add interest to the page, and the small letter alphas from Elle's Studio, included in the kit, are just the perfect size for this entry.  I am always trying new ways to journal on my pages; this time, I chose to write along the edge of the page!.

  CK_Nathalie DeSousa_April2017_My Personal Journal-6


 Finally, the last entry i am sharing with you, is just a fitting example of how versatile the kit is,  and how easy is to document in a TN format.   Once again, I picked  the last piece of the Impossible paper -included in the kit-, and covered one side of the TN.  The beautiful ephemera pieces from the Make Your Mark collection  serve as the sentiment and embellishment on the page.


  CK_Nathalie DeSousa_April2017_My Personal Journal-7


 By using the TN on a landscape format, I was left with  a large space to add my journal lines (this entry is all about me, and how happy my DSLR makes me!).  I balanced the page, by adding some of the ephemera pieces, and a sentiment fussy cut from the cut-apart paper from the JELLYBEAN kit. I hope these all serve as inspiration to take a look at Traveler's Notebooks, and how to use the kit when documenting in this format.  TNs are versatile, and work for many different types of memory  keeping/ planner/ art journal.  Clique Kits has just launched a new subscription program all about traveler's notebook, just click here to see all about this new venture. As always i am just a comment away, if you have any questions on how any of these came together.   Thanks for stopping by!


  CK_DT17-headshots-Nathalie


Materials Used:

Clique Kits - Jellybean Kit
Stamp - Latina Crafter
black velvet color shine - Heidi Swapp

Little Man


Scrapbook Layout created for Scrapbook Nerd's March Madness On-line crop  -  LITTLE MAN -


Hi There!

This entire weekend, Scrapbook Nerd is holding their March Madness on-line crop.   Each DT member will be challenging all participants to create projects using the prompts provided.   For my first challenge, I chose to create with cut files.


For this layout, I started with the free April 2016 cut file from Scrapbook and cards today.   I used the colorful Cool Kid collection from Crate Paper to back the cut, and then adhere it to one of the papers from the collection.


Next, I trimmed white card stock by about a 0.25in on each side.  Then using my Cameo, i cut a circle on the cardstock, making sure it was a bit off center.  In addition, I used the cameo to perforate the edge of the circle (at an offset) so I can add some texture through hand stitching.  I used very fine foam to glue all the pieces together.


I attached the picture of my little at the edge of the circle that has the most space. Pieces from the Cool Kid and Alex collection worked perfect to frame the picture.  The title of this page was added at the opposite side of the circle.  Here is the finished layout:


I really hope this serves as inspiration, and you join us in the Scrapbook Nerd On-line challenge.  There is always a lot of fun, and prized.

Don't hesitate to contact me with any questions on how this came together.


Take care!


Materials Used:
Patterned papers - Cool Kid collection - Crate Paper
cut file - April 2016 - Scrapbook and Cards Today
Ephemera, stickers, chipboard stickers, puffy stickers, cardstock stickers, resin stars - Cool Kid Collection - Crate Paper
Ephemera - Alex collection - Bella Blvd.

Mar 30, 2017

You Wonderful Thing


Scrapbook layout created for The Cut Shoppe  -  YOU WONDERFUL THING  -


Hello there!

There is a new set of cut files available over at the Cut Shoppe Etsy store.  As always, they are all beautiful, and so versatile.


For this layout's background, I chose the Follow Your Heart cut file.  I added an offset to the image before cutting, and made sure to used the Silhouette software to create a stitching pattern.   I picked papers from the new Oh My Heart collection to back the heart segments, but added the stitching (in a matching color  thread) before backing the heart.


The Spring Forward cut file is full of tags with beautiful details on them.  I simply enlarge the "Bloom" tag until it was big enough to back and frame the picture of my daughter.   A small piece of pink vellum behind the word is all that was needed.   The Flowers in the collection were just perfect to create the cluster.


For the title of this page, I used one of the chipboard stickers from the collection.  Once again, I just layered more of the fussy cut flowers from the collection, and place them at the opposite side of the picture -diagonally-.   Here is completed layout after adding some smaller details, and the journal lines:


I love how this layout turned out.   The colors are perfect even when the picture is of my daughter walking in a winter wonderland.   Remember to visit the Cut Shoppe Etsy Store to check all the new designs.


Please do not hesitate to contact me with any questions on how this came together.

Take care!


Materials Used:
Cut files - The Cut Shoppe


Patterned papers-  Paige Evans - Oh My Heart  and Take me Away collections
Embellishments - Oh My Heart and Take Me Away collections - Paige Evans
Black, and white color shine - Heidi Swapp

Mar 28, 2017

Be Impossible To Forget


Scrapbook Layout created for Clique Kits   -  BE IMPOSSIBLE TO FORGET -


Hello there,

Today, I am up on the Clique Kits Blog with  a new project using their April kit "JELLYBEAN".   I was inspired by the Impossible paper from Bella Blvd's Make Your Mark collection to create this layout.


The background of this page was created with the Silhouette Store's cut file #65661.  All the empty hearts were backed with the  kit's papers that matched the color palette of the paper.  A bit of dimension was created by using foam adhesive to back the cuts, and create the lovely shadow on the page.


The picture of my daughter, and nephew showing a milestone on their growth was nicely framed with the PL cards included in the Jellybean kit, and clusters created with  the embellishments from the kit.


The fussy cut words from the paper easily formed the title for the page.   After adding the journal lines inside some of the hearts in the background, and a few more small details, the project was finished.  Here is a look at the final layout:


I have created a small video on how this layout came together, just sit down and enjoy!


I hope this serves as inspiration on a fun way to capture and document your kid's milestones.  Don't forget to stop by the Clique Kit site to check the complete kit and what the ladies are always bringing to the store.  Remember I am a comment away if you questions on how this came together.

Thanks for stopping by!


Materials Used:
Clique Kits - April Kit - Jellybean

Cut file - Silhouette Store  #65661
White smooth card stock
Gold Lame, black color shine mist spray - Heidi Swapp

Mar 24, 2017

Dream


Scrapbook Layout created for Maya Road  -  DREAM-


Hello Roadies!
Happy Spring to you all!
Nathalie here with you today sharing a new scrapbook layout using one of my favorite Maya Road products:  dies.
Maya Road - MArch

Maya Road offers a large selection of dies that are just so beautiful, and can be used for all kinds of crafts.  This time, I wanted to share the last project created for Creativation 2017 using  the Geometric Stars Die set.

DREAM-4

This project started with a bit of mixed media on the background.  By simply using some watercolor, and the packaging technique, the background was set to look like a blue sky.   While it dried,  A large moon was cut on the Silhouette Cameo.   I wanted to keep the layout monochromatic, but brought just small color pops by backing the cut file with papers from Maggie Holmes' Gather collection.

DREAM-5

A little bit of hand stitching does not only secure the cut files together, but adds texture to the project.  Before gluing the crescent moon to the background,  a hole was poked at the top  corner of the moon.  Here I used some crochet thread to attach two Star Bright Charms, and  a Ken Oliver Vintage Heart and Key Charms, so that they hung on top of the picture i was about  to add.

DREAM-3


The picture of my little sleeping on my brother in law's arms was perfect for this layout.  I simply layered some gold vellum behind the picture, and a piece of Ken Oliver's Vintage Trim- Rick Rack edge -.    A small cluster was created at the opposite side of the picture using a Journaling Wood Token, some Vintage Crafting Tassels (Milk white), and a small Chipboard heart (colored with gold paint)

DREAM-2

To add to the dreamy feeling of the project, the Geometric Stars die was used to cut smooth white card stock.  A small piece of gold marbled vellum was then sandwiched between two of the die cuts, so that there white edge of the star will show on both sides.   These stars were then attached to create clusters around the big crescent moon.

DREAM-6


To finish the project, a large cork sticker was added to create the title for this piece, and some small embellishments just add little pops of color around the page.  Here is the final layout:


I hope this serves as inspiration to stop by the Maya Road on-line store, and check all the beautiful projects being used in this project, as well as the large selection available.  Remember to use the code DIESOFMARCH to receive 25%off all your die purchases until March 31st.

As always, I am a comment away if you have any questions on how this project came together.

Thanks for stopping by!

Nathalie-desousa-signature


Materials Used:
White cardstock 
Watercolor - Prima Marketing - the classics, the tropicals
Clique Kits - October and December, January kits


Maya Road products used:
Geometric Stars Die set
Star Bright Charms
Ken Oliver Vintage Heart and Key Charms
Journaling Wood Token 
Ken Oliver Vintage Trim - Rick Rack Edge
Vintage Crafting Tassels - Milk White-
Mini Heart Chipboard set

Mar 21, 2017

You Sparkle -TCS


Scrapbook layout created for The Cut Shoppe   - YOU SPARKLE  -


Hello there!

Happy Spring everyone!

today, I am up on the Cut Shoppe blog with a new project that celebrates Spring.  I wanted to bring lots of colors, and cheerfulness to this picture of my niece, so I chose the newly released Social Butterfly cut file as  a highlight of this piece.


For this layout, i highlighted just one of the butterflies of the cut file, and cut them in different sizes on white card stock.  Using the same images, I cut the butterflies on papers of the Maggie Holmes Chasing Dream collection, and vellum.  


I glued the butterflies just through the middle line, to each other, and the card stock.  Using a paper piercer, i poked holes, and stitched the body of the image, and added antennae to the images.  I made sure to leave the wings unattached so that they can be raised as in flight.


The title was created by stitching the word "Sparkle" from the 'Tis the Season cut file.  A bit of an offset makes the title pop, and the pink water color just complements the colors of the page.  Here is the final layout:


This layout is just so Springy, it  brings life to this very long winter.   The dimension and movement in the butterfly wings just add so much interest to the page.  Don't forget to check the Cut Shoppe Etsy store to pick these and the many beautiful designs available.


I hope this inspires you to work with colors and cut files.  As always let me know if you have any questions.

take care!


Materials Used:
Bazzill card stock - Robin's egg ombre
Cut files -  Social Butterfly

                   Tis the Season - The Cut Shoppe

Patterned paper-  Maggie Holmes' Chasing Dreams collection
Card stock stickers , word stickers - chipboard stickers - Maggie Holmes Chasing Dreams collection - Crate Paper
Metallic watercolor palette - Prima Marketing

Mar 16, 2017

Live for the moment


Scrapbook Layout created for Scrapbook Nerd  -  LIVING FOR THE MOMENT  -


Hello there!

It is the end of my reveal week for Scrapbook Nerd.  This month's winter blahs brought a new source of inspiration to my work, color.


A few days ago, the beautiful Pinkfresh Studio collection "DREAM ON" arrived at the Scrapbook Nerd store (it has been on my pre-order list for a while), so as soon as  it hit my doorway, i had to create with it.


Using the Counting Stars cut file from the Cut Shoppe, the cut out for the back ground was created.   I used papers from the collection to back the stars, but i used a lot of this celestial blue paper in most of the stars.


I played with the position of the cut file for a bit, until i was satisfied with the look in the page.  Then I used foam adhesive to attached the cut out to the page, and create the beautiful shade on the mat.


I used a picture of my son on one of the many snow walks we have taken around the snow covered paths behind our home.  Since the colors match, I simply layered pieces from the collection to form the title, and clusters around it.


I went a little crazy with the ink splatters, but to my defense it was late at night.   A large amount of journal was added, on how much i adore this kid, and his awesomeness. Here is the final layout:


I love,  love this layout, and the colors in the collection are just supreme.  You can check all the materials used at the Scrapbook Nerd Store.

As always let me know if you have any questions on any of this week's projects,  I am just a comment away.

Take care!


Materials Used:
cut file - Counting Stars  - The Cut Shoppe
Patterned papers, die cuts, leatherette stickers, puffy stickers, washi tape, rubber shapes - Dream On collection - Pinkfresh Studio