Showing posts with label trim. Show all posts

Nov 20, 2017

Pursue Magic


Scrapbook Layout created for Maya Road - PURSUE MAGIC -


Hi there Roadies!!!

Nathalie with you today bringing you a bit of fall inspiration using the beautiful MAYA ROAD products!  I am sure that when you think Fall, there is a lot of different images that come to your mind, mostly leaves, pumpkin and fall colors.   So i used a more modern version of those concepts to create this page all about my mom.


I have had this picture of my mom in my scrapbook folder for a while, and finally decided to create a soft background where the colors of the picture will pop, for this i am using Pinkfresh Studio's Escape the Ordinary collection to create the leaf branch.


I used the Tropical Flowers Die to cut papers from the collection and then arranged them on the olive color cardstock as to form the branch that my mom is hiding behind (we were apple picking at the time!).   All the die cuts were attached with a combination of glue and foam adhesive to create dimension in the page.


Next, the picture was glued to the page, but i added a piece of Ken Oliver Vintage Trim -Rick Rack Edge- under the picture, just to soften the line of the picture once it was glued to the page.  The cluster of ephemera at the corner of the picture houses also the title of  the page, and a Mini Arrow Charm.  Just love all the texture in this cluster.


Next I added a cluster of  beautiful Maya Road products at the other corner of the picture.  This small cluster consists of a Wood Thoughtful Sentiment token, a banner from the Love Chipboard Banner set -it was colored using Gold colorshine-, and a small heart from the Mini Chipboard Heart Confetti set that was colored with deep coral color shine.  Once again I wanted to add textures and colors from the picture.  After that a few lines of journal and some color droplets complete the page.


I love how easy it was to create the leaf branch with the die cuts.   The non traditional colors of the layout are the perfect way to have the picture and title pop from the page.   I really hope this inspires you to create a new take on Fall, and use the beautiful Maya Road goodies to add texture and softness to the page.
That is all for me today!  remember to visit the Maya Road store to check all the products in this page. 
XOXO


Maya Road products used:

Oct 5, 2017

It Is In The Stars


Hello there!
 Hope you all are doing well!
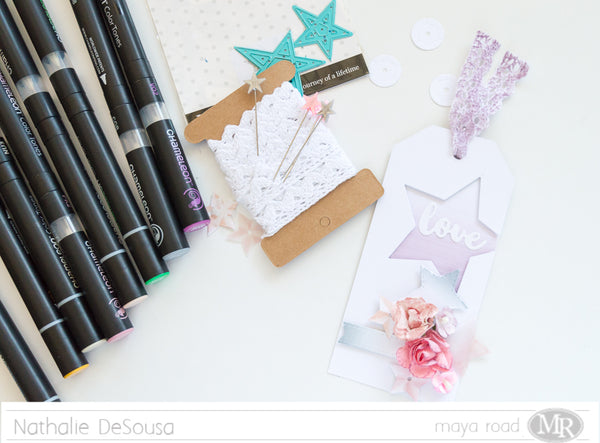
Nathalie with you today, and I am so excited to kick off the Maya Road & Chameleon Pen collaboration.  For the next few Fridays some of the Maya Road DT will be sharing some inspiration using the amazing (trust me they are amazing!!!) Chameleon Changing color pens on some of the beautiful Maya Road products.


Upon receiving the Chameleon Pens, i spent just a few minutes learning how to control the changing color in them.  They are that easy to work with, and actually, I decided to  treat myself, and bought a few more sets for my  studio.   But let me show you what i created with these pens:


Maya Road_Nathalie DeSousa_SHINE BRIGHTLY ALWAYS & FOREVER


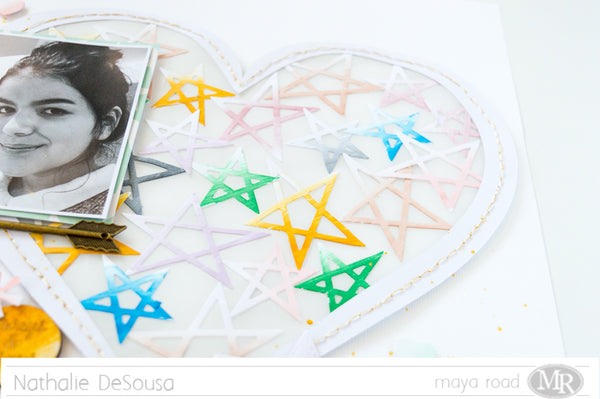
It all started with some white cardstock,  I used some the Geometric Star DiesSparkle and Shine Die setCloud Die set to cut  a few stars, hearts, asterisks, and sequins from the white cardstock (i used Neena cardstock for the die cuts).


To bring color to the page, i chose a colorful palette of the Chameleon Pens to color the die cuts as if giving them an ombre look.  The palette used for the die cuts contains:  BL6 Royal Blue, CG8 Cool Gray, GR3 Green Grass, NU1 Bisque, NU3 Fawn, PK2 Dusky Rose, VO2 Mauve, and YO3 Warm Sunset.  It was so easy and fast to achieve the color in the die cuts.  These pens actually worked amazingly when adding highlights to the sequin die cuts as to create a sense of dimension on them.


Once I had all the  Geometric Stars die cuts, i glued them to a piece of vellum, and then stitched a  large heart cut out to the vellum to create the background for this page.


All the small die cut pieces were then scattered at the corners of the heart as to create the effect of cascading confetti on the page.   To bring more color, the pens were used to shade in some chipboard stickers (Freckled Fawn) so that they matched the color scheme on the page.  In addition, i used  the  Golden Moments Mini Kit stamp set to add a few sentiments along the scattered confetti.


Finally to create the title of this page, i used the YO3 Warm Sunset Chameleon pen to  color the  title words from the Danielle Mini Alphabet Chipboard set, and a  Wood Token.  Then  used the With Love Nature Die bundle to cut the small banner and stamped the word 'brightly' using the Just My Type Stamp Set.     Finally, I accented the title by adding one of the Arrow Charms just below the picture.  Totally in love with the final result of this page, and now i want to show you what else i was inspired to create with these products.


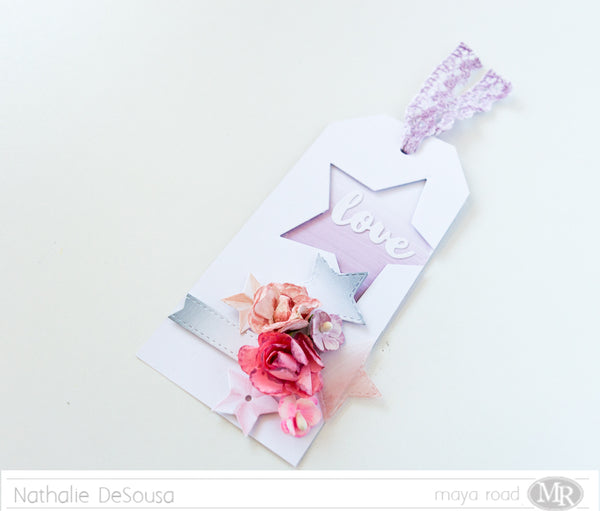
A few years ago, I created a series of tags and used them to decorate presents.  Well, they are quickly disappearing, so i thought i would take  this opportunity to create a new one for my stash.


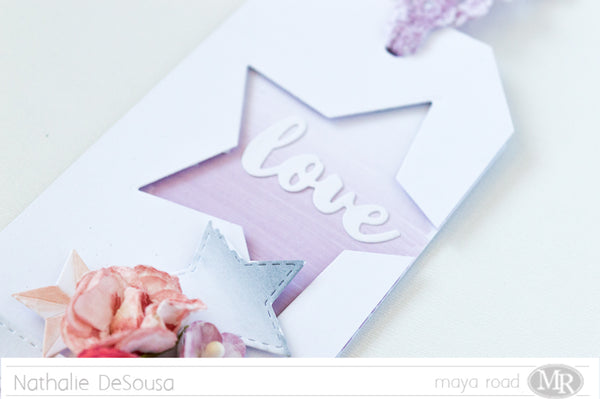
It all started when i cut a large star from a tag - i off centered the star on the tag-.  Then used the VO2 Mauve Chameleon Pen to color a  piece of cardstock , and backed the cut out star using a bit of foam adhesive.


Using the With Love Script die, I cut the sentiment to this tag, and glued it straight onto the colored cardstock.


I used some of the leftover stars from the layout to add a  large cluster to the bottom of the tag;  the pens also work on vellum, so i  used one of the vellum die cuts to add some softness in this tag.   This time, I added the PK4 Peony Chameleon Pen to the palettes so that i could color some Maya Road paper flowers.   By simply adding color to the edges and middle of each flower, i was able to add some antiquing, and detail to the flowers.


A tag is not completed without a piece of string or, in this case, lace to be able to attach it to the present.  So i used the VO2 Mauve Chameleon pen to add the same tone to a piece of Ken Oliver Vintage Trim Rick Rack edge.


I am so pleased with how these projects came together.  The Chameleon pens make it a breeze to create colorful projects.
Remember to stop by the Maya Road store to check all the products used in this page, and trust me you want to check the Chameleon Pens, they are amazing!!!

See you all soon!


Maya Road Products:

Aug 18, 2017

Shine


Scrapbook Layout created for Maya Road   - SHINE -


Hi there!


I hope you are all doing well.  Today, i am up on the Maya Road DT blog with the  last day of the Maya Road and Photoplay Product/Blog swap.    Please visit the Maya Road DT blog to see all the deatails of the swap.   But know let me show you what i created for this swap using the beautiful Maya Road products, and the super fun Mad 4 Plaid collection from Photoplay.


For my project, I wanted to recreate a Christmas tree just like the one my daughter is sit under in the picture.  Since there are so many beautiful patterns in the Photoplay's  Mad 4 Plaid collection,  i tried to combined them all by using 1x12 in long strips to create paper rosettes.  These were then glued -and stacked- to recreate the Christmas tree silhouette.


Once the entire tree shape was created, I started adding details to the center of each rosette using the sequin stickers from the Mad 4 Plaid sticker sheet, along with some of the Maya Road Pearl Button Trim, and Pearl Flower Trim that were cut individually, and glued to the center of each rosette.


To tie in the picture to the layout, I used a few wood tokens as centers for some of the rosettes -the wood tokens come from the Wood Classic Tokens,  Wood Love Tokens,  Wood Beloved Tokens - .  A little bit of gold acrylic paint was all that was needed to add some shine to each of the tokens.   In addition, since the papers color palette had some grey in it, i added some Silver Star Pins scattered at the edge of the tree.


Every tree needs a topper!, so I pulled some of the Snowflake Chipboard Set, and used gold foil on two of their matching snowflakes (same star, different sizes) to tie in with the gold shine in the wooden tokens; then just glued them together, and affixed it to the top paper rosette.  Our Christmas tree usually has a large bow right under the star, so I added one of the White Pretty Resin Bow to recreate our Christmas tree.


The Mad 4 Plaid collection comes filled ith beautiful papers fun stickers and die cut pieces.   I used some of the stickers to create clusters around the picture, and one of the die cut pieces "SHINE" serves as the title for this project.   To make the small title/die cut pop, i used the Sparkle and Die Steel Die set to create a few star sequin from some of the 6x6  papers from the collection, and then just glued them around the title.


Here is a close up of one of the clusters around the picture, once again,  i used a combination of embellishments, plus I added my favorite charm from the Ken Oliver Heart & Key Charm set to the cluster.
A few flickers of gold paint, and a few lines of journal complete the page.  Can i say that the beautiful Maya Road along with the Mad 4 Plaid collection from Photoplay made it easy to document a memory in July (it was a humid day the day i created this page!!).

Remember to stop by the blog to check all the projects created this week, and leave a comment on each entry, there will be a prize for a lucky comment.  As usual, let me know if you have questions on how this came together.

See you all soon,

Nathalie-desousa-signature

Maya Road Products used:
Pearl Button Trim
Pearl Flower Trim
 Wood Beloved Tokens
Wood Classic Tokens
Wood Love Tokens
Wood Beloved Tokens
Silver Star Pins
Snowflake Chipboard Set
Pretty Resin Bow
Sparkle and Die Steel Die set
Ken Oliver Heart & Key Charm set

Mar 24, 2017

Dream


Scrapbook Layout created for Maya Road  -  DREAM-


Hello Roadies!
Happy Spring to you all!
Nathalie here with you today sharing a new scrapbook layout using one of my favorite Maya Road products:  dies.
Maya Road - MArch

Maya Road offers a large selection of dies that are just so beautiful, and can be used for all kinds of crafts.  This time, I wanted to share the last project created for Creativation 2017 using  the Geometric Stars Die set.

DREAM-4

This project started with a bit of mixed media on the background.  By simply using some watercolor, and the packaging technique, the background was set to look like a blue sky.   While it dried,  A large moon was cut on the Silhouette Cameo.   I wanted to keep the layout monochromatic, but brought just small color pops by backing the cut file with papers from Maggie Holmes' Gather collection.

DREAM-5

A little bit of hand stitching does not only secure the cut files together, but adds texture to the project.  Before gluing the crescent moon to the background,  a hole was poked at the top  corner of the moon.  Here I used some crochet thread to attach two Star Bright Charms, and  a Ken Oliver Vintage Heart and Key Charms, so that they hung on top of the picture i was about  to add.

DREAM-3


The picture of my little sleeping on my brother in law's arms was perfect for this layout.  I simply layered some gold vellum behind the picture, and a piece of Ken Oliver's Vintage Trim- Rick Rack edge -.    A small cluster was created at the opposite side of the picture using a Journaling Wood Token, some Vintage Crafting Tassels (Milk white), and a small Chipboard heart (colored with gold paint)

DREAM-2

To add to the dreamy feeling of the project, the Geometric Stars die was used to cut smooth white card stock.  A small piece of gold marbled vellum was then sandwiched between two of the die cuts, so that there white edge of the star will show on both sides.   These stars were then attached to create clusters around the big crescent moon.

DREAM-6


To finish the project, a large cork sticker was added to create the title for this piece, and some small embellishments just add little pops of color around the page.  Here is the final layout:


I hope this serves as inspiration to stop by the Maya Road on-line store, and check all the beautiful projects being used in this project, as well as the large selection available.  Remember to use the code DIESOFMARCH to receive 25%off all your die purchases until March 31st.

As always, I am a comment away if you have any questions on how this project came together.

Thanks for stopping by!

Nathalie-desousa-signature


Materials Used:
White cardstock 
Watercolor - Prima Marketing - the classics, the tropicals
Clique Kits - October and December, January kits


Maya Road products used:
Geometric Stars Die set
Star Bright Charms
Ken Oliver Vintage Heart and Key Charms
Journaling Wood Token 
Ken Oliver Vintage Trim - Rick Rack Edge
Vintage Crafting Tassels - Milk White-
Mini Heart Chipboard set