Showing posts with label steel dies. Show all posts

Oct 11, 2018

Altenew October 2018 Stamp/Die Release Blog Hop + Giveaway


Hi there!

Welcome to  the Altenew October 2018 Stamp/Die Release Blog Hop + Giveaway.  You should have arrived from  Kymona Tracey's blog .


I am so excited to have been invited by Altenew to be part of this release blog hop, and couldn't just chose one stamp or die set, as there are so many beautiful products being released this month.  So, let's better show you some of the beautiful products at work.


It is no secret i love flowers, and the new Layered Floral Elements Die is the complement  to the  Floral Elements stamp/die set.   For this project, I chose to use the die to create all the flowers, leaves and stems that you see on the page.   The Paige Evans cut file in the background comes to live with all the details in the layered flowers.   All the Floral Elements die cuts were created from cardstock, and then combined to form the clusters around the page.   A few stamped leaves (from the Floral Elements set) helps to add dimension to the page.  The following video will show you how this was put together:


Love all the soft tones and details in the Layered Floral Elements bring out the details in the cut file, and are the perfect contrast/complement to the picture of my daughter.  But, since we are talking dies,   then let me show you a few more projects created with two of this month's new die sets,  the Classic Alphabet Die, and The Layered Snowflakes Die sets.


If you have seen my work, then you know that i love adding large titles/words as part of the focal point of my projects.  The new Classic Alphabet Die set is, then, a must have in my die  collection, as the font is clear and clean, and the perfect size!  For  this project, I chose to cut the word "NOEL"  in a grid formation from frosted white cardstock. The center of the "O" was then replaced with a layered snowflake created using the new Layered Snowflakes die set.  The gold and frosted white snowflakes bring enough shine and interest to this simple and elegant card.


But what to do with the cut letters (created with the Classic Alphaber die set) from the previous card, well how about combining them with a few snowflakes (created using the Layered Snowflakes set) in another card.  This time a bit of Altenew Sapphire Crip Dye ink was used to create the background.  the negative left from cutting the snowflake was used as a stencil to repeat the shape on the background using ink.   Then the letters and snowflakes were glued, followed by a few small diamond accents for some shine.   The beautiful new die set are so versatile, that can easily transform
your projects.


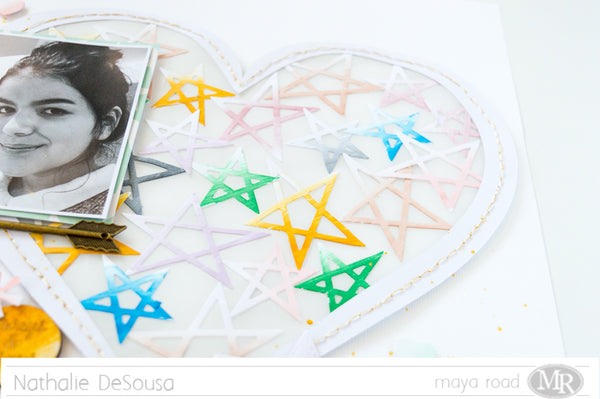
For this project i decided to mix a few of my favorite techniques with the new Classic Alphabet Die set and the gorgeous Always There Stamp set.   First i used the "X" and "O"  to create the background and title of this page, and then combined a few sets of Altenew Crips Dye Inks and the Always there stamp set to create the cascade of flowers that are set on the page.   You are welcome to watch the following video on how this page was put together:


How fun are all those colorful florals combined with the awesome Classic Alphabet Die!   Well, this month's Altenew releases are so gorgeous and so versatile, i had so much fun combining them to create diverse projects.  


For this project, I used a combination of the new Brilliant Baubles Stamp set and the Layered Snowflakes die set to create a very Holiday inspired layout.   This time, i used a bit of black paint to create a messy background for the page.   While the paint set, i used a few of the Altenew Crisp Dye inks and the Brilliant Baubles Stamp set to create all the Christmas decorations.  At the same time I created a few of the Layered Snowflake die cuts from white cardstock.


Once the paint set, all the elements -the stamped Brilliant Baubles images, and the Layered Snowflakes die cuts- were used to create clusters around the page and picture of this page.   All the color and texture on the page bring that happy and cheery feel of the season!.  And now to my last project.


I fell in love with the shape and movement in the new Playful Blooms Stamp and Die set.  Now combine it with the new Classic Alphabet Die set, and i call it perfection.   I chose to work with    yellow and teal-blue tones of the Altenew Crisp Dye Inks to create the stamp Playful Bloom images.  The shape of the stems in the  flowers helped to create the movement in this page which nicely flows to the die cut title of the page.  This was a joy to put together in a short amount of time, the following video will show you how it all came together:


<<<<< The giveaway in this blog is now closed>>>>>

thank you all for such lovely comments.  you all know how to put a smile on my face.  Unfortunately i can only pick one winner; so, drumroll please:


Congratulations MIRIAM PRANTNER you are the winner of the $30 gift certificate to Altenew. 
Please email Altenew at winner@altenew.com by 10/30/2018 with the subject line Altenew October 2018 Stamp/Die Release Blog Hop Winner from Nathalie's Blog to claim your prize.


.>>>>>GIVEAWAY IS NOW CLOSED>>>>
And now to the fun part of this hop!  A chance to win some prizes:
1.   To celebrate this release, Altenew will be giving 6 lucky winners a  $50 gift certificate to the store.  All you have to do is leave a comment on the Altenew Altenew Card Blog and/or Altenew Scrapbook Blog by 10/17/2018 for a chance to win. Winners will be announced on the Altenew blogs on 10/20/2018
2. You can also win a $30 gift certificate to the Altenew Store by leaving a comment in this blog. One lucky winner will be selected from all the comments left on this blog on 10/17/2018, Good Luck everyone!!!

 It is now time to hop onto the next talented designer's blog...Norine Borys to complete the blog hop loop.  Here is the list of all the blog hop participants for your convenience:


Thanks for visiting!!!!


Materials used:


May 21, 2018

Beach Fun


Scrapbook Layout created for Maya Road  - BEACH FUN -


Hi there Roadies!
Nathalie with you today bringing you a bit of inspiration using the beautiful Maya Road products in a new 12x12 scrapbook page.


Well, after the long winter here in Canada, I think I am ready for Summer to arrive, so I decided to pull some tropical colors to create a page about one of our beach vacations.


To start,  I used the Tropical Flowers Die set to cut flowers and leaves from Pink Paislee's Confetti Wishes collection.   A bit of foam adhesive was used to adhere the center to each flower.


I used the negative part of the die cuts to add  a bit of mixed media to the background.  I simply laid the negative part on the white cardstock, and then used a stencil brush and some art crayons to add some leaf details to the background.


Next, I glued the die cuts onto the cardstock, so that they cover the top part of the page, and then glued the picture on the middle of the flowers.  One of the Wood Classic Tokens was painted with gold watercolor and added to the top corner of the page.


Next i used the Lowercase chipboard to create the title for this page.  Once i had the letters for the title, i also used the same shade of gold watercolor to add a bit of shine to the letters.  Once they dried, the title was glued to the page. A few lines of journal, and gold ink splatters complete the page.


This page came together in no time.   The beautiful Maya Road dies are so easy to work with, and cut paper like butter. 
Stop by the Maya Road store to check all the products available, there is so many to chose from that will for sure inspire you to get creative!
Do not hesitate to contact me if you have questions on how this came together.

Take care,


Maya Road products used:

Jan 22, 2018

Grateful


Scrapbook Layout created for Maya Road  - GRATEFUL -


Hi there, Roadies!!

Nathalie with you today to bring you a bit of inspiration using the beautiful Maya Road products.   It has been a rather cold and snowy winter here in Toronto (Canada), so I have been thinking of better days ahead, and decided to create a cheery layout.


Lately, I have been feeling uninspired, so to kick back my mojo, I pulled some watercolor and a few of the Maya Road dies.


For the background, i used a combination of two of my Prima watercolor palettes and some watercolor paper to try and recreate the background of the picture.


While the background was drying, I used the Geometric Feather Steel dieBe Brave Die Set, and the Geometric Heart Steel Die  to cut a few images from papers from the Quartz Rose collection from Prima Marketing.


Once the watercolor background had dried,  and the picture had been put in place.   A few images from the  Rose Garden Sentiment stamp set  were added (with grey Archival Ink) around the background to mark the places were the clusters of die cuts will be placed.


To create the clusters on the page,   few fussy cut flowers and die cuts were used.  In addition, a Feather clip was added to the top corner's cluster, and different sentiments from the Golden Moments Kit stamp set were added around the clusters.


To create the title of this page, a banner was cut, from one of the collection's papers, using the With Love Nature Die bundle;  and the  word "GRATEFUL" was stamped on it using the Just My Type Stamp Sheet.    After that a few lines of journal, and a few drops of rose gold ink complete the page.


This page came together in less than an hour ( it took that long to have the watercolor background dried completely), and it was the perfect cure for the case of the Blahs.   I hope this inspires you to visit the Maya Road Store   to check for some of the materials used here.

Remember, I am just a comment away if you have questions on how this came together.

XOXO,


Oct 5, 2017

It Is In The Stars


Hello there!
 Hope you all are doing well!
Nathalie with you today, and I am so excited to kick off the Maya Road & Chameleon Pen collaboration.  For the next few Fridays some of the Maya Road DT will be sharing some inspiration using the amazing (trust me they are amazing!!!) Chameleon Changing color pens on some of the beautiful Maya Road products.


Upon receiving the Chameleon Pens, i spent just a few minutes learning how to control the changing color in them.  They are that easy to work with, and actually, I decided to  treat myself, and bought a few more sets for my  studio.   But let me show you what i created with these pens:


Maya Road_Nathalie DeSousa_SHINE BRIGHTLY ALWAYS & FOREVER


It all started with some white cardstock,  I used some the Geometric Star DiesSparkle and Shine Die setCloud Die set to cut  a few stars, hearts, asterisks, and sequins from the white cardstock (i used Neena cardstock for the die cuts).


To bring color to the page, i chose a colorful palette of the Chameleon Pens to color the die cuts as if giving them an ombre look.  The palette used for the die cuts contains:  BL6 Royal Blue, CG8 Cool Gray, GR3 Green Grass, NU1 Bisque, NU3 Fawn, PK2 Dusky Rose, VO2 Mauve, and YO3 Warm Sunset.  It was so easy and fast to achieve the color in the die cuts.  These pens actually worked amazingly when adding highlights to the sequin die cuts as to create a sense of dimension on them.


Once I had all the  Geometric Stars die cuts, i glued them to a piece of vellum, and then stitched a  large heart cut out to the vellum to create the background for this page.


All the small die cut pieces were then scattered at the corners of the heart as to create the effect of cascading confetti on the page.   To bring more color, the pens were used to shade in some chipboard stickers (Freckled Fawn) so that they matched the color scheme on the page.  In addition, i used  the  Golden Moments Mini Kit stamp set to add a few sentiments along the scattered confetti.


Finally to create the title of this page, i used the YO3 Warm Sunset Chameleon pen to  color the  title words from the Danielle Mini Alphabet Chipboard set, and a  Wood Token.  Then  used the With Love Nature Die bundle to cut the small banner and stamped the word 'brightly' using the Just My Type Stamp Set.     Finally, I accented the title by adding one of the Arrow Charms just below the picture.  Totally in love with the final result of this page, and now i want to show you what else i was inspired to create with these products.


A few years ago, I created a series of tags and used them to decorate presents.  Well, they are quickly disappearing, so i thought i would take  this opportunity to create a new one for my stash.


It all started when i cut a large star from a tag - i off centered the star on the tag-.  Then used the VO2 Mauve Chameleon Pen to color a  piece of cardstock , and backed the cut out star using a bit of foam adhesive.


Using the With Love Script die, I cut the sentiment to this tag, and glued it straight onto the colored cardstock.


I used some of the leftover stars from the layout to add a  large cluster to the bottom of the tag;  the pens also work on vellum, so i  used one of the vellum die cuts to add some softness in this tag.   This time, I added the PK4 Peony Chameleon Pen to the palettes so that i could color some Maya Road paper flowers.   By simply adding color to the edges and middle of each flower, i was able to add some antiquing, and detail to the flowers.


A tag is not completed without a piece of string or, in this case, lace to be able to attach it to the present.  So i used the VO2 Mauve Chameleon pen to add the same tone to a piece of Ken Oliver Vintage Trim Rick Rack edge.


I am so pleased with how these projects came together.  The Chameleon pens make it a breeze to create colorful projects.
Remember to stop by the Maya Road store to check all the products used in this page, and trust me you want to check the Chameleon Pens, they are amazing!!!

See you all soon!


Maya Road Products: