Showing posts with label layout. Show all posts

Aug 20, 2020

TOTALLY AWESOME BOYS - Simple Stories


Hi there!
Nathalie with you today to share a new page that is all about boys and their magical bond.   It is always a treat when a masculine line is perfect to document those especial people in your life.  The new BRO & CO collection from Simple Stories is just perfection in a kit, which made this page come together easily...


I wanted to play with paper for this page, so i started by cutting the strips from the So Rad! paper and then cut strips of paper that matched the colors of the paper ( Total Legit!, Killin' It!, You Rock!, 2x2 Elements).  


I used the Birch/Grid Sn@P basics paper as the background for the page, and created the chevron pattern with the paper strips, making sure they formed that weaved pattern as they met in the center of the chevron.  Here is where i handstitched the strips in place.


The picture was backed and layered with the Level Up! and So Rad! papers, and then placed in between the chevron lines.  There are so many cute and fun embellishments, it was easy to create clusters around the page.


The foam stickers in the collection are a must have!!! I combined them with the Color Vibe Navy Foam Alphas to complete the title work. A few more stars, brads and stamped images complete this layout.


This layout was so fun and easy to put together, and i love how the design and colors bring the focus to the picture of my son and nephew.   Remember to check the BRO& CO collection, you are going to love it!

XO


Jan 27, 2020

HELLO BEAUTIFUL - Scrapbook Nerd


Hi there

I love paper, and usually Heidi Swapp collections are my favorite, so i asked my friends at Scrapbook Nerd if they could order the collection, and i love how they are able to accommodate your preorders.  So i am using it today to share this page on their youtube channel.


I started with a cut file from Handipaper, and cut it three times from white cardstock -making one frame larger than the rest-.  I used the papers in the collection to back the frames.


I backed the larger polaroid with a picture of my daughter, and used the specialty paper to back the frame picture spaces.   Before setting on the background, i added a bit of white paint  to haze the background.


The images are set on the background with foam adhesive.  Since the frames are delicate, i wanted to keep the decorations to a minimum, and just added a few details around them.


I used the vellum foiled pieces to create the title, and then added a few stars around the page.  The background was trimmed and then framed with a paper from the collection.


The final touch were a few sprinkles of white paint and copper color shine.  I love how this turned out, and how easy it came together.  You can see the entire process in the following video:


Don't forget to check Scrapbook Nerd for the materials used in this page, they are amazing at ordering your products.  If you have questions on how this came together, please do not hesitate to contact me!

XO


Oct 31, 2019

BOOTIFUL - Altenew


Hello there and Happy Halloween!   Let's create a Halloween Layout with Altenew Antique Roses and Sweet Rose Bouquet Stamp sets.  Nathalie here to show you how  to combine the sweet and delicate design of the stamps sets and color.   I chose these two stamp sets because of their elegant design, softness and classical look.

  @Altenew- Halloween Layout with Altenew Antique Roses and Sweet Rose Bouquet stamp set by Nathalie DeSousa 

   I chose a very vivid and festive color palette for this page -representative of the holiday-.   My choices of color to create the flowers for this page include: Shades of Purple, Warm Gray, Warm and Cozy Rock Collection,  Golden Sunset mini cube sets, as well as Mocha and Jet Black ink pads.  


  It was so easy to build this Halloween Layout with Altenew products as there are so many to chose from.  I mixed  a bit of Lava Rock Liquid Watercolor refill  and Jet Black Liquid Watercolor -Brush marker refills to add a touch of black to the background, and to create my own patterned paper.  


I used the Delicate Mandala die to create a large doily which was used as the backing layer behind the picture.   The curvature of the mandala die cut created the best place for the title of this layout, "BOOTIFUL".  I think the Puffy Alphas in the Reflection Scrapbook collection are the perfect font for this Halloween Layout.  


All the flowers created from the Antique Roses and Sweet Rose Bouquet stamp set were then added to the page so that they surround the picture.  All the Halloween colors along with the classical floral design do make this a magical page.  The following video will show you how this page came together: 


   I hope this inspires you to use ALTENEW's products to document your Halloween memories.   Remember you can contact me with any questions about this page.  


Happy Halloween everyone!!

Mar 1, 2019

ALTENEW BUILD-a-FLOWER: DAHLIA Release Blog Hop + Giveaway


Hi there and welcome to the Build-a-Flower: Dahlia Release Blog Hop and Giveaway!   You should be arriving from the talented Emily Midgett's blog.      I am so happy you are joining me today as i show you a few projects created with the beautiful Build-a-Flower:  Dahlia Stamp and Die set.


For my  first project i chose to create a card using the Build-a-FLower: Dahlia Stamp and Die set and pairing up with the Leaf Medallion die.   I chose to stamp the flowers on mixed media paper and used the Altenew watercolors pan set to detail them and bring losts of dimension to the image.


To make the Dahlia stamped images stand out, i used the Leaf Medallion die to create the background from dark brown metallic paper from Tim Holtz.  This was all glued to a white cardstock panel.  The sentiment also comes from the Build-a-Flower:  Dahlia stamp set.   I chose this time to use a wine color card base as it frames the card pannel nicely.    Totally love how easy this was to put together.


After creating the card, i was totally loving the color combination, so i decided to use it to create this layout about my new baby cousin -my Goddaughter-.  This time, i chose to detail the Dahlia stamped images with the Altenew Shade of Purple, Rose Petal, Tropical Forest, Green Fields Crisp Ink Mini Cubes.


To have the colors of the flowers stand out, i paired them with a few papers from the Verdant 6x6 paper pad, and embellishments from the Acetate Butterfly collection.


The title was created using the Mini Hello stamp set and the Charmed Stamp set, and placed opposite to the picture in the layout.   The following video will showcase how this page came together:


The beautiful blooms from the Build-a-Flower: Dahlia set are the perfect background to the sweet picture of my new baby cousin.     The delicate images are so perfect to create all types of projects beyond cards and layouts.  Remember to stop by Altenew to check the new Build-a-Flower: Dahlia stamp and die set, or better yet sign in for the BAF subscription which will provide you with the monthly Build-a-Flower release at a discounted prize .


And now to the fun part of this blog hop...

GIVEAWAY

  • To celebrate this release, Altenew is giving away a $30 gift certificate to 6 lucky winners! Please leave a comment on the Altenew Card Blog and/or Altenew Scrapbook Blog for a chance to win. Three winners will be announced on the Card Blog, and the other three winners will be announced on the Scrapbook Blog on 3/9/2019.
  • I will be also be drawing a lucky comment for a chance to win a $20 gift certificate to the Altenew Store. The winner will be announced on March 6, 2019.
GOOD LUCK everyone!


Thank you all so much for your lovely comments.   The winner of the $20 GC to Altenew is:


Please email winner@altenew.com by 3/15/2019 with the subject line BAF: Dahlia Release Blog Hop Winner from Nathalie DeSousa's Blog.


Thank you so much for stopping by, and now it is your chance to continue being inspired with all the projects created for this blog hop. Your next stop is  the Altenew Scrapbook Blog.  You can always come back here to start your loop, or stop by the Altenew Card Blog.   A list of all the participants has been added for your convenience.


have a blessed day!

Nathalie

Dec 22, 2017

Time Together


Scrapbook Layout created for Citrus Twist Kits  - TIME TOGETHER -


Hi there!

It is time to show you one more project created with the beautiful December "Sonoma" kit from Citrus Twist Kits.   This time, I limited my color palette, and decided to add mixed media to create this simple and clean design.   


It all started by using some watercolor to create the soft background.  Then a few details were added using some gold modeling paste through a stencil.     The finished background was then stitched to some pieces of paper from the kit!


To keep the page simple, the clusters on the pictures were also limited to the same color palette, and built completely by layering ephemera and sticker pieces.


To complete the visual triangle, a small cluster of pieces and mixed media was added to the opposite side of the picture.    A thin line of gold ink drops and stencil lines connects this cluster to the picture.  Here is the final layout:


Love the soft feel of the page, and the layers of mixed media and papers created in this layout. 
I hope you are inspired to create a page of your own,   Remember to check Citrus Twist Kits for all their kits  (they are all gorgeous!!!).   I am always a comment away if you have questions on how this came together.


Take care!

Dec 20, 2017

Joyful Joyful Heart


Scrapbook layout created for Wild Whisper  - JOYFUL JOYFUL HEART -


Hello there!


I am up on the Wild Whisper blog with my last project as part of their design team. 

The layout was created using their new HOME FOR THE HOLIDAYS collection, some mixed media, and a Paige Evan's cut file.


Stop by the Wild Whisper Design website to check all the collection, and all the details on this page.   It has been a pleasure working with their products, plus Suzy and Heather are lovely!  Will miss them both! 

It is all for me for now!


See you soon!

Oct 5, 2017

It Is In The Stars


Hello there!
 Hope you all are doing well!
Nathalie with you today, and I am so excited to kick off the Maya Road & Chameleon Pen collaboration.  For the next few Fridays some of the Maya Road DT will be sharing some inspiration using the amazing (trust me they are amazing!!!) Chameleon Changing color pens on some of the beautiful Maya Road products.


Upon receiving the Chameleon Pens, i spent just a few minutes learning how to control the changing color in them.  They are that easy to work with, and actually, I decided to  treat myself, and bought a few more sets for my  studio.   But let me show you what i created with these pens:


Maya Road_Nathalie DeSousa_SHINE BRIGHTLY ALWAYS & FOREVER


It all started with some white cardstock,  I used some the Geometric Star DiesSparkle and Shine Die setCloud Die set to cut  a few stars, hearts, asterisks, and sequins from the white cardstock (i used Neena cardstock for the die cuts).


To bring color to the page, i chose a colorful palette of the Chameleon Pens to color the die cuts as if giving them an ombre look.  The palette used for the die cuts contains:  BL6 Royal Blue, CG8 Cool Gray, GR3 Green Grass, NU1 Bisque, NU3 Fawn, PK2 Dusky Rose, VO2 Mauve, and YO3 Warm Sunset.  It was so easy and fast to achieve the color in the die cuts.  These pens actually worked amazingly when adding highlights to the sequin die cuts as to create a sense of dimension on them.
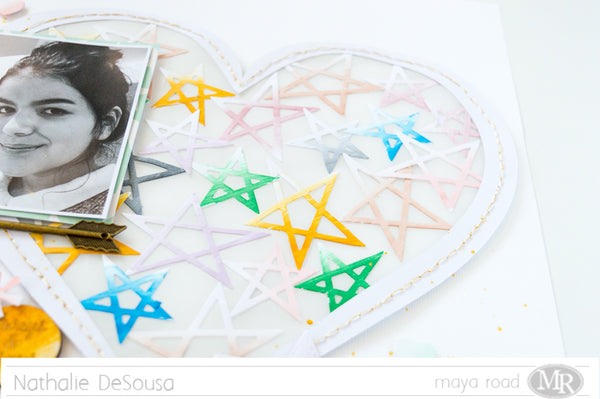


Once I had all the  Geometric Stars die cuts, i glued them to a piece of vellum, and then stitched a  large heart cut out to the vellum to create the background for this page.


All the small die cut pieces were then scattered at the corners of the heart as to create the effect of cascading confetti on the page.   To bring more color, the pens were used to shade in some chipboard stickers (Freckled Fawn) so that they matched the color scheme on the page.  In addition, i used  the  Golden Moments Mini Kit stamp set to add a few sentiments along the scattered confetti.


Finally to create the title of this page, i used the YO3 Warm Sunset Chameleon pen to  color the  title words from the Danielle Mini Alphabet Chipboard set, and a  Wood Token.  Then  used the With Love Nature Die bundle to cut the small banner and stamped the word 'brightly' using the Just My Type Stamp Set.     Finally, I accented the title by adding one of the Arrow Charms just below the picture.  Totally in love with the final result of this page, and now i want to show you what else i was inspired to create with these products.
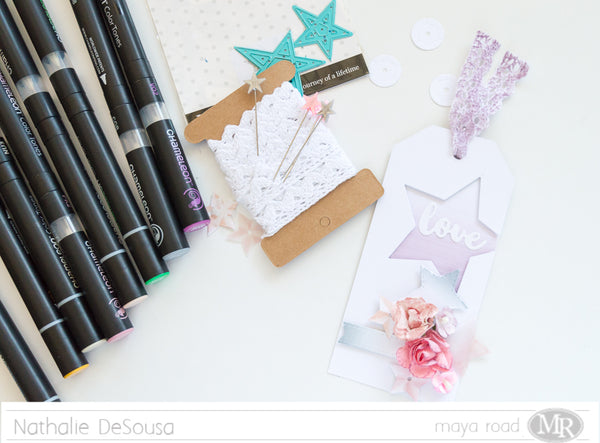


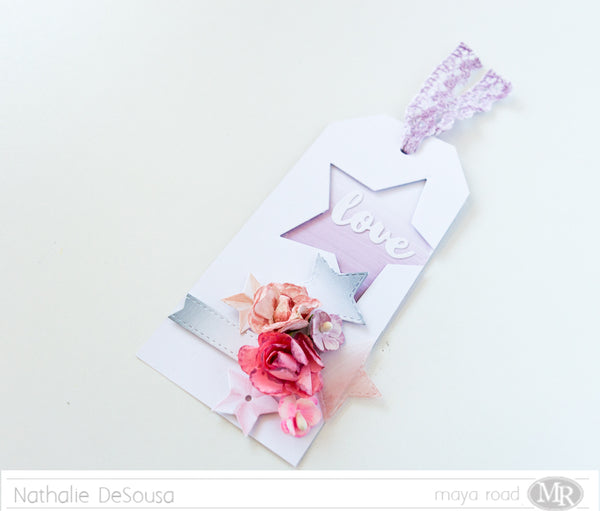
A few years ago, I created a series of tags and used them to decorate presents.  Well, they are quickly disappearing, so i thought i would take  this opportunity to create a new one for my stash.


It all started when i cut a large star from a tag - i off centered the star on the tag-.  Then used the VO2 Mauve Chameleon Pen to color a  piece of cardstock , and backed the cut out star using a bit of foam adhesive.
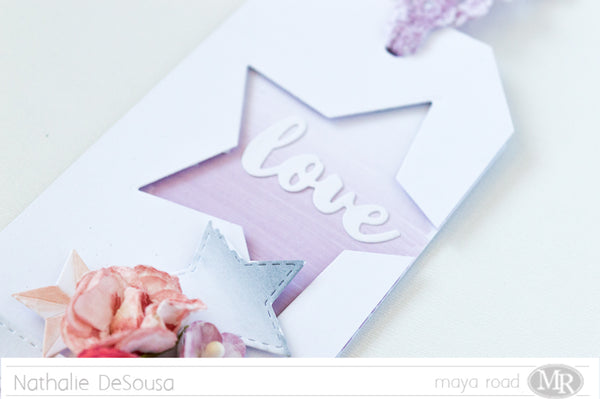

Using the With Love Script die, I cut the sentiment to this tag, and glued it straight onto the colored cardstock.


I used some of the leftover stars from the layout to add a  large cluster to the bottom of the tag;  the pens also work on vellum, so i  used one of the vellum die cuts to add some softness in this tag.   This time, I added the PK4 Peony Chameleon Pen to the palettes so that i could color some Maya Road paper flowers.   By simply adding color to the edges and middle of each flower, i was able to add some antiquing, and detail to the flowers.


A tag is not completed without a piece of string or, in this case, lace to be able to attach it to the present.  So i used the VO2 Mauve Chameleon pen to add the same tone to a piece of Ken Oliver Vintage Trim Rick Rack edge.


I am so pleased with how these projects came together.  The Chameleon pens make it a breeze to create colorful projects.
Remember to stop by the Maya Road store to check all the products used in this page, and trust me you want to check the Chameleon Pens, they are amazing!!!

See you all soon!


Maya Road Products: