Showing posts with label product swap. Show all posts

Oct 5, 2017

It Is In The Stars


Hello there!
 Hope you all are doing well!
Nathalie with you today, and I am so excited to kick off the Maya Road & Chameleon Pen collaboration.  For the next few Fridays some of the Maya Road DT will be sharing some inspiration using the amazing (trust me they are amazing!!!) Chameleon Changing color pens on some of the beautiful Maya Road products.


Upon receiving the Chameleon Pens, i spent just a few minutes learning how to control the changing color in them.  They are that easy to work with, and actually, I decided to  treat myself, and bought a few more sets for my  studio.   But let me show you what i created with these pens:


Maya Road_Nathalie DeSousa_SHINE BRIGHTLY ALWAYS & FOREVER


It all started with some white cardstock,  I used some the Geometric Star DiesSparkle and Shine Die setCloud Die set to cut  a few stars, hearts, asterisks, and sequins from the white cardstock (i used Neena cardstock for the die cuts).


To bring color to the page, i chose a colorful palette of the Chameleon Pens to color the die cuts as if giving them an ombre look.  The palette used for the die cuts contains:  BL6 Royal Blue, CG8 Cool Gray, GR3 Green Grass, NU1 Bisque, NU3 Fawn, PK2 Dusky Rose, VO2 Mauve, and YO3 Warm Sunset.  It was so easy and fast to achieve the color in the die cuts.  These pens actually worked amazingly when adding highlights to the sequin die cuts as to create a sense of dimension on them.
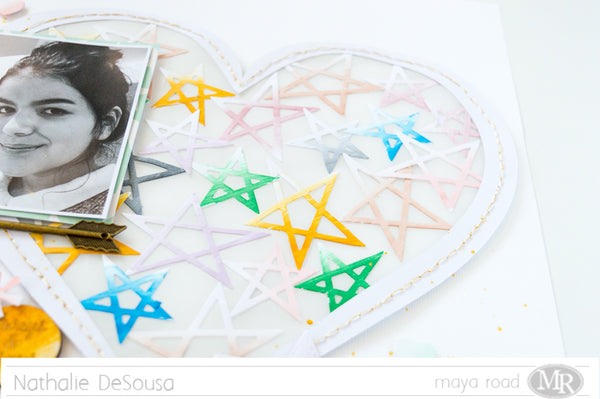


Once I had all the  Geometric Stars die cuts, i glued them to a piece of vellum, and then stitched a  large heart cut out to the vellum to create the background for this page.


All the small die cut pieces were then scattered at the corners of the heart as to create the effect of cascading confetti on the page.   To bring more color, the pens were used to shade in some chipboard stickers (Freckled Fawn) so that they matched the color scheme on the page.  In addition, i used  the  Golden Moments Mini Kit stamp set to add a few sentiments along the scattered confetti.


Finally to create the title of this page, i used the YO3 Warm Sunset Chameleon pen to  color the  title words from the Danielle Mini Alphabet Chipboard set, and a  Wood Token.  Then  used the With Love Nature Die bundle to cut the small banner and stamped the word 'brightly' using the Just My Type Stamp Set.     Finally, I accented the title by adding one of the Arrow Charms just below the picture.  Totally in love with the final result of this page, and now i want to show you what else i was inspired to create with these products.
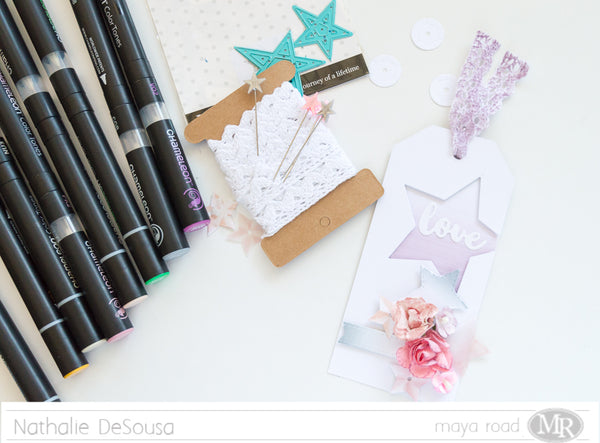


A few years ago, I created a series of tags and used them to decorate presents.  Well, they are quickly disappearing, so i thought i would take  this opportunity to create a new one for my stash.


It all started when i cut a large star from a tag - i off centered the star on the tag-.  Then used the VO2 Mauve Chameleon Pen to color a  piece of cardstock , and backed the cut out star using a bit of foam adhesive.
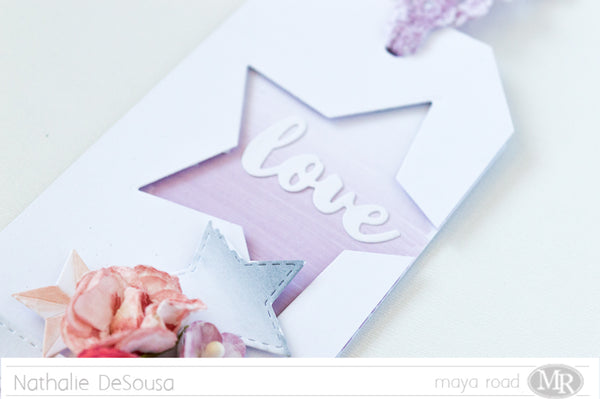

Using the With Love Script die, I cut the sentiment to this tag, and glued it straight onto the colored cardstock.


I used some of the leftover stars from the layout to add a  large cluster to the bottom of the tag;  the pens also work on vellum, so i  used one of the vellum die cuts to add some softness in this tag.   This time, I added the PK4 Peony Chameleon Pen to the palettes so that i could color some Maya Road paper flowers.   By simply adding color to the edges and middle of each flower, i was able to add some antiquing, and detail to the flowers.


A tag is not completed without a piece of string or, in this case, lace to be able to attach it to the present.  So i used the VO2 Mauve Chameleon pen to add the same tone to a piece of Ken Oliver Vintage Trim Rick Rack edge.
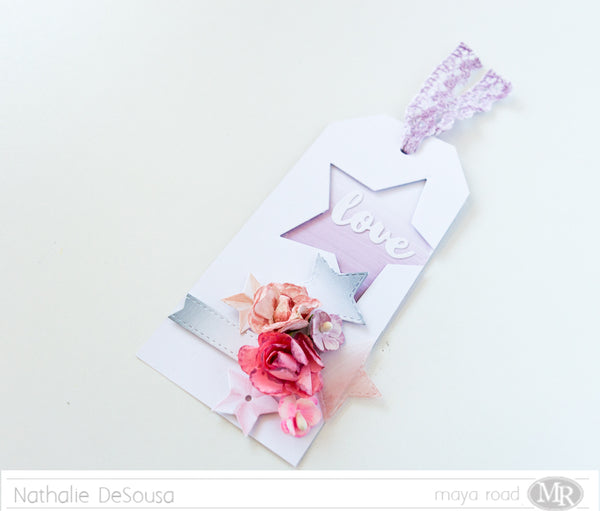


I am so pleased with how these projects came together.  The Chameleon pens make it a breeze to create colorful projects.
Remember to stop by the Maya Road store to check all the products used in this page, and trust me you want to check the Chameleon Pens, they are amazing!!!

See you all soon!


Maya Road Products:

Aug 18, 2017

Shine


Scrapbook Layout created for Maya Road   - SHINE -


Hi there!


I hope you are all doing well.  Today, i am up on the Maya Road DT blog with the  last day of the Maya Road and Photoplay Product/Blog swap.    Please visit the Maya Road DT blog to see all the deatails of the swap.   But know let me show you what i created for this swap using the beautiful Maya Road products, and the super fun Mad 4 Plaid collection from Photoplay.


For my project, I wanted to recreate a Christmas tree just like the one my daughter is sit under in the picture.  Since there are so many beautiful patterns in the Photoplay's  Mad 4 Plaid collection,  i tried to combined them all by using 1x12 in long strips to create paper rosettes.  These were then glued -and stacked- to recreate the Christmas tree silhouette.


Once the entire tree shape was created, I started adding details to the center of each rosette using the sequin stickers from the Mad 4 Plaid sticker sheet, along with some of the Maya Road Pearl Button Trim, and Pearl Flower Trim that were cut individually, and glued to the center of each rosette.


To tie in the picture to the layout, I used a few wood tokens as centers for some of the rosettes -the wood tokens come from the Wood Classic Tokens,  Wood Love Tokens,  Wood Beloved Tokens - .  A little bit of gold acrylic paint was all that was needed to add some shine to each of the tokens.   In addition, since the papers color palette had some grey in it, i added some Silver Star Pins scattered at the edge of the tree.


Every tree needs a topper!, so I pulled some of the Snowflake Chipboard Set, and used gold foil on two of their matching snowflakes (same star, different sizes) to tie in with the gold shine in the wooden tokens; then just glued them together, and affixed it to the top paper rosette.  Our Christmas tree usually has a large bow right under the star, so I added one of the White Pretty Resin Bow to recreate our Christmas tree.


The Mad 4 Plaid collection comes filled ith beautiful papers fun stickers and die cut pieces.   I used some of the stickers to create clusters around the picture, and one of the die cut pieces "SHINE" serves as the title for this project.   To make the small title/die cut pop, i used the Sparkle and Die Steel Die set to create a few star sequin from some of the 6x6  papers from the collection, and then just glued them around the title.


Here is a close up of one of the clusters around the picture, once again,  i used a combination of embellishments, plus I added my favorite charm from the Ken Oliver Heart & Key Charm set to the cluster.
A few flickers of gold paint, and a few lines of journal complete the page.  Can i say that the beautiful Maya Road along with the Mad 4 Plaid collection from Photoplay made it easy to document a memory in July (it was a humid day the day i created this page!!).

Remember to stop by the blog to check all the projects created this week, and leave a comment on each entry, there will be a prize for a lucky comment.  As usual, let me know if you have questions on how this came together.

See you all soon,

Nathalie-desousa-signature

Maya Road Products used:
Pearl Button Trim
Pearl Flower Trim
 Wood Beloved Tokens
Wood Classic Tokens
Wood Love Tokens
Wood Beloved Tokens
Silver Star Pins
Snowflake Chipboard Set
Pretty Resin Bow
Sparkle and Die Steel Die set
Ken Oliver Heart & Key Charm set

Jun 23, 2017

Summer Chill


Scrapbook Layout created for Maya Road   - SUMMER CHILL -


18951455_10213846628748334_9155030161043053618_n


Hello Roadies!

I am the one to wrap up the Maya Road & Simple Stories product swap.  I hope you all have been inspired by all the beautiful projects members of both design teams have been sharing this week.
I am lucky to serve as a member on both design teams, so this project was a dream to work on.   Today, I am bringing you a new layout that was completely inspired by the floral designs in the new Summer Days collection by Simple Stories.


The flowers in this collection resemble the ones from the  Maya Road Flower Die Set.   So i pulled some white texture card stock, and cut a few of the flower die cuts.  Since I wanted to make this page cheery and fun, I pulled the So Much Fun paper from the Summer Days collection to serve as the mat for this layout.


The color lines in the paper was the  starting point for the color blocking in the die cuts.  I simply used watercolors and inks to try (at best!) to replicate the colors of the paper lines in the die cut flowers, and leaves. To tie in the design, the centers of all the flowers were cut from the B side of the Lazy Days paper.


Once the picture of one of my littles was set in the center of the page, all the flowers were attached to the page following the color line they landed on.  Now it came time to decorate, and embellish!


I chose to add some wood tokens from the Wood Snapshot Token set, and the Wood 24/7 Journaling Tokens as centers in two of the flowers closest to the picture on each corner.  A Resin Diamond in Snow White as well a few Vintage Pearl - Trinket Pins were added around some of the flowers to bring the white color in the layout's mat.  


MR_ND_SUMMER CHILL prep-2


In addition, i used some of the papers and stickers from the collection to cover some pieces from the Mini Chipboard Heart Confetti Set and Love Chipboard Banner so that they also continue the colorful striped pattern in the layout papers.  A little bit of glue attaches the paper to the chipboard, then a bit of fussy cutting, and you can easily create new chipboard stickers for your projects.  These pieces were then used to frame the picture in the layout along with a few more stickers and paper pieces from the Simple Stories Summer Days collection.


I love the final look of this layout; lots of dimension and different textures bring the happiness of cheerfulness of a pool day on a hot day to the layout.  The Summer Days collection from Simple Stories is just beautiful, and our super versatile Maya Road products bring that special touch to this project.  They are a match made in "Craft" heaven!!

I hope you all have been inspired this week!  Don't forget to check the new Simple Stories  blog for more inspiration, and their new collections, and all the newly released Maya Road products (there are so many new goodies) available on line.  Remember I am comment away if you have questions on how this came together.

Thanks for Stopping by!

Nathalie-desousa-signature


Maya Road Products used:
Flower Die Set
Wood Snapshot Token Set
Wood  24/7 journaling Tokens
 Resin Diamond - Snow White
Trinket Pins - Vintage Pearl
Mini Chipboard Heart Confetti Set
Love Chipboard Banner

Materials used:
Simple Stories - Summer Day collection - papers, stickers, ephemera

Jun 22, 2017

Chilling TIme

Scrapbook layout created for Simple Stories  - CHILLING TIME -


Hello there!

Today I am up on the Simple Stories blog with some projects created for the Simple Stories & Maya Road product swap.  These projects were a dream to create since I am part of the creative team for both companies


My first layout is all about summer,  my daughter's fascination with ice cream floats, some of the Maya Road goodies,  and the super fun Summer Days collection.  The staring point for this layout was the "Lazy Days" paper in the collection.   The spin wheels in the paper was the inspiration for this layout.  So i set out to create a few spin wheel cut-outs using the Cut Shoppe's Spinwheels cut file.


The cut outs were backed using the Lazy Days, So Much Fun, Hello Sunshine, Gotta Wear Shades papers from the Summer Days collection.   The lovely  decorative brads were then used in the centers of each of the spinwheels.


To bring in the colors of the collection to the page, a few splatters of watercolor were used to create a mixed media background on the page.  Once this dried,  the page was trimmed on two of edges, as to continue the movement of the spinwheels, and then attached to the B side of the Lazy Days paper.  All the spinwheels were also glued to the page as if cascading from the top of the page.


And now to embellish the page.  First, I created clusters around the picture using some of the combo stickers, bits and pieces and 4x6 stickers from the collection.  The little mason jar sticker full of lemonade gave me the idea to create a mason jar of my own for this page.


Some white acrylic paint was used to add some color to one of  the  Maya Road Vintage Wood Mason Jar.  To pull more of the colors from the Summer Days collection, some water crayons were used to color the Medium Vintage Paper Flowers , and Ken Oliver's Small Vintage Paper flowers.  Once the wood jar was dried, a piece of Lime Green Jute Twine cording was wrapped around its neck, and all the flowers were then glued to the page.   I just love how the Maya Road products add that charming accent to the page!


To finish the page, the Alphas in the 4x6 stickers were used to create the title.  Oh! I really like the overall look of this page.  It is bright, happy and full of texture, in total a great fusion of both Simple Stories and Maya Road Products.


Materials Used:
Simple Stories - Summer Fun collection - paper kit, sticker combo, brads. ephemera
Simple Stories - Faith collection - Brads
The Cut Shoppe -  Spinwheelsl cut file
Ranger- Distress Oxides - Worn lipstick, Fossilized Amber, Cracked Pistachio, Broken Chine
Maya Road  - White  Vintage paper roses,  Mason jar wood piece, jute cording twine in lime  Ken Oliver's small vintage flowers