Showing posts with label Fancy Free collection. Show all posts

Mar 2, 2017

Stamp and Scrapbook Expo Designer Spotlight


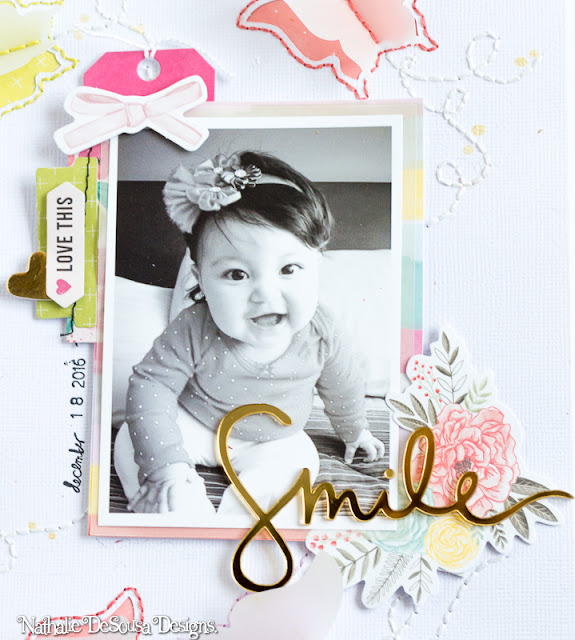
Scrapbook Layout created for Stamp and Scrapbook Expo  - SMILE -


Hello friends!


I  hope you all are doing well.   

Today, it is a super special day for me, as i finally get to share some super exciting news with you all.   A few months ago (a few days before my birthday), the ever sweet Paige Taylor Evans asked if she could feature me in her bi-weekly Designer Spotlight at Stamp and Scrapbook Expo blog.  I had just woken up to the message, and after drying my happy tears, I humbly accepted her offer.  Til this day, I feel so honored, humble and blessed to share my work with you all.  I am forever thankful to my God, for whom i work, and Paige Evans for taking the time to look at my body of work, and giving me this opportunity.


If you have seen  my work before, then you know that i love cut files, embroidery, watercolor, black and white photos, vellum, lots of white, and pretty paper.  I think this layout combines most of my favorite things, and my  goddaughter.   


For this project, I chose one of my favorite cut files (but never used before), "I'll Fly Away", from the Cut Shoppe.   I backed the cut-out with papers from  Pink Paislee's Take Me Away and Fancy Free collections, and stitched the papers in place using embroidery floss that match the colors of the respective paper.  To add dimension to this page, i used the cut file to cut the butterflies out of white vellum, and stitched them on top of the backed image.


I love this picture of my goddaughter, so i layered pieces from the collections in small clusters around the picture, and used a mirror sticker for the title in the page.  I chose to hide my journal, by writing it on some of the butterflies backing papers, and then stitching the vellum on top of it.  Here is the final layout:


I am still pinching myself about seeing my work featured in the Stamp and Scrapbook Expo blog.   I am forever thankful to Paige for having picked me for the spotlight, and hope that you all stop by the Stamp and Scrapbook Expo blog to learn more about me, and see some of my favorite layouts ( it was hard to pick just 4).  just click here to be taken to the blog.


Thank you all for the continuous support, I am amazed that you take the time to see my work.  I really appreciate it.


Remember i am always a comment away if you have any questions, or just to say hello.


Thanks for visiting, today!


Materials Used:
cut file -  I'll Fly Away - The Cut Shoppe

Patterned papers-  Take Me Away & Fancy Free collection - Paige Evans - Pink Paislee
Embellishments - Take ME Away & Fancy Free colelctions - Paige Evans - Pink Paislee
Mirror sticker - On Trend 2 collection - My Mind's Eye
Gold color shine - Heidi Swapp


Sep 27, 2016

Best Ever


Scrapbook Layout created for Scrapbook Nerd (Silhouette Savvy Series - Stretch your Cuts)  -  Best Ever-


a close up of the layout.


Hello everyone,

For today's blog post at Scrapbook Nerd, I  am showing a small tutorial on how to use the left over pieces of a cut-out.  Here is the link to the tutorial:  http://scrapbooknerd.com/?p=4947
I am always looking for inspiration for my layouts.  After creating a cut-out for one of the previous layouts, i realized that the negative side of the cut could be used as an interesting background for a new layout.  


I used the cut out as a guide to transfer the small pieces onto watercolor paper, and started working on creating a new background for this project.  Here is a small video on how the background was put together after being transferred.


Since the background give opportunity to color and texture, I used a few color shine inks to create a mixed media effect.


The background of the layout.


Once the background was dried, I used a  paper piercing tool to create a stitching guide around the heart.

I tried to stay simple with the design, so that the background and the picture will be showcased.


A simple large title works well on this page, as a ways to balance the design.


To finish the page, I added small details around the page, and a few lines of journal  at the bottom of the heart.  Here is the final layout:


I love it (truly love it!).   For more information, on how the cuts were transfer, please visit the Scrapbook Nerd blog.  As always, let me know if you have any questions on how this page came together. 

See you tomorrow!


Materials Used
Cut file - designed by Paige Evans for Studio Calico
Watercolor paper
White card stock - American Crafts
Inks - coral, blush, mustard, cherry, gold, navy, seafoam, green, and white - Color shine collection - Heidi Swapp
Title -Thickers -Fancy Free collection -Pink Paislee
Wood Veneer - Fur Fusion collection - Jillibean Soup
Tabbies - Illutrated Faith
Word stickers - Small chat collection - Tim Holtz for Idea-ology
Stickers - Soft Spoken collection - MAMBI


Aug 5, 2016

Most Favorite Smiles


Scrapbook Layout  -  Most Favorite Smiles -


Hello!

My goal for the next few weeks is to put a dent on my stash, so i can  make space for all the new goodies that are coming my way.  One of my fave collections so far this year has been Paige Evans' Pink Paislee Fancy Free, and i have to use what i was able to get my hands on.  Since, I am always finding ways to document multiple pictures in a layout (it is not my favorite way,  I rather focus on a single picture),  I think that i found a solution by shrinking the pictures and creating collages of them.  Here is a layout I created with some of my favorite pictures of my kids a few years back... 


I used 2x2.5in photos to create this photo strip.


For this project I am using all Fancy Free collection to back and layer the picture as well as the cut file (May Mash-up) from the Cut Shoppe.   I added some dimension to the cut-out by backing some of the spaces with vellum, while others are backed up with a layer of foam between the paper and the cut-out.


i love that shadow the foam dots create behind the cut-out


I attached the  figure to one of the papers from Simple Stories Heart collection, and added ephemera clusters around the figure and pictures.  For the title, i used stickers from the Fancy Free collection and Thickers to complete the word "smiles'.


To complete the project, a hand stitched frame was created in two same-toned embroidery floss around the page.  After adding the date, and the journal lines along the figure, the layout was complete.  Here is the final layout:


I love this layout,  it is simple, delicate and features my babies...

As always let me know if you have any questions about this or any of my layouts.

Till next time,

Happy Scrapping!.


Materials Used:

Patterned papers - #1, 2, 3, 5, 6  - Fancy Free collection, Pink Paislee
Patterned paper mat - Forever in my Heart,  Heart Collection - Simple Stories.
Cork heart sticker -  C'est La Vie collection - Pink Paislee
Wood Pieces,  Fancy Free collection,  Pink Paislee
Puffy stickers-  Fancy Free collection, Pink Paislee
paper Clip,  Freckled Fawn
Smiles Alpha stickers - Heidi Swapp collection
Chipboard stickers - MAMBI collection
Planner icon - THe Happy Planner collection,  MAMBI
Cut file - The Cut Shoppe


Aug 3, 2016

Happy Easter


Scrapbook Layout - Happy Easter -


a close up of the layout


Hi there!,

I am trying to kill all the collections from my stash, as i need to make room for all the goodies that are on my way (trust me I have pre-order enough paper to wallpaper my apartment twice).  One of the collections I want to use up is Pink Paislee's Fancy Free collection (which i love, but couldn't get all the papers and add ons).   Since the colors of the collection remind me of happy times, I chose to use it to document a picture of my son and sister on Easter Day.


A little bit of machine stitching can add lots of texture, and dimension to a layout

I started by cutting  papers of the collection to 2x2in squares.  I lined them up, slightly slanted, on the mat, and proceeded to machine stitched them at about a quarter of an inch inside each square.  After they were all properly attached, I raised the edges of outer edges of the squares ( as seen on the picture).

black and white pictures are my to go choice as they lend to all color combination


I used papers from the collection to mat and layered the picture; all accents come from small clusters of ephemera, stickers and cut-outs.


For the title, I used a combination of Thickers and ephemera pieces.   I added my journal lines at the bottom of the page, and added some extra details.  Here is the final layout:


Though I love this collection, I also love all the new goodies coming my way, so I rather enjoy the pictures, and lovely  papers together.


Till next time. 

Happy Craftin'!


Materials Used:
Patterned papers -  Fancy Free collection #1, 2, 4,  6, 8, 9 - Pink Paislee
Ephemera, puffy stickers, letter Thickers - Fancy Free collection - Pink Paislee
Cork Hearts, ephemera - Cest La Vie collection - Pink Paislee
Puffy stickers - Bloom Collection - Crate Paper
MInc icons - Heidi Swapp collection
Puffy sequin stickers - Felicity collection - Pinkfresh Studio