Showing posts with label fussy cut. Show all posts

Feb 24, 2020

REMEMBER TODAY - Just Nick Studio

Hi there friends!
Nathalie with you today sharing a new project filled with bright and happy memories.  I am so hoping for Spring to arrive, so, i am making my own Spring on my pages with this colorful page filled with flowers and cut files from the JustNick Studio shop.


As soon as i saw the new OPEN FLORAL BACKGROUND, the idea of creating a panel for my layout formed in my mind.  So, i shrunk the design to be 6x6, then used the Silhouette software to weld two of the backgrounds together to create the panel  die cut for the page.


While the background was cutting, i added a bit of white paint and Fossilized Amber Distress Oxide  on a sheet of turquoise cardstock.  In addition, i used the time to fussy cut a few floral images from the Dear Lizzy's She is Magic collection.


To assemble the page, i  first glued the panel onto the background.  The picture was then placed on the page surrounded by all the fussy cut florals.   I cut the word always 4 times from white cardstock using the LOVE YOU ETERNAL cut file.  The die cuts were stacked together as to form a dimensional die cut and this was glued onto the cluster of florals at the bottom of the picture.
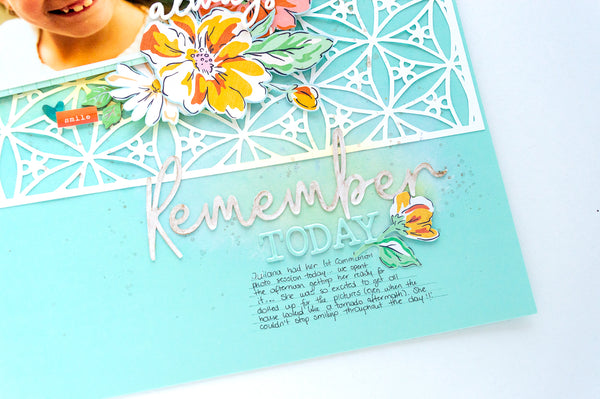


To create the title, i cut the word Remember from the REMEMBER FLORAL cut file twice from white cardstock. Then stacked the die cuts together and finished by adding a light coat of shimmer watercolor on top.   The word along with some alphas complete my page.


Just love how quick and easily this page came together.   The soft panel die cut is the perfect background for this memory of my niece.  Remember to stop by the Just Nick Studio shop to check the cut files used here and all the new designs available.
'Til next time!


Oct 3, 2019

PICTURE PERFECT - Citrus Twist Kits


hi there!

The new Citrus Twist Kits  kits for October have been revealed and i love them all!  As soon as i opened the add on kit and saw this paper from Paige Evans Truly Grateful collection, i knew that i will be fussy cutting the leaves for one one of my pages.


I cut about a third of the paper, and took my time cutting each leaf, making sure that i had a good mix of all the colors and leaf designs.   Then, i arranged them on a piece of white cardstock so that they  looked like they were flying through the page.


Also, besides movement, the leaves were also arranged so that they transition in color as they move through the page.  I glued just the center of the leaves, and then softly curled some of the edges, before using my piercing tool to create holes for my hand stitching.  My idea was to create wind trails for the leaves.


This picture of me finding color on my walks was then framed with a paper that matches the shoes, and then i glued it to the page so that it sits in the center of the page, nestled by the leaves.      I added a simple label as a layer, and used the wood veneers to add the embellishment ( i added a bit of gold paint to the piece).


Along the way i stamped sentiments from the this month's TN stamp with gold ink, and then added  the title using a piece of ephemera and the Stamp (love that stamp!!!).  To emphasize the change of colors, i cut two little slits at the corners of the layout, folded the edges and backed them with papers from the add on kit and At My Table kits, i added a few stitches to hold the folds together,


I love how this turned out.  It is simple,but filled with texture and color!  Remember to stop by Citrus Twist Kits to check the kits, they are amazing!!!  As always, please feel free to contact me with any questions on how this  came together.


Aug 27, 2018

Some Kind of Wonderful


Scrapbook Layout created for Scrapbook Nerd  - SOME KIND OF WONDERFUL -


Hi there!

It is time for a new project for Scrapbook Nerd.   I recently picked the entire Maggie Holmes Willow Lane collection from the store, and decided to use it to create this page all about my daughter and her love for her guitar.


I challenged myself to use a non-white background for this page, and decided to stamp a monochromatic background using the collection's stamp set.  To bring attention to the tone-on-tone stamping, I added a small clear Nuvo drop to the center of each of the flowers.


Next,  I cut a few of the papers from the 12x12 paper pad, and layered them on the right hand side of the page.  Love the gold embossed music sheet paper, as it works perfectly on this page.


Some of the floral images were fussy cut from the 12x12 and 6x8 paper pads.   Once i have backed the picture with papers from the collection, I used the fussy cut florals to create clusters at the corners of the picture.


There are so many embellishments to chose from in this collection.  I played with some of the die cuts and foam thickers to create the title for this page.  Then added some of  the rub ons to the picture, and around the clusters in the page.  After my lines of journal, here is the final layout:


Sometimes inspiration hits late at night, and so is this case of this layout!  I love how this turned out, even when the background is not white!!!.

Remember to stop by Scrapbook Nerd to check this and all the new collections available at the store. As always let me know if you have questions on how this came together.

XO


Mar 26, 2018

Hello Sunshine


 Scrapbook Layout created for Simple Stories  -  HELLO SUNSHINE  - 


Hello Simple Stories friends and fans!

Nathalie with you today with a new project that is Spring on a page.   I was so excited to be able to create some samples for Creativation this year, and this is one of them (that is why there is no journal lines on it yet!!!).  That means I was one of the lucky ones who got to play with some of the new collections before they were released, and the new Bliss collection is one of the  most beautiful ones  i have seen.   Just look at all that purple!!


It all started when i cut the triangles from the Live in the Moment paper from the collection. I wanted to take advantage of the angles to anchor my picture between them.   So once i cut them,  i carefully also cut some of the butterfly wings  -using an exacto knife- so that they could be lifted of the page


Then i hand stitched the triangles to white cardstock, making sure to follow the lines of the wood grain of the paper design.  To add more interest to the triangles, a few fussy cut butterflies were also stitched, through the center line, so that they form a flying path on the page.


I fell in love with the florals in this collection, so I fussy cut quite a bit of them from the Be Good, and Remember to Shine papers to create the clusters around the picture.  All the fun embellishments (and the ones included in this collection are gorgeous) just help bring more sentiment to the page.


The title for this page (all about my niece's sweet smile, and love for the ipad) comes from the chipboard sticker set from the collection.   Once i set the "Hello Sunshine" banner for the title, i quickly add another one at the top of the picture.  The movement they create along with the butterflies is just what this layout needed.


I hope this has inspired you to pick the beautiful Bliss collection.   It is the perfect Spring collection, and you will be wanting to use it all to document the upcoming season.  Remember to check all the new Simple Stories collections, they are so so beautiful

See you all soon!


Materials Used:
Bliss Collection
10012   Collection Kit
10014   Be The Good Paper
10015   Enjoy The Ride paper
10016  Remember to Shine paper
10017   Live in the Moment paper
10020   6x12 Chipboard
10021  Bits and Pieces
10022  Bliss 4x6 Stickers


Dec 12, 2017

Love This Day!


Scrapbook Layout created for Scrapbook Nerd -  LOVE THIS DAY! -


Hi there!

It is time to share some inspiration with this week's project for Scrapbook Nerd.   This time, I got to play with Maggie Holmes's Carousel collection, and a bit of mixed media to document a picture of my sister on her 40th birthday.


It all started when i carefully cut the letters from the Carousel paper pad.   I love large titles!  To make sure all the title letters and picture pop, a bit of mixed media was added to the background of the page.  A few splashes of  Heidi Swapp colorshine in rose, mustard, gold and peacock.


After placing and stitching the title to the background. It was time to start embellishing by creating a visual triangle to the page.  For this I used the top and bottom corner of the title to add a few embellishment clusters - all from pieces from the collection-.


Next I simply added the picture of my sister to the side of the picture,and completed the visual triangle by adding two clusters of embellishments to 2 of the picture's corners.   Just love that black and white flower print!!!  Here is the final layout:


I love the combination of the subtle background, the large gold title and the clusters of the black and white flowers.   The perfect page to document my sister on her birthday.


Don't forget to stop by Scrapbook Nerd to check all the Maggie Holmes Carousel collection items available at the store.  I am always a comment away if you have questions on how this came together.


Take care,


Nov 15, 2017

*Explore


Scrapbook Layout created for Scrapbook Nerd  - #EXPLORE -


Hello everyone!


As we are gearing towards the end of the year, I find that i have not made a dent  at documenting  my vacation memories.   So i will try to spend some of my winter break working on creating pages about our travels, and this is the first layout  of many to come.  For this project i am using the Escape the Ordinary collection from Pinkfresh Studio that i picked from Scrapbook Nerd (and for whom this page is being created)


I created this layout using the large triangular forms as my inspiration for the page. I used an exacto knife to cut them out so that i could form a mountain range as the background for a picture of my daughter and cousin posing at the top of a mountain.


A bit of Distress Oxide Inks help recreate the background of the page, so that it gives the idea of a mountain scene.   I chose to pop the triangles by using some adhesive to attach them to the background.


All the embellishment pieces from the Escape the Ordinary collection work seamlessly to bring to life the feeling in this page,   I took advantage of all the angles  to add clusters, and the title of the page.   Here is final layout:


I love this page!  the colors in the collection, along with the angles in the design are beautiful.   If  you would like to see the entire collection, stop by Scrapbook Nerd to pick this, and the many other beautiful goodies available at the store.


Remember to contact me if you have questions on how this came together.

See you all soon!


Nov 5, 2017

I Believe You Can


Scrapbook Layout created for Scrapbook Nerd -  I BELIEVE YOU CAN -


Hello there!

It is favorite week over at Scrapbook Nerd, a chance for all the DT to chose a favorite to showcase on a project.   Now, being a lover of pretty paper, it was hard for me to choose a favorite, but i love Paige Evans style, and her paper collections never disappoint ( i think I have hoarded pieces of each of her collections, and have bought doubles just to safe keep them in my shelves!)


For this page, i was inspired by all the beautiful and colorful butterflies in the Turn the Page 12x12 paper pad (they have gold foiling on them!), so I used a bit of my watercolors to create a soft background that graduated in colors, and formed a path to place the flying butterflies.


While the background dried, i spent quite a bit of time fussy cutting the images, and gluing a few of them together -this will help with creating the idea of flying when the wings are folded up.


Once all the pieces were ready to assemble, I carefully started gluing the butterflies to the respective color on the background.  Some of the butterflies were pop on  foam adhesive to add dimension and create levels on the page.


I just love the collection so much, and all the embellishments were perfect to add just a few details around the page, and to form the title on the layout about my daughter.   Here is the completed layout:


I just love how this page came together!   The Turn the Page collection is gorgeous and so versatile.  Just look at the colors, and design.  Honestly i have created so many projects with it, and still have lots of material left (not to count the entire collection I am keeping for later use  ;)  )  Remember to check all the collection at Scrapbook Nerd, this entire collection is available there!

I am always a comment away if you have questions on how this came together.


take care!


Sep 25, 2017

Summer Fun


Scrapbook Layout created for Scrapbook Nerd  - SUMMER FUN -


Hi there!

It  feels like Summer does not want to leave Toronto, just yet!  Since, I cannot fight the weather, then better join it and make the best out of it.   So, i am going to scrap  a few of my summer memories in the next few days!!!


I created this background using Distress oxides and some Heidi Swapp colorshine.   There was no set idea on what i was going to  place on top, so i just had fun with some ink.


I found this picture of my daughter upset at the sun during one of our outings, and thought it fit my mood completely, so I set it on top of the mixed media, and layered pieces of fussy cut flowers, and ephemera at clusters in 2 corners of the picture.  The title came from on the of the cards from the SUMMER FUN collection from Echo Park (which is featured in this layout) that i picked up from Scrapbook Nerd On line store.


To complete the visual triangle of this page, i added a small cluster of embellishments at the bottom of the picture.  Here  is the completed layout:


This layout summarizes how i feel about Summer...  It is gorgeous, but it is time to go!   I hope you use this as inspiration.  Remember to check Scrapbook Nerd for all the materials used in this project.  I am always a comment away if you have questions on how this came together.

Take care!


Materials Used:
Ranger - Distress Oxides - Worn Lipstick, Fossilized Amber
Heidi Swapp - color shine - gold lame
Echo Park - Summer Fun collection - papers, stickers, ephemera, tags, brads