Showing posts with label Life Crafed kits. Show all posts

Sep 12, 2019

I LOVE YOUR SMILE but THIS PHOTO MAKES ME LAUGH - Technique Tuesday


Hi there! Nathalie with you today with a layout that uses the fun Laugh and Smile Stamp Set, along with the Layered Smile Crafting Dies, and the Layered Laugh Crafting Dies. These new sets are sure to be a staple in my documenting, as they are versatile and lots of fun. Let me show you what I have created.
1---TT_I-LOVE-YOUR-SMILE-BUT-THIS-PHOTO-MAKES-ME-LAUGH_June'19_Nathalie-DeSousa-2
To create this page, I pulled the Oh Happy Day collection from Simple Stories and cut one of the collection’s papers to fit the size of my Life Crafted album (Citrus Twist Kits). The idea was to create a fun border for the pages, so I used the Cascading Hearts Border crafting die to create the edges of the layout.
2---TT_I-LOVE-YOUR-SMILE-BUT-THIS-PHOTO-MAKES-ME-LAUGH_June'19_Nathalie-DeSousa_close-ups-3
In addition, I used the Cascading Hearts Border Crafting Die to detail another strip of paper (same collection) so that I could use it to create the title of the page on the other side of my layout. Here I used a combination of the Laugh and Smile Stamp Set and the coordinating dies to create an elaborate title for this layout.
3---TT_I-LOVE-YOUR-SMILE-BUT-THIS-PHOTO-MAKES-ME-LAUGH_June'19_Nathalie-DeSousa_close-ups
For the title, I used some black ink to create two sentiment boxes on white cardstock using the Laugh and Smile Stamp set. These were fussy cut and popped with foam adhesive on the page. The Layered Laugh crafting die and Layered Smile crafting die sets were used to create the script “Smile” and “Laugh” words twice from metallic black paper. This were stacked together, and then glued on the page to complete my title, so that it reads, “I LOVE YOUR SMILE, but THIS PHOTO MAKES ME LAUGH”.
4---TT_I-LOVE-YOUR-SMILE-BUT-THIS-PHOTO-MAKES-ME-LAUGH_June'19_Nathalie-DeSousa_close-ups-2
To balance the title, I chose to add the picture at a mirror position and then added a few clusters around it. I chose to use the words, “smile” and “laugh” from the Laugh and Smile Stamp set at the bottom of the picture to emphasize the sentiment of the page. Some of the negative heart pieces were then glued to the layout to bring some extra color pops.


The Laugh and Smile stamps are sure to become a staple on my collection. They are part of the Memory Keeper Studio Collection. Make sure to check them out on the Technique Tuesday shop. As always, please do not hesitate to contact me with any questions. Thank you all so much!

Jul 10, 2019

LIFE CRAFTED LAYOUTS - Citrus Twist Kits -


Hello everyone!
Nathalie here to show you how i was inspired by this month's Best of This Life kit and my pictures to create a few layouts in my Life Crafted album.    The kits are so packed, but also the stamps are just so versatile you will want them all.  Let me show you what i created:


The inspiration for this page was the shadows the tree cast on the road -finally warm days are here in Toronto-.   This gave me the idea to use this month's This is Life: Chasing Curiosities stamp set as a way to recreate the look of the shadows on the page.


Using different Distress Oxides inks, i stamped the background on the page, and also on an enlarged Cut apart element that had a botanical feel to it.   I made sure to type my lines of journal before gluing everything in place.   First i fussy cut the shapes from the printable and glued it on top of the series of stamped shapes.   Then added a few more of the sentiments from the This is Life stamp set to build the title and a small puffy sticker to finish this page.


I used the same shape stamp to create a few more images on different papers from the kit, and then fussy cut them.   These were clustered at the top of the enlarged picture, followed by the small tag sentiment from the cut apart elements.


This was so fun to put together and love how it all turned out.   Here is another page of my album created using the Best of This Life kit, and once again inspired by the picture.


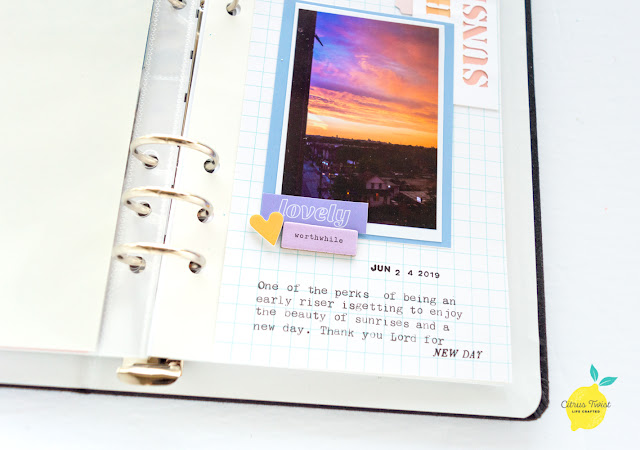
It was the colors of the sunrise that inspire this page.  Firstly, i printed the graph paper using the Digital TN papers -available at the CTK shop-, and then used one of this month's cut files to create the Hello Sunshine title for the page.


The title was backed with a piece of  the rainbow paper included in the Best of This Life kit -i picked colors that matched this corner of the picture, and then added a small sticker from last month's Add on kit.  My choice to glue it on this orientation was to complement the location of the sun -as seen from my balcony-.


The picture was backed with one of the Subscriber bonus PL cards, and once set on the page, i chose to add a few extra stickers that complemented the colors on the left hand side of the picture.   A few lines of journal and the date complete the page.


I know that once you create single sided pages then it is some times hard to create a new layout so that it doesn't clash with the other.   To avoid that, my choice is to transform the picture to black and white, and  then add a few extra colors to the ones already being used.


For this page, i chose the Folded Triangles cut file (this is available at the CTK shop ) and backed it with papers, and cut apart elements from the Best of This Life kit.   I glued the circles to the edges of the page - this was also printed using the Digital TN papers that match this kit-.


Once i set the picture in place, i used some of the ephemera pieces and stickers to add a repetitive shape around the page and picture.   Then used the stamp included in the Best Of This Life kit to build the title.   A few lines of journal and enamel dots (love them, and might need to buy more!!!) complete the page.  The following video will show you how it all came together:


I hope this has given you some ideas on how to use the Best of This Life kit in your Life Crafted album. The kits and stamps are gorgeous, so it makes documenting so pleasurable  and colorful.  As always, remember you can contact me if you have questions on how these came together.

XO


Feb 6, 2019

Scrapbooking with DIgital Files

Scrabooking with Digital files  - Citrus Twist Kits -


Hello everyone!
Nathalie back with you to show you a few projects created using the new Digital files that coordinate with the Life Crafted Love Stories kit.   This month's kit is gorgeous, but having the digital products makes it more versatile and never ending....


It is no secret that I  love working hybrid entries for my personal journal (Traveller's Notebook), so imagine how happy it makes me to be able to add these entries in my Life Crafted album.   There is something about being able to customize the page and papers that makes it so much more special to document my memories.


For this first entry in my Personal Journal, I chose to create the vellum dashboard using one of the PL cards.  First, a document was created on Photoshop with the dimensions on a Standard TN page size.  Then i embedded the PL card and size it to fit the page.


Since i wanted something really soft for the page, i used the adjusment commands in Photoshop to alter the colors of the card to suit my needs.  Once it was printed, I cut the vellum with an offset of about half an inch, so that i can tuck it under the next page of the TN.


For this page, i used the new Digital TN papers (these are the same prints as the ones in the Love Stories kits, but sized to fit an standard Traveler's Notebook page) to create the  background of the page.  Once it was all printed, I added my picture and a few pieces of the cut apart elements (available for free to all Subscribers) as well as my lines of journal and call the page completed.

 Well, now let me show you how i have been incorporating the Digital files in my January Life Crafted album.


For this page, i use the This is Life digital stamp to create  the flower branches (i size and rotated the stamp a few times to create the background).   Next i used the large version (this just means the file has been sized so that it does not lose definition when enlarging it) of one of the phrases to create my title.


I  added the lines of journal and send it to print on vellum. In addition, i once again used the digital TN papers to print the pink ledger paper so that i can use it as  layer behind the vellum.


For my picture, i enlarged it to fit 4x8 in as i used it to cover the back of the large tag (included in the Love Stories kit) and then punched the hole so that i can add the little piece of string through it.


To finish this page i used pieces of ephemera from the Love Stories kit as well as some elements from the cut apart sheet - just love the small fussy cut butterfly on top of the page protector-  and the stamp set to decorate the page.

I really hope this inspires you to check the new Digital Files available in the Citrus Twist Kits Shop.  Think of all the possibilities and how much they will stretch your kit!  If you have any questions, please do not hesitate to contact me!

XO