Showing posts with label doodlebug designs. Show all posts

Jul 5, 2025

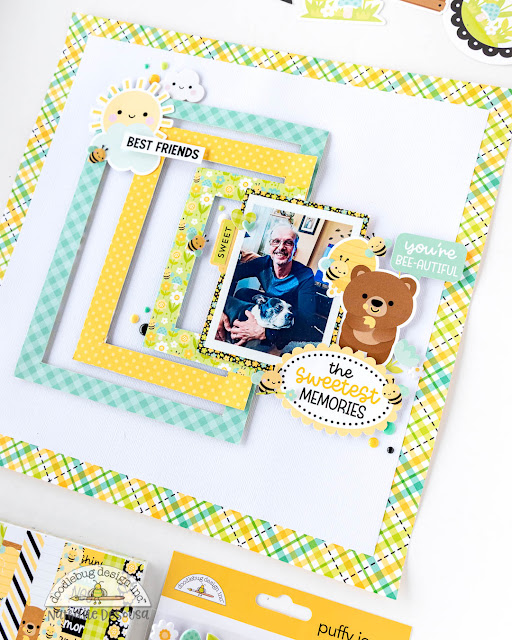
THE SWEETEST MEMORIES - Doodlebug Design

IT is time for us to show you a fun filled ideas featuring the new Bee Happy collection.   I think that the theme, colors, and designs in this collection make it so easy to document your Summer and simply your daily activities with style.


I wanted a combination of colors and structure for this page, so the idea of creating the frames from the papers in the 6x8 paper pad just popped on my mind.


I used a crafty knife to trim the frames out from different patterns from the 6x8 paper pad.  I made sure to reduce the size of the frames so that they create the graduated look on the page.  I attached to the base with foam adhesive, but decided to set them so that the left edge of all the frames stacked together.


I used pieces of the 6x8 papers to back the photo, and placed it to the right of the frames.  I then combined pieces from the stickers, ephemera pack, and puffy stickers to create a large cluster and title to the right of the photo.   These pieces help to balance the page.


I added a smaller cluster of embellishments to the top left corner of the frames.   I just loved all the icons in this collection, and wanted to used them to bring the page together.   


I added a few Sprinkles and little bees all around the page to make sure that there are extra pops of color. I just love how this turned out, and I hope that  inspire you to check the new Bee Happy collection,  You are going to love it!

XO


.

Instagram | Blog | YouTube 


SUPPLIES

Bee Happy Collection

Bee Happy Cardstock

 Sprinkles


Jan 22, 2025

6X8 ALBUM - Doodlebug Design

 I am loving the new 6x8 Doodlebug albums, I love documenting in a small format!  So, I wanted to share with  you how I am using my Cupcake 6x8 album to start documenting my December 2023 memories..


I always start my albums with a title page, that way it creates a beginning to the stories it holds.  For this album, I wanted something fun and colorful.


I chose to trim one of the premade pages that come in the album into a circular shape, making sure that the binding holes are included, so the page can be secured to the album.  Next I reached for the Tinsel Time Shadow Box Kit to build my page


I cut the vellum in the kit to a 1/2" smaller than the page, and use the template in the Box Kit to attach the stickers and sprinkles. I used foam adhesive to pop the "December" Chit Chat piece and added Alphabet Soup - Ladybug- complete the title of the page.   I backed the vellum with a piece of white cardstock before gluing it to the premade shaped page.


I added a few personal notes to the back of the circle page, then decided to jump into a fun idea  to document a story with multiple photos.  Make an interactive pocket page spread!


For the pocket portion of the spread, I kept it simple with one of the cards from the Happy Hollydays paper, and I made the other card using a piece of Tinsel Time paper, Stickers and puffy stickers.   I kept the pockets simple as I am adding a larger pocket next to it.


I created the tags with the two sides of the Snow Bright paper.  I added my photos and embellishments from the Tinsel Time collection, and still have space to add more photos to the back of the tags, or add more tags in the pocket featured in this page.


I am using a piece of Tinsel Time paper and Berry Merry to create my pocket.  A few stickers complement the colors and match the feel in the pocket page.  I then added my journaling in one of the large journaling cards from the Christmas Candy paper, and added it to the pocket. I just love how all these page came together.  There is so much you can do and store in your 6x8 Albums, be sure to check them out!


XO

.

Instagram | Blog | YouTube 


SUPPLIES

TINSEL TIME Collection

6x8 Album - Cupcake

Tinsel Time Shadow Box Kit

Alphabet Soup Puffy Stickers - Ladybug


Jan 20, 2024

HELLO WINTER - Doodlebug Design

The Winter weather here in Canada is truly showing off! And though we love snow, we are happy to be indoors  playing the beautiful SNOW MUCH FUN COLLECTION to document  a few memories of snowy, but not so cold days!  Let me show you what I have created.


My baby loves fresh snow, and I wanted to take advantage of all the colors and patters in the collection to bring a layered look to the page.


I started by cutting paper strips from the 6x6 paper pad and layering on white textured cardstock.  My idea was of snowflakes falling, so why not paper layers!!  I simply drew a line on the cardstock, then glued the top row of paper strips, then kept tucking strips under them until they formed this paper cascade.   I added one of the scalloped border stickers to the starting point of the paper strips as a way to anchor them and the photos to the page.


I added two photos of my little one at the top of the scalloped border.  A bit of an offset helps to bring extra embellishments and sentiments to the page.   I love all the embellishments in this collection, so it was easy to put this together.


I set the title of the page to the left of the photos.   I loved the trees, especially since my baby is outdoors.  So, I pulled a few Bits and Pieces and mixed them with a Chit Chat piece for the title.  I then started adding a few snowflakes to each of the major clusters in the page,


I addded a smaller cluster of stickers at the bottom right corner of the page in hopes to balance the page, and also add a bit extra interest.    To finish the page, I added Sparkles to the center of each of the snowflake stickers. All I need are a few journal lines and voila!


I just love how this turned out!  The SNOW MUCH FUN COLLECTION is sure to bring those warm happy feelings to your cold winter day memories!


XO


.

Instagram | Blog | YouTube 


SUPPLIES

Snow Much Fun Collection

Snow Much Fun Coordinating Cardstock

 Sprinkles


Oct 13, 2022

HALLOWEEN FUN - Doodlebug Design

It is time to get ready for a fun night of trick-or-treating!  Or in my case, a whole day full of it.  Even after the kids have outgrown Halloween, our baby dog still gets to have all the fun and attention of the day.   As soon, as the new Monster Madness collection arrived, I knew it would be perfect for all this spooky memories.


I wanted to take advantage of all those spooky cute monster pieces.  This lead me to create a simple but fun design for the background of the page.


It all started with the Treat Yourself paper.  It has all the collection colors in small polka dots.  So, let's highlight some of the colors by creating moving frames.  I simply cut a frame from a few of the collection papers, and attach them to the base using foam adhesive.  Along the way, I slightly rotated some of them to add interest to the layered look of the background.  I used the banner garland a top of the page to help me add a festive look to the page.


I backed my baby's photos with a paper from the 6x6 paper pad.  Then added them to the right of the frame.  I rapidly went through the Chit Chat package to pull the speech bubble and help me complete my title work.


Did I mention how cute the monster Bits and Pieces are? Well I pull a few of them and set them along the bottom of frame... Like, how cute do they looked all bundled together.  After that, just a few extra sprinkles complete my page.


Just love how easily this came together, and how frightfully adorable this spread is!  I cannot wait to see what you will create with the new Monster Madness collection


XO

.

Instagram | Blog | YouTube 


SUPPLIES:

MONSTER MADNESS collection