Nov 13, 2023

Pinkfresh Studio November 2023 Stamp, Die, Stencil, and Embellishment Release


Hi there!

Welcome to PINKFRESH STUDIO NOVEMBER 2023 STAMP, DIE, STENCIL, AND EMBELLISHMENT RELEASE...  I am so happy you are here, and checking all the beautiful inspiration created with this month's release.  Let me show you what I have created with some of the new products:


I combined the new ORNATE RECTANGLE FRAME DIE, NOTHING BUT THE BEST STAMP SUITE, KAITLIN ALPHA DIE, and FARM FRESH STAMP SET along with pieces from Lovely Blooms and Garden Bouquet collections for this spage,


I started by heat embossing a few of the NOTHING BUT THE BEST stamp  with Snow white Embossing powder.  I used the coordinating NOTHING BUT THE BEST stencil and Crisp Dye Inks ( Ballet Slipper, Cherry Blossom, Peony, Begonia, Eucayptus,  Spanish Moss) to color all the images, before cutting them out with the NOTHING BUT THE BEST die.  I set the images on a small crescent formation on dark blush cardstock.


Using the new ORNATE RECTANGLE FRAME DIE, I cut a few of the small frames, and used them to encase my photos.   I set these in the inside of the crescent  of flowers.    I added just a few embellishments from the paper collections, before working on my title.  For this, I used the new  KAITLIN ALPHA DIE to cut the letters from white cardstock (shadow), and blush metallic cardstock for the letters.  I placed the title above the pictures with a few extra embellishments. 


To finish my page, I chose to add a few stamped sentiments using the new FARM FRESH STAMP,  using ink colors in begonia, around the flowers.   A few Metallic Gold Pearls complete the page, and I love how it turned out!


I hope this inspires you to check all the new PINKFRESH STUDIO NOVEMBER RELEASE.   There is so much inspiration to checkout, and also a generous giveaway.


- Pinkfresh Studio will be giving away the full release on their blog and YouTube Channel, and 

- There is a total of ten $25 gift cards that will be given away to selected comments left on each of the blog stops

The winners will be posted on November 21,2023 in Pinkfresh Studio Giveaway page.  If you are one of the lucky winners, then you will have two weeks to claim your prizes!


Now it is time to continue the inspiration. Be sure to check each stop.  


You are invited to the Inlinkz link party!

Click here to enter
Thanks for stopping by!


Nov 8, 2023

ADVENT CALENDAR - Doodlebug Design

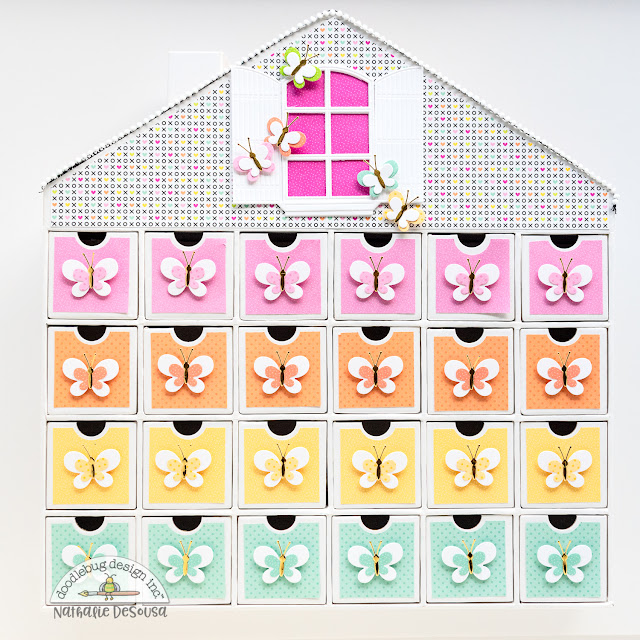
Today,  I want to show you a little twist for your Advent Calendars.   Maybe is the fact that we have adult children, and that we live in an apartment, that pushed me to look at this project as a storage case that can live in my common area throughout the year... Let me show you what I have created:


As you can see I went with a design that can easily fit in any room of my apartment where we need storage for little items (my daughter is already thinking about a second one for her earrings and make up)


I used the 6x6 Dot/Stripe Petite Print pad and the12x12 Dot/Stripe papers to cut the covers for each box. My inspiration for the colors was one of my favorite collections of this year, HELLO AGAIN.  I also used the Butterfly Wishes Doodle cuts to create matching butterfly die cuts and attached them to the front of each box.


For the top of the calendar, I used patterned paper from the Hello Again collection to cover the top and the roof of the house.  I used a die to create the window and shutters and added that to the top of the house.  I added a bit of pom pom trim to the edge of the house to mark the roof of the house.  Then continued the butterfly theme to the top of the window and shutters..


Once it was all ready, I filled the little boxes with my Doodle pins and a few favorite little trinkets.  Like I said, it is the perfect place for some extra storage.


I hope this gives you a new idea for your Advent Calendars.  Remember to share with us what you create!


XO

.

Instagram | Blog | YouTube 


SUPPLIES

Advent Calendar

 Doodle Cuts Butterfly Wishes

Hello Again collection

Dots & Stripes Petite Prints 

Dots & Stripes 6x6 paper pad

Smooth Cardstock


Nov 3, 2023

HALLOWEEN COSTUME - Doodlebug -

 We are so close to celebrating Halloween once again!  I am sure that many of you are getting your costumes ready for the day, just like my cousin's doggie!   Though, we bought the costume here in Canada, it had to travel all the way to Ecuador.  As soon as I got the pictures of the fitting, I had this idea for  a new project featuring the beautiful SWEET & SPOOKY collection.


The starting point for this page was the Taffy Stripe paper.  I just saw the stripes as a fun way to create a banner for my page.


I cut 2 strips of 1.5in, then cut each color section out - the little pieces looked like small squares-.  I then, used a pair of scissors to round one of the edges. Using a thin chopstick, I curled the straight edge of each paper, then using liquid glue attached the rolled edge to Beetle Chunky Doodle Twine.  I alternated the a and b sides in the formation of the banner.


I glued the banners to the top lilac textured cardstock, making sure they draped from the top of the page.   This paper was then framed with Candy Sticks paper.


I used stickers and Doodle Pops to add a bit of interest to the banners that were of a solid color.   Once the banners were set on place, I added a few sprinkles for pops  of shine throughout the banner.


I cut a few pieces of paper to create side banners at the bottom of the page.  This was a perfect way to anchor my photos to the layout, plus provided space for my title work. and extra embellishments.   I just love combining stickers, Doodle Pops, and Chit Chat for this.


A few extra stickers and gems complete the page.   I hope this inspires you to get your Halloween memories documented with the SWEET & SPOOKY Collection


XO

.

Instagram | Blog | YouTube 


SUPPLIES

Sweet & Spooky collection

 Sprinkles

Doodle  Pops

Chunky Doodle Twine

Textured Cardstock