Showing posts with label new cut files. Show all posts

Aug 10, 2018

Fun in the Sun

Hi there!
Nathalie with you today bringing you a Summer/sunny layout.   Summer is slowly coming to an end, so why not bottle those happy, fun memories of the season in a bright and colorful page using a few of JustNick Studio cut files.


To start this page, i used some Vicki Boutin Art Crayons to create the ink/painted look on the background. 


The background cut out was created by welding a few of the Sunburst Background 2 a few times together.  The paper that backs the center of each sun image comes from Fancy Pants' Poolside collection, and brings that sunny feeling to the page.


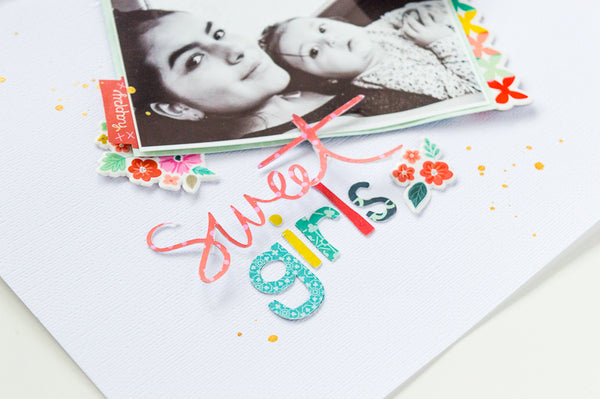
To create the title of this page, I pulled the Fun in the SUn cut file, and cut it from white cardstock.   To continue the Summer feel of the page, I used Fancy Pants  Hello Sunshine collection to back the letters iin the title.   The colors and patterns in the title balance the sunburst background.


Having a large and colorful title takes care of a lot of the embellishing on the page, so a few die cuts, sticker and stamped sentiments complete this page.


Love how this page just screams Summer Fun! Love the combination of cut files and fun summer patterrns.

Remember to stop by JustNick Studio to check for these and many new cut files available.   There is so much inspiration waiting for you!  As always, I am a comment away if you have questions on how this came together.

XO

Feb 26, 2018

Family Forever


Scrapbook Layout created for JustNick Studio  - FAMILY FOREVER  -


Hello!

Nathalie with you today.  Finally the weather seems to be changing here in my part of Canada, so I am preparing myself for a colorful Spring by bringing a clean, and kinda monochromatic layout created with a few  JustNick Studio cut files.


Once I saw the new Grandma's Napkins cut file, the idea for this soft monochromatic page came to my mind.   The soft background was created by welding two of the images together, and cutting it from white linen cardstock.  It was then glued straight to the dark blush background.


Next, the  Boho Florals cut file was used to cut the flowers that serve as clusters and decoration around the page.   Just the flowers were backed with a lighter tone of blush patterned paper from My Mind's Eye Blush collection, while the leaves were backed with white vellum, so that they remain soft and delicate.


To add more dimension to the larger floral, a second die cut was glued to the mat under it, and a bit of foam adhesive secure both floral motifs together.   The tile was then created by adding a few pieces from the collection to one of the floral cuts that is placed at the bottom of the page.


I love how this page turned out.  The soft blush tones of the florals contrast with the darker coral tones of the mat, and the white lace-like background.   The page took no time to put together once the background was created. 


Stop by the Just Nick Studio on line store to check all the cut files used in this page, and the many new designs available each week.  I am also a comment away if you have questions on how this came together,


Take care!

Jan 1, 2018

Sweet Girls


Scrapbook Layout created for Just Nick Studio - SWEET GIRLS -


HAPPY NEW YEAR TO YOU ALL!!!

 Nathalie with you today, bringing you the first project of 2018  (can you believe it is a New Year already!). 


I have had this picture in my scrapbook file for a while waiting for the right cut file, and when i saw the new Magic Carpet Background, the idea popped into my head.


To create this background, I isolated only the full images of the cut file, and then copy them in a tile formation.   Using the Silhouette software,  the image was moved until it matched the angle of the picture, and then set to cut from white cardstock.


Each image was then backed by a different paper from the Paige Evans' "Turn The Page" collection (one of  my fave collections from 2017!).  Using a bone folder, the centers of the motifs were slightly creased as to create the dimension in the background.


Just a few embellishments were needed to complement and frame the picture.   I wanted the picture to balance the background, so I chose to keep it Black and White so that it stands out from the colorful background.


The title of this page was created using the  "Girl Power"  and  "Lower Case Alpha" cut files from papers from the collection.   Each letter and word was cut twice, and glued together, a bit of foam adhesive adds the dimension to the word "sweet".


I hope this serves as inspiration for the start of a new year!  Stop by the Just Nick Studio store to check these and all the cut file designs available. 
Remember i am a comment away if you have questions on how this came together.

See you all soon!

Oct 2, 2017

Fall Love


Scrapbook Layout created for Scrapbook Nerd  - FALL LOVE -


Hello there!

Today, I am up on the Scrapbook Nerd blog with a quick video tutorial for the current project using their new, and free FALL FAVES cut file.   This new file was designed exclusively for Scrapbook Nerd by The Cut Shoppe, and it is all about Fall, so sit comfortably, and enjoy the video on how this page came together:


I hope you enjoyed the video.   For this page, I am using the new Grattitude Documented collection by Bella Blvd. and a bit of mixed media for the background.


To start, the title was cut at the bottom of the  paper from the collection.   Then, about a 1/4 in was trimmed from all sides of the mat, and this paper was stitched to a piece of white cardstock.  I made sure to back each of the title words with a piece of patterned paper before attaching the mat to the cardstock.


All the leaves were set to cut from white cardstock, in the mean while, a bit of white acrylic paint was then added to the mat as to haze the space where the picture and leaves will be attached.


While the paint dried, some of the leaves were backed with papers from the 6x8 paper pad and vellum - I didn't use gesso on the paper, so there is a bit of warping in the layout-.  The picture, too, was also backed with the a side of one of the collection papers.


The leaves were then attached to the mixed media spot with a bit of foam adhesive, and the picture was then nested in between the leaves.  Just a few embellishments were placed in clusters around the picture.


For the title, i chose to add the negative pieces of the cut on a bit of an offset onto the respective letter.  A bit of foam adhesive was needed to make the title pop.   Also, using a white ink pen, the edge of the letters -on the mat- was drawn, so that there is some contrast on the colors of the title.  Here is the final layout:


The detail in the cut file in combination with the bit of mixed media bring attention to the picture, making it the focal point of this layout.  Remember to stop by Scrapbook Nerd store to pick up your free copy of this cut file.  I look forward to see what you create with it!

Let me know if you have questions on how this came together.

See you all soon!


Materials Used:
Scrapbook Nerd - Cut file - Fall Faves


Bella Blvd - Grattitude Documented collection - kit, 6x8 paper pad, stickers, paper clips
Acrylic paint  -white - Michaels

Mar 30, 2017

You Wonderful Thing


Scrapbook layout created for The Cut Shoppe  -  YOU WONDERFUL THING  -


Hello there!

There is a new set of cut files available over at the Cut Shoppe Etsy store.  As always, they are all beautiful, and so versatile.


For this layout's background, I chose the Follow Your Heart cut file.  I added an offset to the image before cutting, and made sure to used the Silhouette software to create a stitching pattern.   I picked papers from the new Oh My Heart collection to back the heart segments, but added the stitching (in a matching color  thread) before backing the heart.


The Spring Forward cut file is full of tags with beautiful details on them.  I simply enlarge the "Bloom" tag until it was big enough to back and frame the picture of my daughter.   A small piece of pink vellum behind the word is all that was needed.   The Flowers in the collection were just perfect to create the cluster.


For the title of this page, I used one of the chipboard stickers from the collection.  Once again, I just layered more of the fussy cut flowers from the collection, and place them at the opposite side of the picture -diagonally-.   Here is completed layout after adding some smaller details, and the journal lines:


I love how this layout turned out.   The colors are perfect even when the picture is of my daughter walking in a winter wonderland.   Remember to visit the Cut Shoppe Etsy Store to check all the new designs.


Please do not hesitate to contact me with any questions on how this came together.

Take care!


Materials Used:
Cut files - The Cut Shoppe


Patterned papers-  Paige Evans - Oh My Heart  and Take me Away collections
Embellishments - Oh My Heart and Take Me Away collections - Paige Evans
Black, and white color shine - Heidi Swapp

Jan 27, 2017

Love Him!


Scrapbook Layout created for The Cut Shoppe  - LOVE HIM! -


Hello!

I am up on the Cut Shoppe's blog with a new layout showcasing some of their beautiful cut files, and Clique Kits "Wonderland" kit.


The layout features one of the images in the " Bless my Heart" cut file as a background to the page.   The heart was sized until the  hearts within the image were slightly bigger than 1 in.  Next i cut the hearts from one of Pink Paislee's Moonstruck collection and lightly glued them down.  A few hand stitches just held the hearts in place.


The pictures of my teens holding their little cousin were then layered using papers and embelishments from Clique Kits Wonderland kit.


The title is a combination of the "Cupid's Arrow" cut file, and Alphas from the Moonstruck collection.  The arrow was sized to cover the length of the two pictures together, then cut in one of the papers in the kit.  Next another image was cut of an offset of  the page in white card stock, both image were glued together, and then mounted on the layout.  A few lines of journal around the heart, and some gold splatters completes this project.


The beautiful "Wonderland" kit from Clique Kits (you can use the code NATHALIE10  to obtain 10% discount at checkout) worked seamlessly to complete this layout.   The new cut files available at the Cut Shoppe's Etsy store are always a joy to work with.

As always let me know if you have any questions.


Thanks for visiting today!


Materials Used:
cut file - The Cut Shoppe - Cupid's Arrows

cut file - The Cut Shoppe - Bless your Heart

Clique Kits - Wonderland kit
Alphas, rub-ons - Moonstruck collection - Pink Paislee
Color shine - gold lame - Heidi Swapp