It seems like i blinked and January just flew by... and now we are starting to get everything ready for Valentine's Day, so i thought i put to work my obsession with Concord & 9th stamps to create a set of cards using their December release. So let's get started...
For the first card, i decided to use the Little Love Tags stamp set to create the heart background of the card using Red Brick Distress ink. The same stamp was used to emboss a few hearts ( i used WOW gold powder and Lawn Fawn Rose Gold powder).
The hearts were cut using the die set, and then attached to the card using foam adhesive. The sentiment was then added using black Archival Ink.
For the next card, i used the Hugs and Kissed Turnabout stamp set to create the heart panel using Distress Oxide inks in Tattered Rose, Worn Lipstick, Picked Raspberry and Festive Berries. I used the heart dies in the Little Love Tags to cut the center heart of this card.
I used some foam adhesive to attach the pannel to a piece of paper from the LA LA LOVE collection from Crate Paper, and added an embossed heart (created using the Little Love Tags stamp and die set) in the middle of the card.
For my last card, I chose to emboss the Just Love stamp image onto Vicki Boutin's Foundation paper. I used my prima watercolor palettes to add the watercolor look to the card.
The gold watercolor comes from the Starry Nights watercolor palette form Gansai Tambi. To shade the background, I used a combination of watercolor and hb pencil.
I framed the pannel, and then glued it to a made to size card. Love how these card came together in a short amount of time (even with the detailed watercolor!)
Remember to stop by Scrapbook Nerd to check these stamp and die sets from Concord and 9th, and all the new goodies arriving at the store. If you have questions, please do not hesitate to contact me!
Today I am very excited to be taking part of this blog hop as i love Altenew products and the new releases are beyond amazing. There is so much to chose from in this release, so i created quite a bit of projects to showcase a few of the new products. Let's get started.
I fell in love with the new Floral Heart Frame die, and chose to use it to create a new page about my daughter and i. For this page, i used some of the Altenew crisp inks to add color beneath the heart so that they match the colors in the FLurries of Flowers washi tape. I nestled the picture in the heart die cuts, and then surrounded it with fussy cut washi flowers. Such a simple and soft design, that came together in no time, here is a video that will show you the process:
I love how the layout came together so easily with just a few products. Really love the new Floral Heart Frame die, but since we are talking hearts, this new release also features the Magnolia Heart Stamp and Die set, which looks a lot like the Floral Heart Frame die but in a smaller format, perfect to create a card!
First i used Altenew's Limestone crisp ink to stamp the heart continuously on the background - i used a small heart mask to help me fill the entire background-. While the ink set on the background, i embossed the image of the Magnolia Heart stamp with rose gold powder, and cut it using the coordinating die. The sentiment on the stamp set was then added to a small piece of vellum with black ink; here i glued the heart, and then trimmed the vellum to size. The vellum was then attached to the background using glue dots. Just love the stamp and die set, and it was so easy to put this card together.
Well since we are talking cards, let me show you how i used the Stained Glass Window Stamp and Die set to create two cards with the same design but slightly different finish
For the first one, i used gold embossed the Stained Glass window and cut it with the coordinating die. To detail the die cut, I used the Altenew Alcohol markers -set E-, and a bit of Lagoon Metallic Ink Spray.
I attached the window to the middle of the card ( i had stamped a few images with gold ink) with some foam adhesive, followed by the sentiment. A few enamel dots - from Altenew- and jewels complete the card... Love how the card turned out, that i decided to recreate the look this time by embossing the Stained Glass Window image with Snow White powder and then using Altenew's Metallic Ink Sprays to detail the flowers.
This time i used Altenew's Lagoon Crisp Ink to stamp the circles, and added enamel dots from also from Altenew to complete the card. Such similar yet diverse looks for cards using the Stained Glass Window image and a bit of Altenew mixed media products.
Since we are still talking cards, then let me show you just a quick idea for the Snail Mail Stamp and Die set. I love dimension, and the small envelopes were the perfect way to create this color envelope cascade on the card. I used Altenew's Crisp Inks to create the envelopes, and then used the die set to cut the envelopes and hearts. Before adding them to the front card panel, I used the Wispy Begonia stamp set to add the sentiment, and then used foam adhesive to create the rainbow envelope cascade. Love how easy it was to put together, and such a cheery and fun card to brighten any birthday.
Well, now i want to show you how i used one of the new Zodiac Constellation Die to create this page in my personal Journal (Traveller's Notebook). I was so grateful Altenew added this to my box, especially since both my kids are Capricorn babies.
For this i used the die to cut the word Capricorm and the small constellation on the one side of the paper. I used gold vellum to back the paper, and then glued it to the Traveller's Notebook. I used the constellation dies to cut more stars, and used the decorate the page with my kids pictures in it. To finish, I embossed sentiments from the Simple Flowers stamp set to finish my title.
Here is another project created for my Family Album (the small format album comes from Citrus Twist Kits) and the WIld Rose 3D die set.
I love Altenew's 3D dies, and the Wild Rose one is simple to put together in a very small amount of time. The flowers are so colorful and bold that i added them outside of the page protector to bring their 3D format to live.
Here is another page of my family album. For this page i used the new Beautiful Blooms stamp set. The large stamp is so versatile, and i chose to use it to create the patterned paper for this page. The image was stamped continuosly to fill the entire length of the page ( the ends of the stamp match!).
The sentiments in this stamp set were perfect to create this page, since i was adding patterned paper behind the picture on the one side of the page, i decided to use the same colors to add just a bit of color detailing to the blooms on the opposite page. This was so easyto create with such a beautiful stamp. And now onto the last project ...
This page features the new Wonderland Stamps and Dies set. The floral images in this stamp set are perfect to create all types of paper crafts, but i took advantage of the long stems ot create movement and dimension on the page. Here is a new video that will show you how this page came together:
How fun are all these new January 2019 stamps and dies. so versatile and beautiful it was hard to put them down -as you can see from all the projects i worked with them!-,but now it is time to have some fun, and hopefully win some prizes
GIVEAWAY
Giveaway CLOSED... Thank you all for the lovely comments, it has been a pleasure reading each one of them.
The winner of the $30 Gift Certificate to Altenew is :
Jordanbev5@yahoo.com .... please email winner@altenew.com with the subject line Altenew January 2019 Stamp/Die/Stencil Release
Blog Hop Winner from Nathalie DeSousa's Blog by 2/15/2019. congrats
It is time to continue the blog hop and be inspired. Your next stop is Sveta Fotinia's blog. For your convenience here is a list of all the participants. Remember you can always come back here or check the Altenew Card Blog and /or Altenew Scrapbook Blog to continue the hop.
Scrapbook Layout created for Scrapbook Nerd - IT IS ALWAYS COFFEE TIME -
Hi there!
It is cold and snowy here in Toronto, the perfect weather to be indoors enjoying the comfort of the couch along a cup of coffee, well in reality a cup of coffee goes well with any season, time regardless of the weather. I mean we were brought up with coffee, as it was always available at our home in Ecuador, so my routine always has a couple cups of it in, and today i am taking the time to document and celebrate coffee time using materials purchased at Scrapbook Nerd.
For this project, i used a cut file from Handipaper to create the coffee mugs from white cardstock. While the cups were cut, a bit of white acrylic paint was added to a piece of blush cardstock - this will take a bit of the color of the background-.
The cut outs were backed using papers from the 6x6, kit and solid kit from Echo Park's COFFEE collection. At the same time, a few floral motifs were fussy cut from some of the papers from the collection.
To assemble the page, first the picture was backed using one of the frame ephemera pieces from the collection, and then backed with thick foam adhesive. The cups were attached also with different widths of foam adhesive around the picture, and then all the floral motifs were added around the cups and picture.
A few stickers form the collection and C'est La Vie collection -too- were added to the page to complete clusters around the fussy cut flowers and also the title for this page. A few lines of journal and some enamel dots complete this page.
Well, i am sure you can tell how much i love this page, as it celebrates my love for coffee thorugh my love for paper, a win-win in my book.
Remember to check this collection - Echo Park's COFFEE- and lots of new products arriving at the Scrapbook Nerd store, you can always contact me if you have any questions.
Nathalie with you today with a new new pages using the beautiful Fresh Starts kit and the Life Crafted album. Are you loving the new album?! Honestly, what is not to love about it, i mean it is versatile, compact and a time saver. So today, i want to give you a few quick ideas on how to use the kit and the album when documenting every day details.
I love large titles, so I took advantage of the 3x8 card that is included in the Fresh Starts kit to build this simple page about my daughter's 16th birthday picture.
I tool advantage of this month's TN stamp and This is Life stamp to build upon the title. Since this is all about my wishes for her, what better way than to add a few flying wishes - dandelion seeds- to the background.
To keep the clean look of the page, i added my journal to a tag that is hidden behind the picture in a vellum pocket. A few of the stickers from the kit complete this page.
Love how this turned out, and how fast it is to put together!, but since i am all about everyday documenting in this new format, i went ahead and added a new entry on the following page, this time is all about my son's new haircut (FINALLY!)
Once again i went for a simple but striking look for this page. I reached for the Spencer Alpha and Outline stamps for this page, as i wanted to create a bold title for the page.
I decided to trim the picture into a circle so that it becomes the focus of the page. Next it was all about using the large alpha stamps to create the title around the picture. First i stamped the top word using the bold alpha, and then used the outline alpha to create the next word by stamping them on one of the patterned papers and fussy cutting them.
The beauty of CTK stamps is how flexible they are! so, i used a few sentiments from the add on and TN stamps to complete the circle around picture. Then i added a few extra stickers using foam adhesive -LOVE LOVE LOVE being able to add dimension in this new format-
I love how simple these entries are, and how easy they come together in the Life Crafted album, the following video will give you a more in-depth look on how they came together:
Remember to stop by Citrus Twist Kits to check the kits and the album, soon you will see the new kit (gorgeous one , btw!). As always if you have questions on how these came together, leave me a comment.
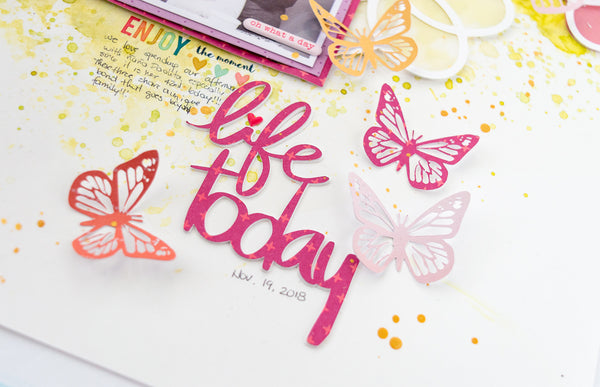
Scrapbook Layout created for JustNick Studio - LIFE TODAY -
Hello everyone!
Nathalie with you today with a new project that brings color and small details in a page to celebrate the small moments in life. I love having a large selection of cut files here in the Just Nick shop that can easily be combined into a page of your own.
To start, i added a bit of watercolor (Prima Marketing) to the background -since i wanted to create a very abstract floral background, i chose a shade of green for the background-. While it dried, the Doily Background was used to create the large cut out from white cardstock.
I chose to back the cut out using warm tone papers from Pink Paislee's Whimsical collection and some vellum. A bit of foam adhesive helps to bring some dimension to the cut out.
A few butterflies were also cut from the same patterned papers using the Butterfly Background 2 cut file. This time, i carefully highlighted just one of the detailed butterflies to create the cutting pattern in the Silhouette software. A bit of fussy cutting -just one of the wings' corners- was all that was needed to have a single image. I added the butterflies around the background making sure that they sit within the flower of its same color.
Once the picture was placed on the layout, the Here and Now cut file was used to create the title of this page. I welded the two words together, and cut them three times -2 from cardstock, 1 from patterned paper - so that they can be stack together.
I love how this turned out, especially when there are flowers and butterflies and i was able to sneak in a picture of my boy in the mix. Remember to stop by Just NIck Studio to check all the cut files used in this layout and the new ones being added each week.
If you have questions on how this came together, please do not hesitate to contact me!