Showing posts with label foil. Show all posts

Dec 20, 2017

Merry Selfie


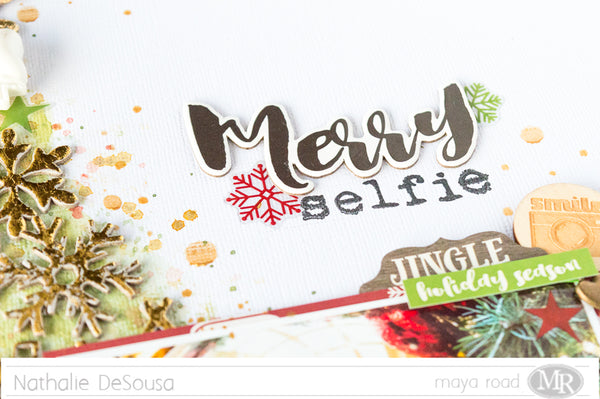
Scrapbook Layout created for Maya Road  - MERRY SELFIE  -


Hello Roadies!
 Nathalie here with a bit of Christmas inspiration using the beautiful Maya Road products.  I am sure by now you all are almost ready to get together with your families, and record all those sweet moments, but always remember to include yourself in the picture!   Today, I want to show you how i documented my latest selfie.
  

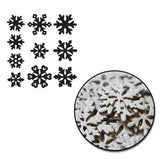
To create this layout, a simple triangle was drawn on white cardstock -to recreate the Christmas tree-;  then a few shades of green watercolor were added to give it some color and dimension.   While the background dried, all the snowflakes from the Snowflake Mini Chipboard set were gold foiled.
 

Once the background was dried, all the snowflakes were then glued inside the watercolor tree.  A  White Pretty Resin bow was added to the top of the tree to add texture, and mark the tree topper snowflake.


This layout was created, and embellished using Simple Stories's "Very Merry" collection.    The colors in the collection match perfectly that of the ones in the picture.   


There are small clusters of ephemera and embellishments cluster around the layout.   On the top corner of the picture, a Wood Snapshot token,  a small heart from the Ken Oliver Lock My Heart Charm set, and a few pieces from the paper collection create a little cluster that bring attention to the picture.


The title for this page was created using one of the Very Merry chipboard stickers, and the Just My Type Clear Stamp set.   A few more embellishments and a few drops of gold ink complete the page.


I hope this inspire you to mix some of the beautiful Maya Road products with some of your favorite paper collections to document a picture of you!  Just look at how easily you can bring your picture to life.  Stop by the Maya Road store to check all the products used in this project.


Please do not hesitate to contact me if you have questions on how this came together.

Have a Blessed Christmas, and may 2018 be filled with love and peace!


Maya Road products used:
Dec 2, 2017

Day 2 of the 14 Days of Giveaways -Just Nick Studio


DAY 2 of the 14 DAYS OF GIVEAWAYS at JUSTNICK STUDIO


Welcome to Day 2 of our 14 Days of Holidays cut file giveaways!  Each weekday from December 1-14, 2017 we will be giving away a FREE cut file for that day only!


When Nicole showed us all the cut files available, I fell in love with the  Snowflake design! and so many ideas formed in my head.  But i chose one that is all about decor, and can easily be used in your home.


Since we change the color scheme of our Christmas decor every few years, i chose to create this garland to match the colors of the tree decorations.  It all started by using some foil to create the snowflake designs, and letters (the letters have a white matte foil finish!).  I cut a few of the Snowflakes in three different sizes, and set them aside.


Next i used some strips  (1.5in wide) to create the paper rosettes, and glued them to a piece of jute cord. I used those small heart die cuts (some leftover pieces from previous projects) to hold the rosettes together, and to attach them to the string.


Next I used Marquee Alpha cut file to cut the word JOY from the white matte foiled paper.  I made sure to size the letters so that they fit in the center of each paper rosette.


Then it was just a matter of assembling all the pieces together.   I used silicone (hot) glue to attach the foiled snowflakes to each of the rosettes.   The center ones got a letter ( i cut two of each letter, and glued them together), while the corner ones got  three snowflakes ( in graduating sizes and colors) and a small star sequin in the center.  I just love the look of the garland.


This is what the garland looks like in our tree.  We are working on adding the word PEACE now!.   I hope this inspires you to use the cut file in a different craft other than a layout!.


Remember that Today's design - SNOWFLAKE - is yours for FREE today only!
Just enter code: SNOWFREE2 at checkout to get this design for free.
This code is only valid until midnight CST on December 2, 2017.  No purchase necessary today, only!  This design will be available in the JustNick store for purchase after the discount code expires.

DON'T forget to check back tomorrow to get a new free cut file.
Take care!


Sep 20, 2017

Thankful


Scrapbook Layout created for Simple Stories  - THANKFUL -


For the second project, I wanted to focus on using the soft patterns of the collection to create a very feminine and simple page about this year's Mother's Day portrait  ( I am so glad i save this picture for the right collection!)


I wanted to keep the page clean and simple, so I reached for some white cardstock for the background of the page.  Then cut two triangles, and two strips from the "CHOOSE HAPPY" paper, and glued them onto the white cardstock making sure to show the b side of the paper  in the strips .  A bit of machine stitching secures is all together to the cardstock.


All the soft patterns in the paper are perfect for recreating flowers on a layout.  For these, I used a steel die to cut the  petals, and a JustNick cut file to create the leaves for the page, and cut them all from the 6x8 paper pad. Then just layer the petals together and glued a small enamel dot from the Faith collection to the center of each flower.


 Once all the flowers were ready to glue, then assembly on the page started.   I glued the picture onto the bottom corner the page, and added two large  clusters of flowers, and stems to  the two corners that run along the paper triangle.   


Then added a few pieces of ephemera, and stickers around the  flower clusters.   The pop of black, white, and gold in the pieces make the flowers softer, and bring out the details in each of them.


Finally, I wanted to bring a bit of shine to this page, and what better place than to create a foiled title for this page.  Using the Deco Foil PeelnStick toner sheet, and one of the Simple Stories  Silhouette store cut files, i created the  title for the page.  The paper was so easy to use in the Cameo machine!
Then a bit of gold foil, and some heat from the laminator bring the title to life.


The simplicity of the page is not lost with the soft flowers and stems that decorate the page.   The dimension created on each of the flowers is perfect to bring the patterns on the papers to life, and keep the focus on the picture.   I really love the final look of the page!

I hope you are all inspire to use the patterns, colors and foiled details in the  Simple Stories BEAUTIFUL collection.  It is one of my favorite Simple Stories to date, and i am sure you will also fall in love with it!  Remember i am a comment away if you have any questions on how this came together.

See you all soon!


Materials used:
BEAUTIFUL collection:
9200 Collection Kit
9201 Sticker combo
9204 Choose Happy paper
9205 Shine Bright paper
9214 6x8 paper pad
9215 Chipboard stickers
9216 Bits and Pieces
9217 4x6 stickers
9218 clear stickers

HL7898  High Style 12x12 paper pad

7719 Faith collection enamel dots


Feb 2, 2017

Enjoy! - Adventure Awaits


Scrapbook Layout created for Clique Kits -   ENJOY! - Adventure Awaits  -


Hello there,

Can you believe we are on February already!

That means a new kit is available at Clique Kits.  This month's BEE YOU kit is packed with the new Hazelwood collection from 1 Canoe 2 for American Crafts.  The gorgeous papers, embelishments, and the Clique Kits exclusives are perfect to document all kinds of memories.


  Since we have had a mild weather the past week, all i have been thinking is   of travel and adventure, so I used one of this month's  Clique Kits exclusives to create a layout about the first day we arrive to my native little town.


I started by cutting the image on one of the papers from the collection, and used some foil to recreate the gold look of the stand of a globe.


adding some vellum behind the image creates a soft shadow that brings out the details of the image


Next I layered some papers behind the picture, and used the branding strips, CK exclusive printables, and ephemera to add interest to the picture.   One of the cut apart papers of the collection had a globe picture with the quote " Adventure Awaits", so I fussy cut the words and used them as a subtitle to this page.


All the butterflies in this kit are one of my favorite parts of the BEE YOU kit.  So i used them to create the idea of butterflies flying around the globe.


The page was trimmed and mounted onto the b side of the paper used to cut the image.   A few ink drops, the date and some journal lines complete the page,  Here is the final layout:


Here is a small video on how the page came together.  Please enjoy!


I hope you enjoyed the quick video!,  As you can see, Clique Kits's BEE YOU kit is so versatile.   You can check all the details included in the kit and more just by clicking here to be directed to the Clique Kits website.

I am always just a comment away, if you have any questions on how this came together.

Thanks for Visiting!!!


Materials used:
Clique Kits - February kit - Bee You

Clique Kits - Feb, cut files

Therm - o - web - Deco foil marker
Champagne foil - MInc - Heidi Swapp
Black and Gold color shine - Heidi Swapp.

Dec 4, 2016

Scrapbook Nerd's Sunday Card Share


hello friends!

Today, I am up on the Scrapbook Nerd blog with some Holiday cards that will inspire you to pull out your die-cutting and foiling machine.  Here are the cards:


To check all the details, just click here to be directed to the Scrapbook Nerd blog.

Take care!


Jun 14, 2016

Crazy Love


Scrapbooking Layout Tutorial for Scrapbook Nerd  - Crazy Love -


A close up of the finished tutorial (title) in the layout.


Hello Everyone,


It is my week to contribute to Scrapbook Nerd  blog with a step by step tutorial.    I have a hard time showing clear pictures tutorials, since i scrapbook late at night, and i have to rely on taking photos of the procedure under poor light,  but I had to share this idea on how to add dimension to titles -that i used on two on my layouts this month-.

Let me show you how i came  about building this title:


1.  I used one of Ashley Horton's cut files to cut the title on white cardstock.  I made 4 cuts of this title at the same time  to ensure that they were all the same size.  You can create a similar result with alphas of thickers (as long as they are the same size, and preferably not to thick).

The title pieces before being stacked.


2.  One of the cut-outs was covered with Heidi Swapp's new MInc Reactive Mist, and set aside to completely dry.

3.  While the misted cut-out is drying,  i went ahead and glued two of the title cut-outs together (making sure that they are completely flushed).  Let it dry completely.


The cut-outs being stacked together.


4.  Using the MInc machine, on setting 3,  (you can use any laminator, I happen to use this brand) aply foil to the misted cut out.  


I wanted a distress look for the foil, and not a complete coverage of the cut-out.


5.  Attach the last title cut-out to the foil pieces with some strong glue, making sure the sides are completely flushed and the foil is sitting on the upper part of the cut out.


The foiled piece after being glued to the other cut-out.


6.  I attached the white cut-outs on top of the foiled cut-outs makingn sure that there was a small overlap, and a small part of the foiled cut out was showing.   Something like a shadow or a tri-dimentional object.  It is up to you whether you chose to glue the foiled piece at the top or bottom;  just make sure that there is that overlap to create the desired look.


Here is a close up of the finished title.


It is up to you to decide which look you want for your title (it can also be used for cut-outs, etc.), and decide on the look that suits your project.  There is no need to foil one of the pieces, a different color piece will also produce the same look.  If you are using thickers or alphas, there is no need to glue flushed pieces (as they are thick already), just go ahead and create the overlap with different color thickers/alphas.  Note: since the new piece will be heavier, make sure you use strong adhesive to attach it to the project.


Now back to the layout;  this time i chose to work backwards and start building the layout from the picture out.  So I used Amy Tangerine's Better Together collection to create lots of layers in a triangular form behind the picture.  This time, I used my ruler to tear paper, instead of clean cutting the pieces.

The layers behind the picture.

I used the rub-on stickers from the Better Together and Finders Keepers collections by rubbing them onto white cardstock and vellum and used them as ephemera around the picture.


I stuffed pieces of cut-outs in between the layers behind the picture.


I chose to create a grafitti like background just by dropping ink dots  (Heidi Swapp color shine in different colors to match the colors on the papers) on a piece of white card stock to form a triangle a little bit larger than the picture and its layers.


I wanted a graffitti feeling to the background to match the title look.


I attached the title next to the picture (at the very right tip of the ink triangle), and my journal lines just below the picture.  Here is the final layout:


I love the vibrancy of the layout, and how easy it was to construct.


I hope you try adding dimension to your pieces (in my case titles), let me know if you have any questions.   Until next time...

Happy crafting!!

Materials Used:
  • American Crafts White cardstock
  • Patterned paper, Amy Tangerine's Better Together collection
  • Stickers and Rub-ons, Amy Tangerine's Better Together collection
  • Rub-ons, Amy Tangerine's Finders Keepers collection
  • Washi tape, Amy Tangerine's Better Together collection.
  • Cut-file,  Crazy Love,  Hip Kit Club May 2015 Ashley Horton Designs.
  • MInc Reactive Mist
  • MInc Silver to Teal reflective foil
  • Heidi Swapp colorshine in gold, butter, mustard, pink, blush, peacock, mint, coral and navy.